Welcome to the Independent Stampin’ Up Demonstrators Fun Fold blog hop. Each month we aim to show off a fun fold that we hope you will enjoy. My love for fun folds continues with this card using the Gathered Wheat stamp set and Wonderful World stamp set and designer series paper. I was looking for a fun fold to show off the beautiful patterns in the designer series paper as well as keep the focus on the sentiment.
The base of the card is 5 1/2” x 11”. From the right it was scored at 4 1/4” and 8 1/2”. The DSP on the inside panel is 5 1/4” x 4”. The DSP on the outside panel is 5 1/4” x 2 1/4”. I used the stylish Shapes dies to cut the pieces for the sentiment.
I hope you have enjoyed this fun fold card. Hop along to the next participant, Melissa Tootle, to see what see has to offer this month.
This month, the theme is Seasons’ Greetings. This month’s design team members showcase projects inspired by their favorite seasonal time of the year. We really hope that you will be inspired by all the amazing creations the Pals are sharing with you! As you hop from blog to blog, we would love for you to leave a comment. You will find the lineup at the end of my post to help you “hop” along from Pal to Pal.
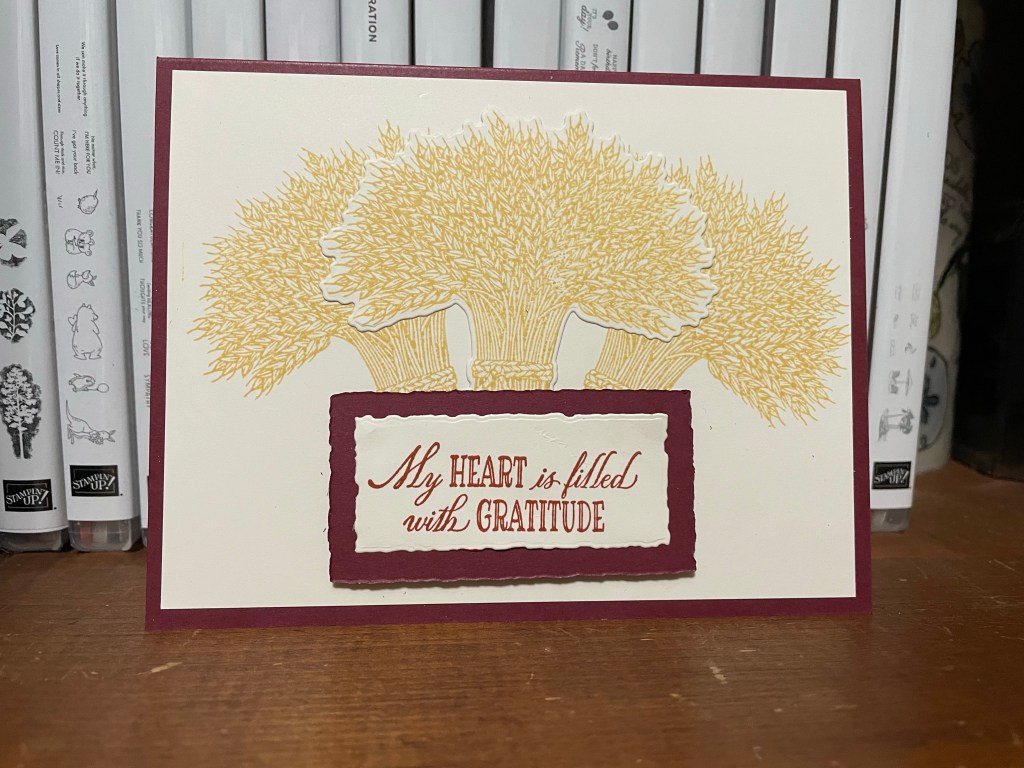
My favorite season? This question always stumps me. I don’t really have a favorite season and living in North Carolina I get to enjoy (or suffer through) all four seasons. But, since I have to pick a season for this blog hop, I choose Autumn / Fall. There are so many important events during this season (start of school, multiple birthdays including mine, Fall Equinox, Samhain, Halloween, Día de los muertos, Thanksgiving) and the changing of the colors is magical to me. Plus, I admit, I love many of the foods associated with this time of year – pumpkin spice donuts, apple cider, pumpkin pie. For this card, I decided to focus on a few of these elements – fall colors and Thanksgiving. I am not focusing on the actual holiday of Thanksgiving but the idea of gratitude. On several occasions this summer, other people have given of themselves to help me or something that was important to me and for that I want to express gratitude. This card was designed with them in mind. While some cardmakers are gearing up for Christmas cards, I need to focus on creating enough gratitude cards for everyone on my list.
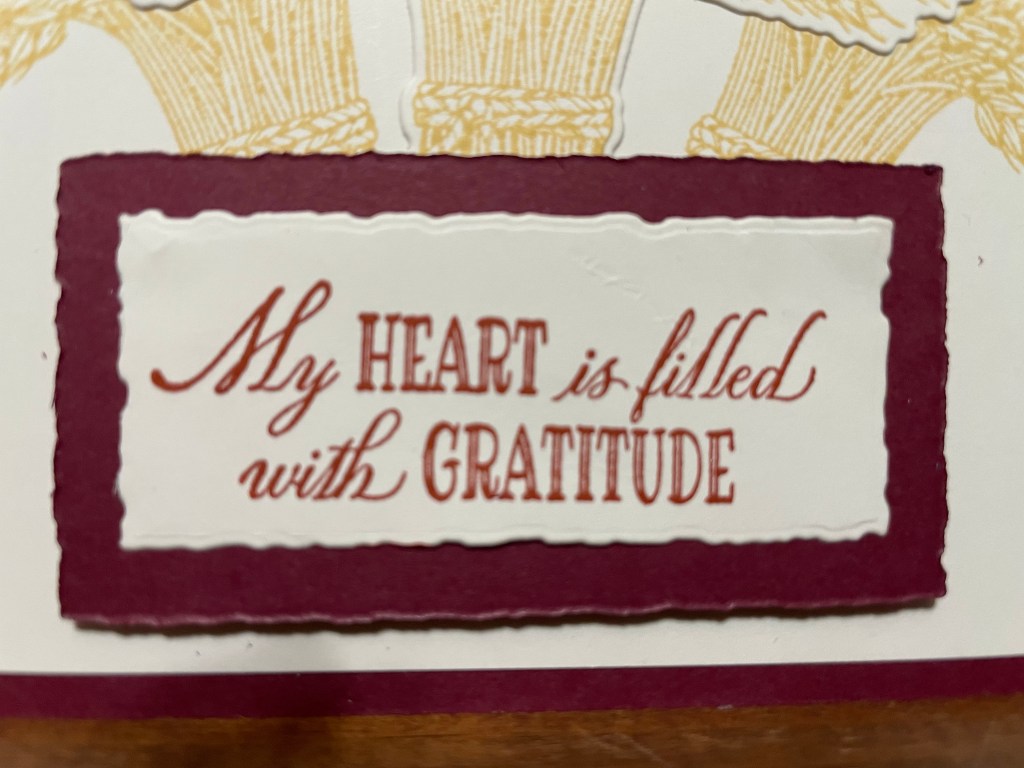
Keeping in mind that I might make close to 50 of these cards, I wanted to keep the design simple. I chose the Gathered Wheat stamp set and Wheat dies for this card. I scanned my ink pads for a color that looked like the color of wheat (difficult for this city girl) and settled on So Saffron. Next I scanned for a complimentary color and settled on Merry Merlot, mainly because I rarely use it.
I started with a 5 1/2″ x 8 1/2″ card base, scored at 4 1/4″. I then stamped the wheat bundle image twice on a 4″ x 5 1/4″ piece of Very Vanilla. On a scrap piece of Very Vanilla I stamped the wheat one more time and cut it out using the die. I adhered it to the middle of the card front, overlapping the other two wheat bundle images. I then stamped the sentiment on another scrap piece of Very Vanilla and cut it out using the smallest die from the Deckled Rectangles Dies. To add a little more color and dimension, I cut a background piece of Merry Merlot using the second smallest die from the same set. I adhered the sentiment to the background piece and attached it to the card front with Stampin’ Dimensionals. I opted to not complicate the card further with embellishments. Hopefully that was the right choice.
More inspiration awaits, so use the lineup below to visit the rest of the Design Team. The Pals are excited to show you what they’ve created! Then, please mark your calendars for our next blog hop on September 14th. Our theme will be Focus on the Sentiment, when the design team will showcase a sentiment as the focal point of their project.
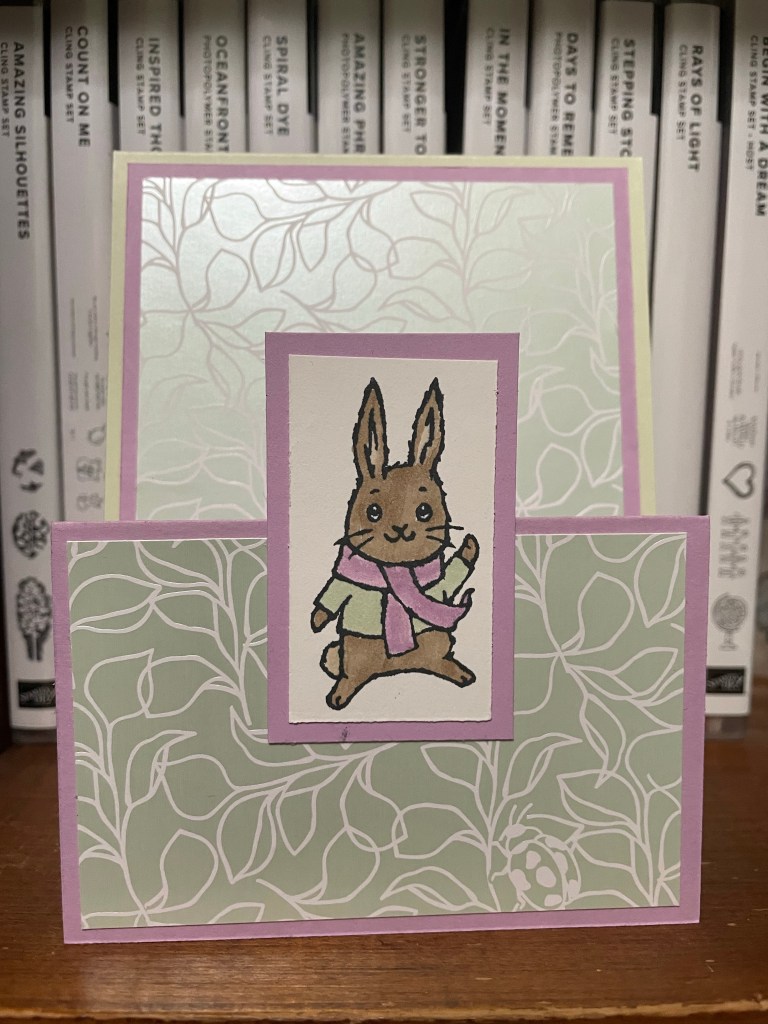
This is actually a sad post. Binky, our Nederland Dwarf rabbit of over 7 years, passed away on Saturday. We knew she had not been doing well for awhile. She was at least 8 years old and seemed to be losing her sight. She would walk by important things, like the entrance to her enclosure and food. On the rare occasion that we let her wander outside her enclosure, she seemed to get lost and somehow ended up in the study which would have involved going down two steps. Unfortunately no one witnessed how she got there. I can only hope she did not slid down the steps as I did when I broke my leg and sprained my ankle. In addition to her sight, she also seemed to be losing her fur in patches. So when she passed away, in some ways we were prepared.
The next day when I sat down to craft, Binky was on my mind. I knew I had to create a card in her honor. The “All Bundled Up” stamp set from the July to December 2022 had a sweet bunny that would be perfect. I wanted to create an easel card so I could stand it on the shelf and remember Binky.
To create the easel card, I used:
4 1/4″ x 11″ Soft Sea Foam cardstock, scored at 5 1/2″
4″ x 10 1/2″ Fresh Freesia cardstock, scored at 5 1/4″ and 7 7/8″
3 3/4″ x 5″ Splendid Day Designer Series Paper
4″ x 5 1/4″ Basic White cardstock (for inside of card)
2 3/8″ x 3 3/4″ Splendid Day Designer Series Paper
2 3/4″ x 1 5/8″ Fresh Freesia
2 1/2″ x 1 3/8″ Basic White (for image)
I stamped the bunny in Memento Tuxedo Black Ink and then colored using Crumb Cake, Fresh Freesia and Soft Sea Foam Stampin’ Write Markers. I adhered all the pieces with Stampin’ Seal. In the end, this card wasn’t that hard, just make sure to line up the pieces well.
I hope you enjoy this card and try this fun fold for yourself. Until next time, have fun crafting!
I just returned from family time at the beach and was excited to find my shipment of products from the July to December Mini Catalog waiting for me. Since I had the beach on my mind, I couldn’t resist using the “Sunkissed” stamp set. And since I recently celebrated my 15th wedding anniversary, the sentiment seemed appropriate.
I have been having fun using the Splendid Day 12″ x 12″ Designer Series Paper from the July to December 2022 Mini Catalog and decided to use a piece from it for this card. I started with a 5 1/2″ x 8 1/2″ card base of Pool Party, scored at 4 1/4″. I added a 4″ x 5 1/4″ piece of Fresh Freesia and then topped it with a 3 3/4″ x 5″ piece of the DSP. I then took a 2 3/4″ x 4″ piece of Basic White cardstock to stamp the image and sentiment. I stamped the image with Memento Ink and then colored it with Sahara Sand, Fresh Freesia, and Pool Party. I then stamped the sentiment in Fresh Freesia. The Basic White seemed a little stark against the card front so I used a daubber to add Fresh Freesia to the edges.
I hope you like the card. Let me know what you think and if it brings you pleasant thoughts of the beach as it did for me.
Welcome to the NC Demos Blog Hop! We are so glad you are here! You might have already stopped by Tina Lesson’s post and know this month’s theme, but if you are just popping in this month’s theme is Celebrate The Great Outdoors.
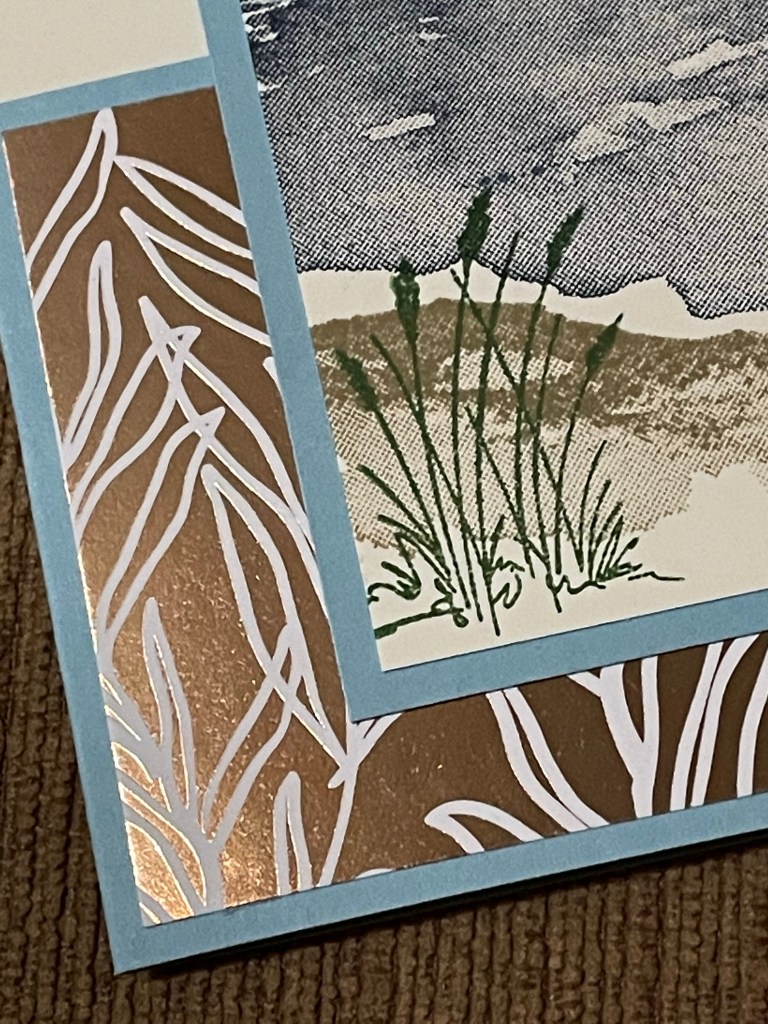
While I was thinking of a project for this hop, I was also preparing for my family’s annual trip to the beach. Therefore, my eyes naturally landed on the Oceanfront stamp set when I scanned my shelf. I have not been a big fan of scene builder stamp sets but I used this set at a recent NC Demos Quarterly and enjoyed it. This stamp set does not have any sentiments so I knew I was going to have to look to another stamp set for one. Rather than ponder that at the beginning, I decided to create the scene and the card.
If you have been following me, you know that I love fun fold cards. I decided to make a Dutch Door card so I could place the scene as a focal point. To create the scene, I started with a 4″ x 2 1/2″ piece of Very Vanilla and turned it vertical for the scene. I choose Balmy Blue for the sky, Night of Navy for the water, Crumb Cake for the sand and Garden Green for the plants. To create the Dutch Door card, I started with a card base, 8 1/2″ x 5 1/2″ and scored it at 4 1/4″. Along the score line, I cut down to 2 3/4″ and cut across the front of the card. This left a 4 1/4″ x 2 3/4″ piece of Balmy Blue that I used to mount the stamped image piece. I then cut a 2 1/2″ x 4″ piece of Splendid Day Specialty Designer Series Paper. This DSP is so beautiful. One side of each sheet has foil accents which is so shiny and pretty! I mounted it on the bottom half of the card front. All that was left was to adhere the image piece to the card front, making sure to only put Stampin’ Seal on the bottom half of the piece. Oh, I almost forgot. I put stamped some more sand and grass on a 4″ x 5 1/4″ Very Vanilla piece and mounted it to the inside of the card.
Thank you for letting me share my project. Please stop by and see Tracie Evans Langley’s post. I know it will be great!
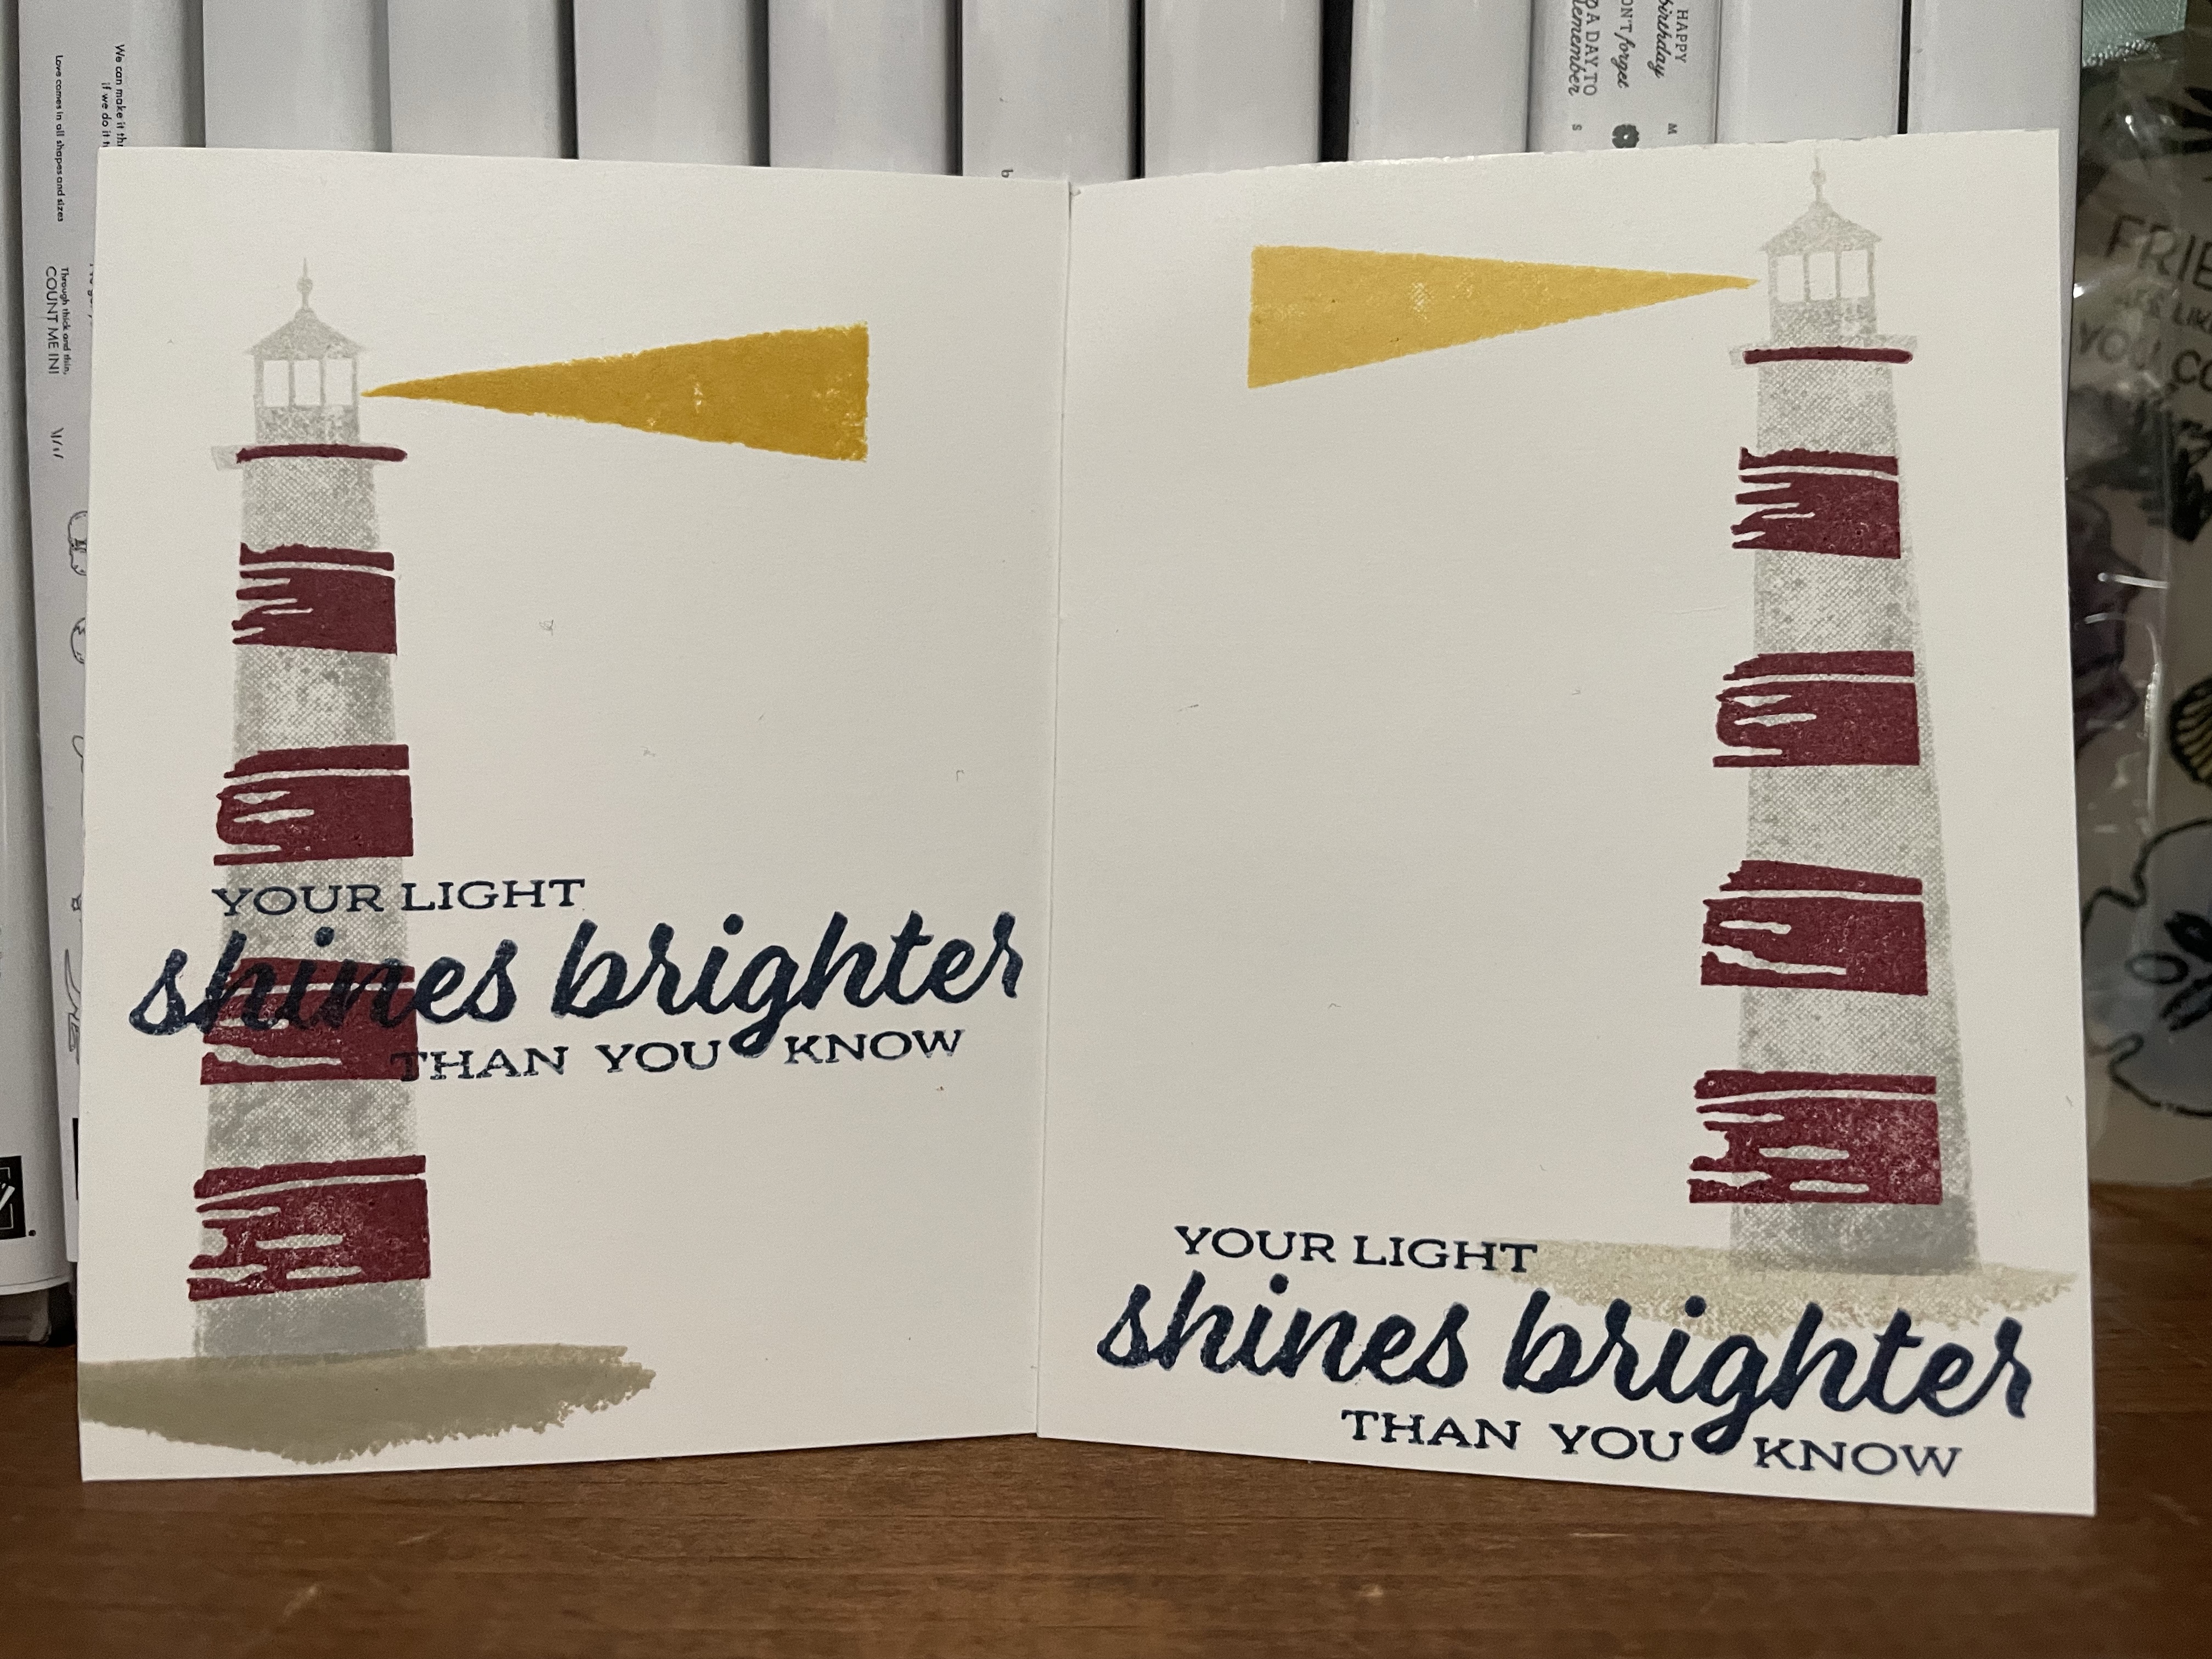
I have been thinking about creating little inspiration cards for awhile but finally got around to it this week. These 3″ x 4″ cards are great for sticking in lunch bags, backpacks, camp mailbags or even as a bookmark. There are lots of stamp sets that will be great for these cards but I decided to start with Lighthouse Point from the 2022-2023 Stampin’ Up Annual Catalog.
These cards took some trial and error as you can see from the samples below. After a few tries, I realized that two-step stamping really does call for the Stamparatus to be able to line up the two parts of the lighthouse. I also had to play around with positioning of the sentiment. The “You are so loved ” wasn’t difficult but the “Your light shines brighter than you know” was wider and therefore trickier. I think I like it at the top the best but you can let me know in the comments. I also realized that stamping off for the beam of light gave it a softer look. I also tried several of the yellows (Dafodil Delight and Crushed Curry) before I settled on So Saffron. I also tried stamping off for the lighthouse and I think I liked the light look best. Unfortunately when I switched to the Stamparatus I forgot about stamping off! Now that I am thinking about it. I could have stamped off on the grid paper on the Stamparatus before placing the card.
I enjoyed making these cards and am looking forward to making more with other stamp sets from Stampin’ Up. I would love to hear your ideas in the comments. Until next time, have fun crafting!
Product List
Lighthouse Point stamp set
Thick Basic White cardstock
Night of Navy Classic Stampin’ Pad – for the sentiment
So Saffron Classic Stampin’ Pad – for the beam of light
Merry Merlot Classic Stampin’ Pad – for the lighthouse stripes
Smoky Slate Classic Stampin’ Pad – for the lighthouse
Sahara Sand Classic Stampin’ Pad – for the sand, of course!
I have not been a big collector of background stamps. I am not sure why, maybe because they aren’t as exciting as stamp sets with lots of options. At the moment I have three background stamps and I rarely use them. That said, when I spotted the Rays of Light background stamp in the 2022-2023 catalog, I knew I wanted it. There were some great sample cards made with it and I could see the possibilities in it.
For my first card with it I wanted to start simple – background stamp and sentiment. And I knew right where to look for the sentiment – Stepping Stones stamp set. This sentiment stamp set in the 2022-2023 catalog has great quotations so I knew there had to be one that would fit well with the Rays of Light stamp. Sure enough, this quotation about dreams seemed perfect. To keep with the simple idea, I decided to go traditional with the colors. I chose So Saffron to stamp the rays of sunshine as well as for the card base. I almost used it for the sentiment as well but decided that would be a little too monotone. Plus, So Saffron can be a little too light sometimes for a sentiment. In looking over the color choices, Calypso Coral seemed like a natural choice to pair with So Saffron for a sunshine card. I started to stamp the sentiment directly on the background but changed my mind and decided to pop it up on a strip of Very Vanilla. I also used Very Vanilla for the card front. I trimmed the edges with the Lovely Labels Pick a Punch, one of my favorites. I was challenged by another demonstrator to use a ribbon on a card this week in a different way so I wove a piece of Faux Suede ribbon through the dimensionals that I had used to pop up the sentiment.
As you can see, I didn’t just adhere the card front to the card base, I made a simple fun fold. The card base is 5 1/2″ x 8 1/2″ and it is scored at 4 1/4″. Rather than leave it there and simply adhere the card front, I thought it would be fun to score it again at 2 1/8″ and fold it back. This meant the the card front could be adhered to the front flap and serve as the card front but it would also be visible when the card was open. This allows the recipient the choice of displaying just the card front or opening it to display the card front and whatever was written on the inside of the card. It also allows for the inside of the card front to still be hidden by the card front when it is closed.
I hope you enjoy this simple fun fold. I know I did and I am looking forward to many more cards and blog posts this summer. Leave me a comment to let me know what you think. Until next time, have fun crafting!
I know, I know. It’s June but May was so busy I didn’t have a chance to put the kit together. Now school is out and I have a little extra time to craft.
First, I put the kit together following the instructions. As I mentioned in the Facebook Live I did on my Facebook page, it is a great way for me to create and craft without a lot of thinking. So many people talk about crafting therapy and this is it.
Next came the alternatives. These always take a lot longer and require a lot more thought. In creating alternatives, I tried to only use products that anyone would have on hand. In this case, I used the 2022-2024 In Color ink pads and cardstock. I also tried to use the stamps that weren’t included in the original designs.
I hope you have enjoyed the May 2022 Paper Pumpkin kit. I can’t wait to receive the June 2022 Paper Pumpkin kit and put it together later this month. And believe it or not, it is already time to subscribe to the July 2022 Paper Pumpkin Kit. Subscribe by July 10 so you don’t miss out!
This month, the theme is “CASE the Catalog” so the Design Team chose a card from the new Annual Catalog and has CASEd it with their own creative twist. We really hope that you are inspired by all the amazing creations the Pals are sharing with you! As you hop from blog to blog, we would love for you to leave a comment. You will find the lineup at the end of my post to help you “hop” along from Pal to Pal.
This month’s theme was new for me. I love looking through the Stampin’ Up catalog but I have not CASEd the catalog before. I actually decided on the stamp set first, then looked at the catalog to see if there was a card or project to case and if I had the supplies. As you can see in the picture below, the project from the catalog was a square and I decided to make a 4 1/4″ x 5 1/2″ card. I also decided to change up the colors and a few elements.
I started by stamping the image on a piece of Basic White cardstock and then trimming it to a square. I then trimmed a piece of Balmy Blue cardstock to about the same size. I colored the image with some of the Natural Tones Stampin’ Blends as well as Basic Black (hair), Daffodil Delight (hair), Balmy Blue (shirt), Mango Melody (shirt) and Soft Sea Foam (shirt). As you can see, I actually created two cards almost identical except for the sentiment. I stamped the sentiment on Soft Sea Foam using Mango Melody ink. I also ran a piece of the Mango Melody cardstock through the Cut n’ Emboss Machine in the Brick & Mortar Embossing Folder. I can’t forget the heart I cut from Blushing Bride using the Give It A Whirl dies.I then started adhering everything with either Tombow Dual Tip Multipurpose liquid glue or Stampin’ Seal. I then added a few Classic Matte Dots for some muted bling!
I hope you like the two versions of the card that I CASEd from the catalog p64. I am thinking it would be nice to blend some ink onto the white card base but maybe I should save that until next month. You can leave me a comment and let me know what you think.
More inspiration awaits, so use the lineup below to visit the rest of the Design Team. The Pals are excited to show you what they’ve created! Then, please mark your calendars for our next blog hop on July 13th. Our theme will be “Create Your Own Background” when our Design Team creates a background using any technique they wish, such as stencils, stamping, watercolor, embossing but not DSP.
Every since I saw this image from the In The Moment stamp set in the 2022 January to June Stampin’ Up Mini Catalog, I have wondered what she is looking at, what she is contemplating. When I was challenged to pair a product from the new 2022-2023 Stampin’ Up Annual Catalog with a product from a previous catalog, I wondered again. Then I spotted the Stepping Stones stamp set and my eyes fell on the quotation, “Follow your own star!” and I knew. I could imagine her staring out the window, spotting that star and thinking about her future. Where would it lead her?
I started with a 4 1/4″ x 11 piece of Orchid Oasis cardstock. I scored it at 5 1/2″ and then cut off one end at 2 3/4″. to form the card base. The cut off piece was used for the center piece and the sentiment piece. I stamped the sentiment in Orchid Oasis on Very Vanilla cardstock and trimmed the edges. I mounted it on the extra piece of Orchid Oasis, once again trimming it so there was about an 1/8″ border. Next I stamped the image on Very Vanilla cardstock with Memento Tuxedo Black Ink and colored it with the In Color Markers as well as Soft Suede for the window and So Saffron for the hair. I also used one of the Natural Tones Stampin’ Blends (SU900) for the skin. I stamped the star from the Days to Remember stamp set in Daffodil Delight. I cut out the image using one of the Deckled Rectangle Dies. Now you might be wondering, how did she end up with a square when she used rectangle dies? Well, I ran the piece through twice. I lined up one end first and then moved the die over to cut the other end. Confused? Maybe I will find some time this week to make a video showing how.
Back to the card, I cut a 4″ x 2 1/2″ piece of Tahitian Tide from the 2022-2024 In Color 6″ x 6″ Designer Series Paper. I adhered it to the card base using Stampin’ Seal but not before I wrapped it three times with a piece of Orchid Oasis twine from the 2022-2024 In Color Baker’s Twine Pack. I also adhered a 4″ x 5 1/4″ Very Vanilla cardstock to the inside of the card.
I hope you enjoy this fun fold. I know I enjoyed making it. Leave me a comment and let me know what you think.