Welcome to the Pals Fun Folds Blog Hop! We hope you enjoy the inspiration we have for you. You will find the lineup to the other great fun fold stampers at the bottom of my post.
I love making fun fold cards, mostly because I love the challenge. That said, I don’t like them to be too complicated since I often am tired when I craft. I also prefer that they fit in an A2 envelope or business envelope so I don’t have to try to find an envelope or make one. (Yes, I can be a lazy crafter sometimes.) I was scrolling through Pinterest (don’t we all?) and saw this Six-Panel Pinwheel Tower Card by Stamp Your Art Out with Rachel. When I realized it was small enough to fit in an A2 card, I had to try it. It was super easy to make and is a great way to show off DSP.
I chose the Sunshine & Rainbows 6″ x 6″ Designer Series Paper from Stampin’ Up along with the Rainbow of Happiness stamp set. I am so used to using card stock as a base that I was surprised that this card used the DSP as the base. The advantage for using the DSP is that it doesn’t add as much bulk to the card and it looks pretty on the inside. The pinwheel pieces were adhered to the DSP and, of course, there was different DSP and Basic White adhered to the cardstock pinwheel pieces. I think if I were to do this again (which I fully plan to do), I will put DSP on some of the narrow pieces and put at least one Basic White piece on the wider piece.
Measurements:
DSP: 4 1/4″ x 5″ scored parallel to the short side at 3/4″, 1 1/2″, 2 1/4″, 3 3/4″, and 4 1/2″.
Color cardstock: 6 pieces of 2 3/8″ x 4 1/4″
Basic White cardstock: 6 pieces of 1 3/8″ x 4″
DSP: 6 pieces of 2 1/8″ x 4″ (you can decide how many different designs you want. I used both sides of three sheets so I had six different designs.)
Product List:
Rainbow of Happiness stamp set #157721
Sunshine & Rainbows 6″ x 6″ Designer Series Paper #158126 (free during Sale-a-bration)
Basic White cardstock #159276
Mango Melody cardstock #146989
Pool Party Classic Stampin’ Ink Pad #147107
I hope you enjoyed my version of the Six Panel Pinwheel Tower Card. Please leave me a comment and let me know what you think. Remember, the fun doesn’t stop here. Click on the button below to check out the projects in this Pals Fun Fold Blog Hop.
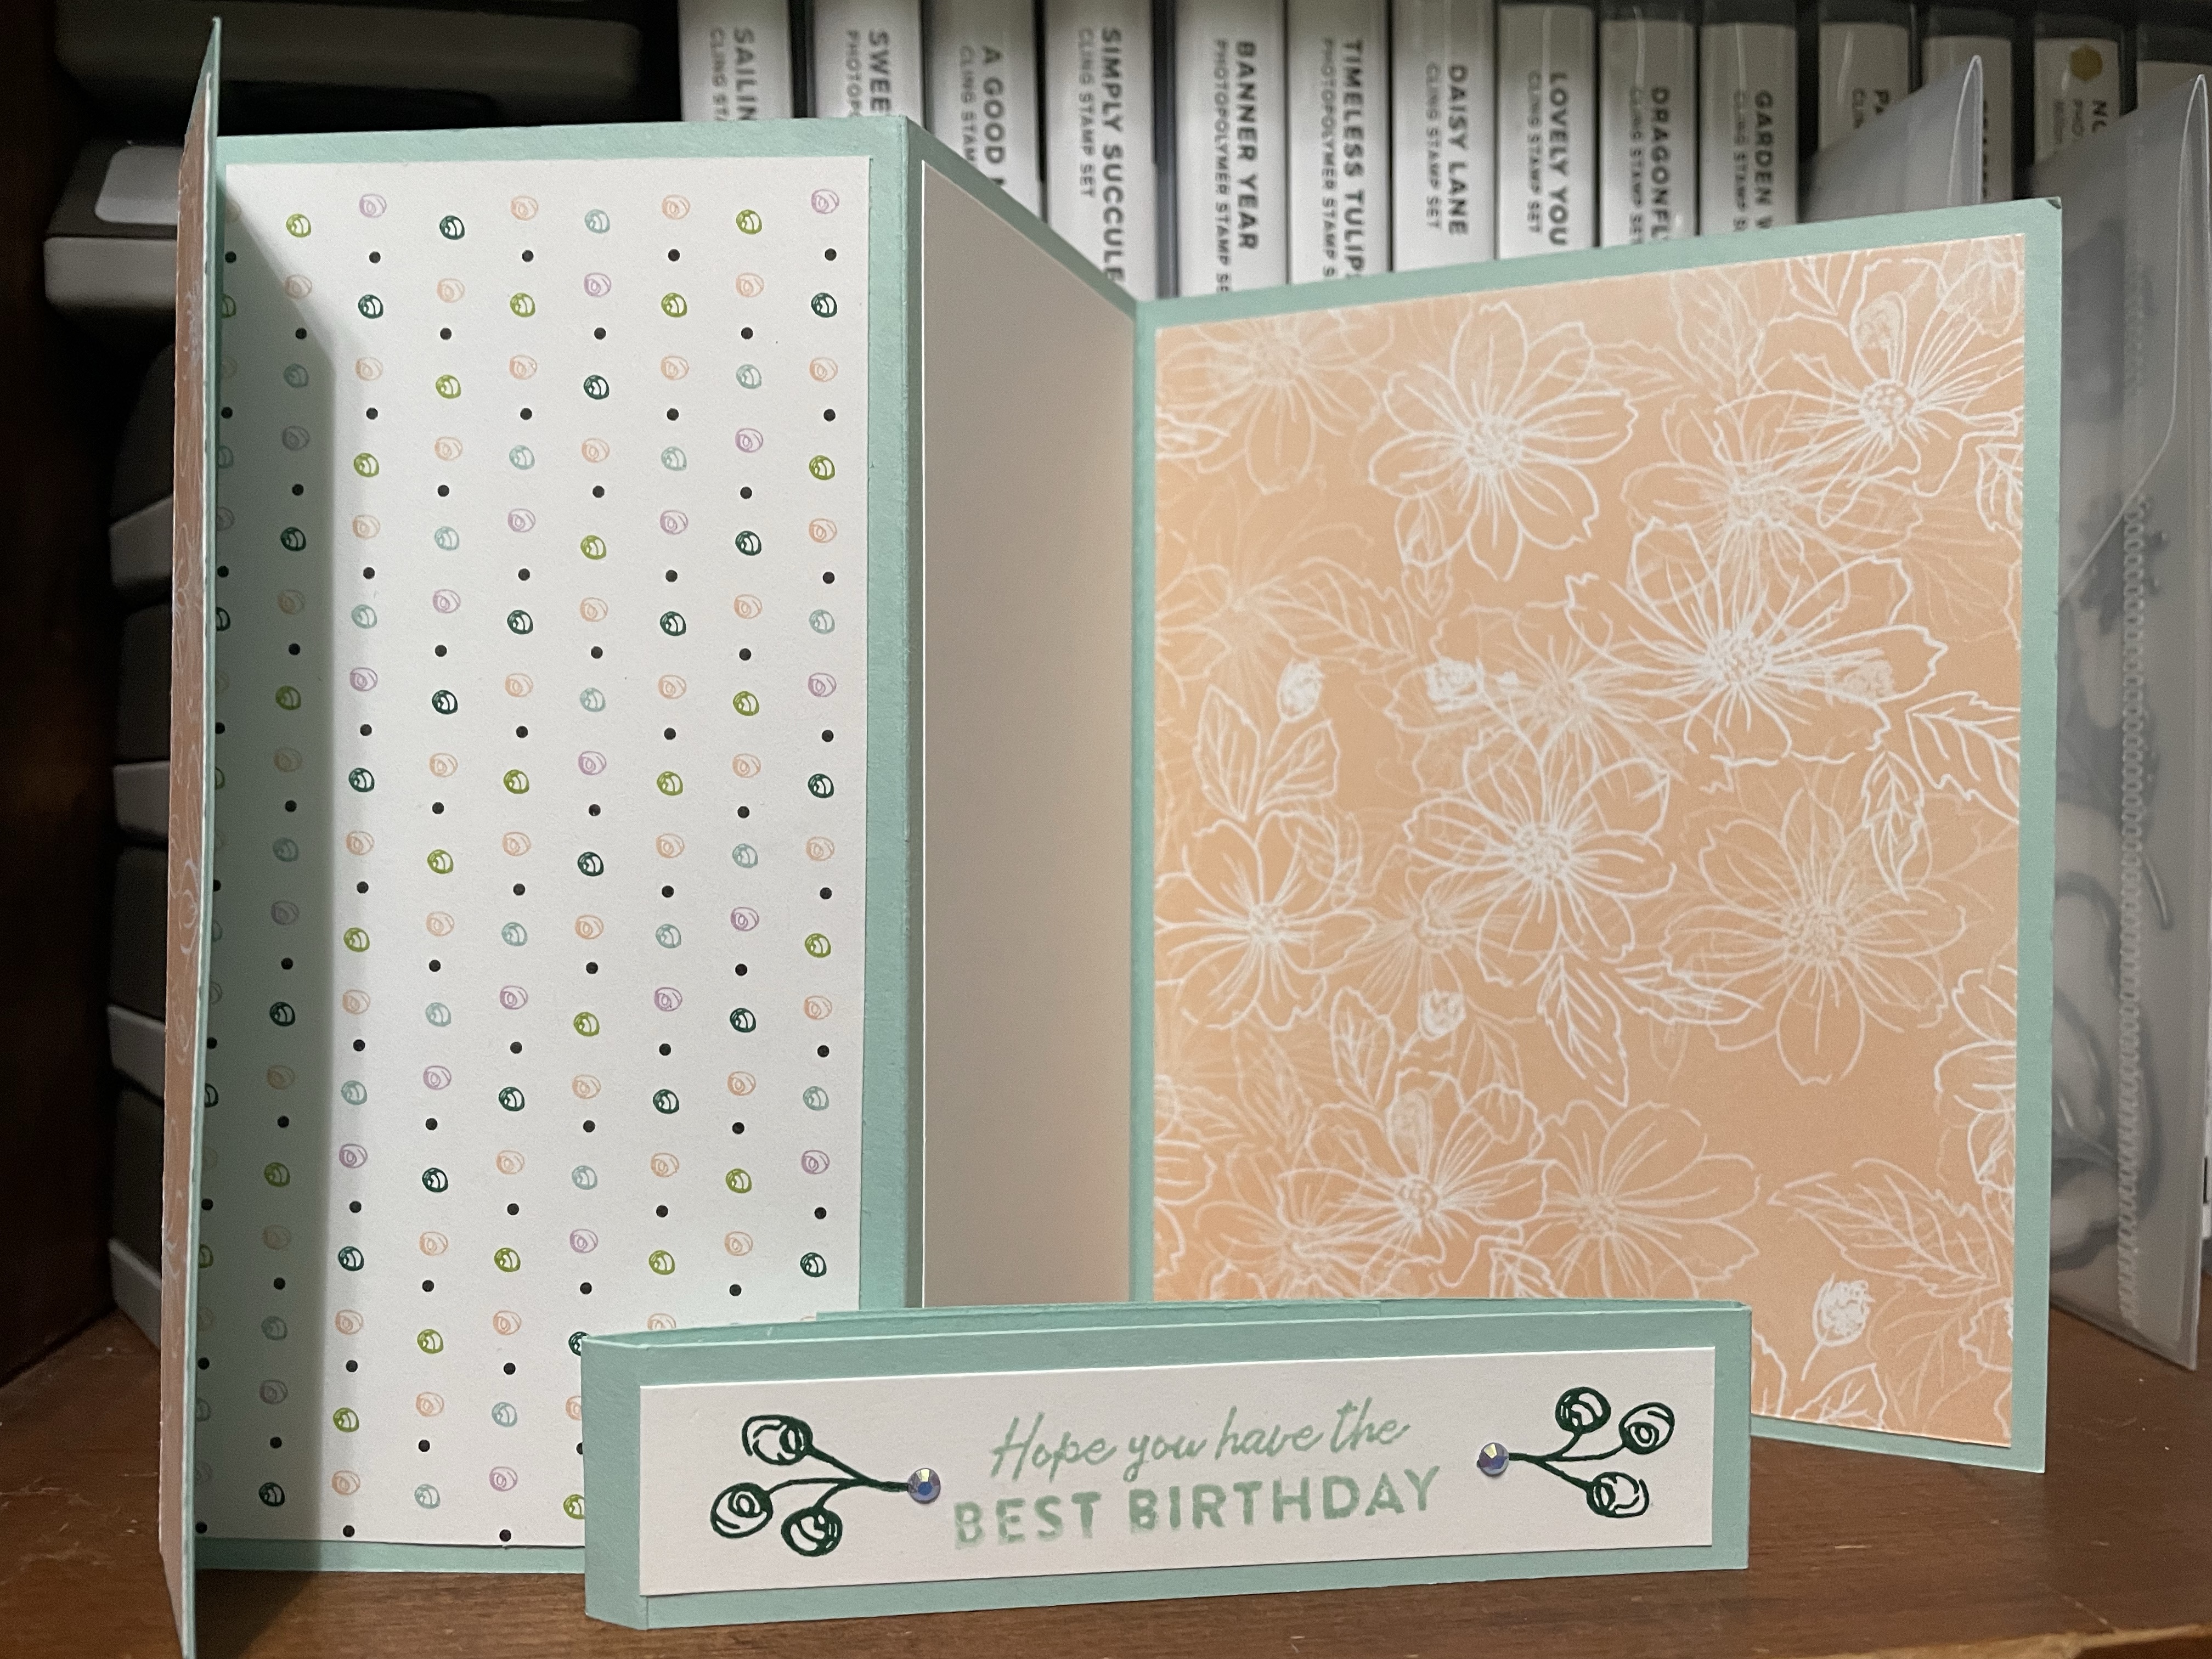
Welcome to the Stampin’ Pretty Pals’ Blog Hop! This month, the theme is Birthday Bash. We really hope that you enjoy and will be inspired by them! As you hop from blog to blog, we would appreciate your comments because we enjoy hearing from you. You will find the lineup at the end of my post to help you “hop” along from Pal to Pal.
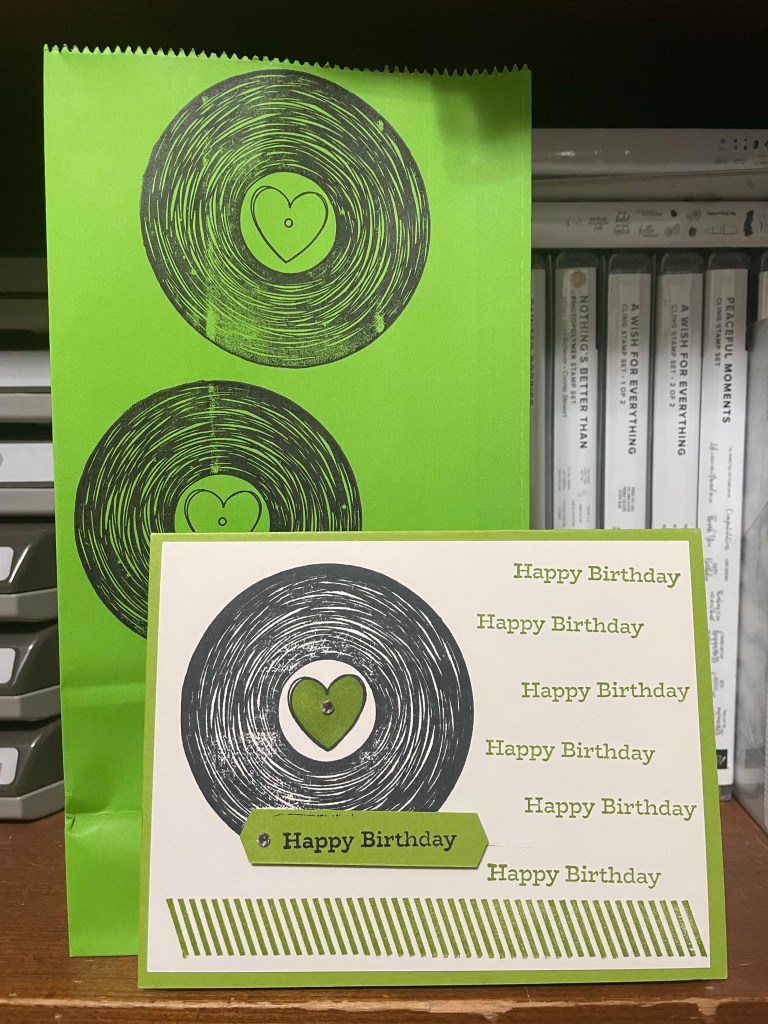
My husband loves Classic Rock and vinyl records. He also has a birthday coming up in March. So, when I saw this stamp set in the January to June 2022 Mini Catalog, I had to get it. My first instinct, of course, was to make a card. But what color? As I looked around my craft room, my eyes spotted some green gift bags. Perfect, I thought. My husband’s favorite color is green. (I think?) What if I stamped the image of the record all over the bag? Because the bag had a shine to it, I stamped the image using StazOn Black Ink. While the color was not an exact match, I decided to go with Granny Apple Green for the card. I stamped the lines image along the edge of a 4″ x 5 1/4″ piece of Very Vanilla in Granny Apple Green. Next, I stamped the record image in Memento Tuxedo Black Ink and colored in the heart with Dark Granny Apple Green Stampin’ Blend. I then stamped the sentiment with the Memento Tuxedo Black Ink on a strip of Granny Apple Green and trimmed the ends with the Banners Pick a Punch. I popped up the sentiment with mini dimensionals and added a couple of rhinestones. I stared at the card for a moment and thought, “Ummm, there is too much blank space, even if a minimalist guy like my husband.” So, what’s a stamper to do? Stamp more! I stamped the same sentiment along the right side of the card, this time with Granny Apple Green. Then I decided to add some Clear Wink of Stella to the record to recreate the shine on a real vinyl record.
It was fun creating these items out of just a few products which I listed below. I would love to know what you think so please leave a comment.
Oh, and after I made this card and wrote the blog post, I asked my husband of almost 15 years about his favorite color. His answer? Blue!
More inspiration awaits, so use the lineup below to visit the rest of the Design Team. The Pals are excited to show you what they’ve created! Then, please mark your calendars for our next blog hop on March 9th. Our theme will be Cute Critters where our Design Team creates a project with any kind of animals, birds, butterflies or insects.
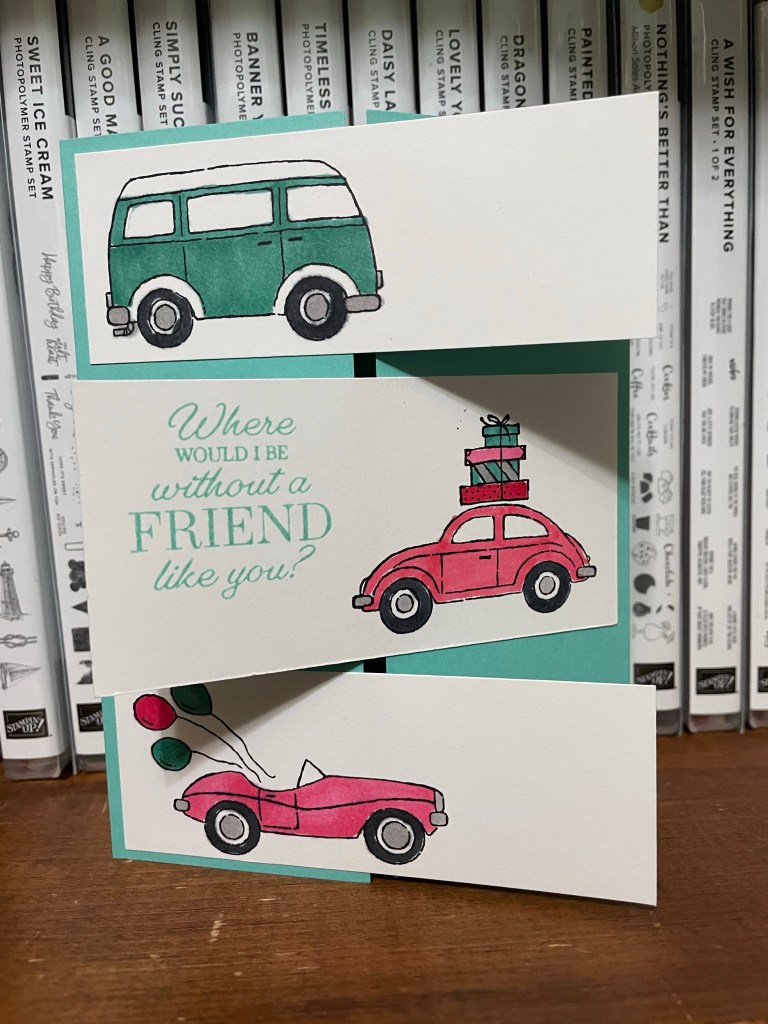
When I was in middle school, my dad inherited his uncle’s red VW bug, He only had it for about five years before it went to VW Heaven. No, really, it is a place in North Carolina where VWs go when they die. Anyway, when I was really little my parents had a VW camper that they actually took on camping trips. So when I saw the Driving By stamp set in the Sale-a-bration brochure, I had to have it. Yes, it is an outline image set so I have to color it but I’m starting to get the hang of it. I’ve been doing a lot of coloring later and am starting to like it more. So I set out to recreate the two cards.
I decided I wanted to use all three vehicles on the card and thought of this fun fold. I have heard a few names – crossover, split gate. Anyway, to create the card, I started with a standard card base of Coastal Cabana (8 1/2″ x 5 1/2″, scored at 2 1/8 from each side). I looked at the stamps and realized that the VW bug was taller than the VW camper and the convertible because of the presents. I hate trying to measure using eighths and sixteenths so I decided to cut the strips different heights. The middle strip is 4″ x 2″. The top and bottom 7strips are 4″ x 1 1/2″. With an 1/8″ border all around and between the strips, those measurements worked out perfectly. I then proceeded with stamping and coloring. I stamped the vehicles with my old Basic Black Archival Stampin’ Pad. I then colored using Stampin’ Blends. All the tires are Dark Basic Black and the hub caps and fenders are Light Smoky Slate. Of course I colored the VW bug using Light Real Red. The convertible is Light Melon Mambo and the VW camper is Light Bermuda Bay. I then stamped the sentiment which I pulled from the Special Moments stamp set in Coastal Cabana. I liked it but had to try one more fun fold with these sets.
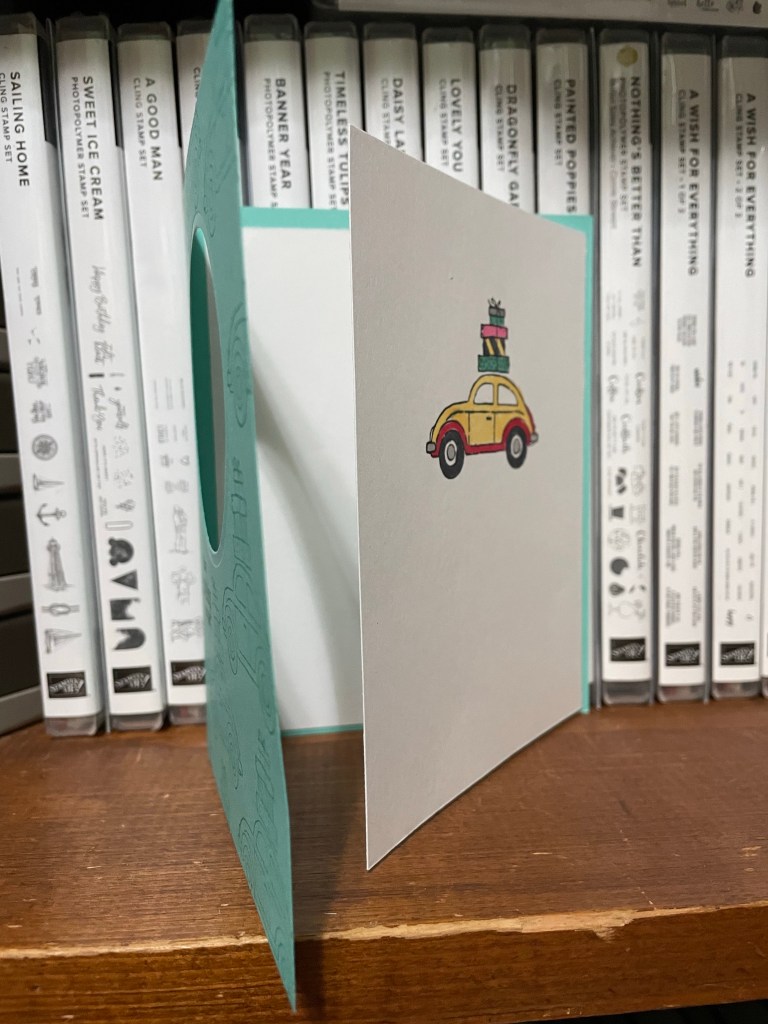
First off, please excuse the shadows on the photos. I had to quickly take the photo before a Zoom meeting so I didn’t have a lot of time to get the lighting just right. I got the idea for this fun fold from Jeanie Stark. Essentially your take a standard card base (8 1/2″ x 5 1/2″, scored at 4 1/4″ and put a slightly smaller card facing the opposite direction inside. The Basic White piece measures 8″ x 5 1/4″ and is scored at 4″. I used the Layering Circles Dies to cut out the window on the front of the card. I laid the inside card in the outside card and closed both. I then stamped the VW bug through the window once again using the Archival Basic Black Stampin’ Pad. This time I colored the VW Bug with Light Mango Melody and Dark Real Red. The presents are Melon Mambo, Bermuda Bay, Mango Melody and Smoky Slate. I then stamped on the card front with the VW Bug in Coastal Cabana. I ended up with a blank space which was perfect for the sentiment, once again from the Special Moments stamp set.
Once I figured what I wanted to create, these cards came together rather quickly. It is fun using the products from Sale-a-bration. They tend to be a little bit different and who can beat free! Well, the Driving By stamp set is free with a $50 or more purchase. The Special Moments stamp set is free with $100 purchase but there are a lot of sentiments for so many different occasions. I hope you enjoyed these cards. Leave me a comment and let me know what you think. And if you haven’t checked out Sale-a-bration, it’s worth a peek.
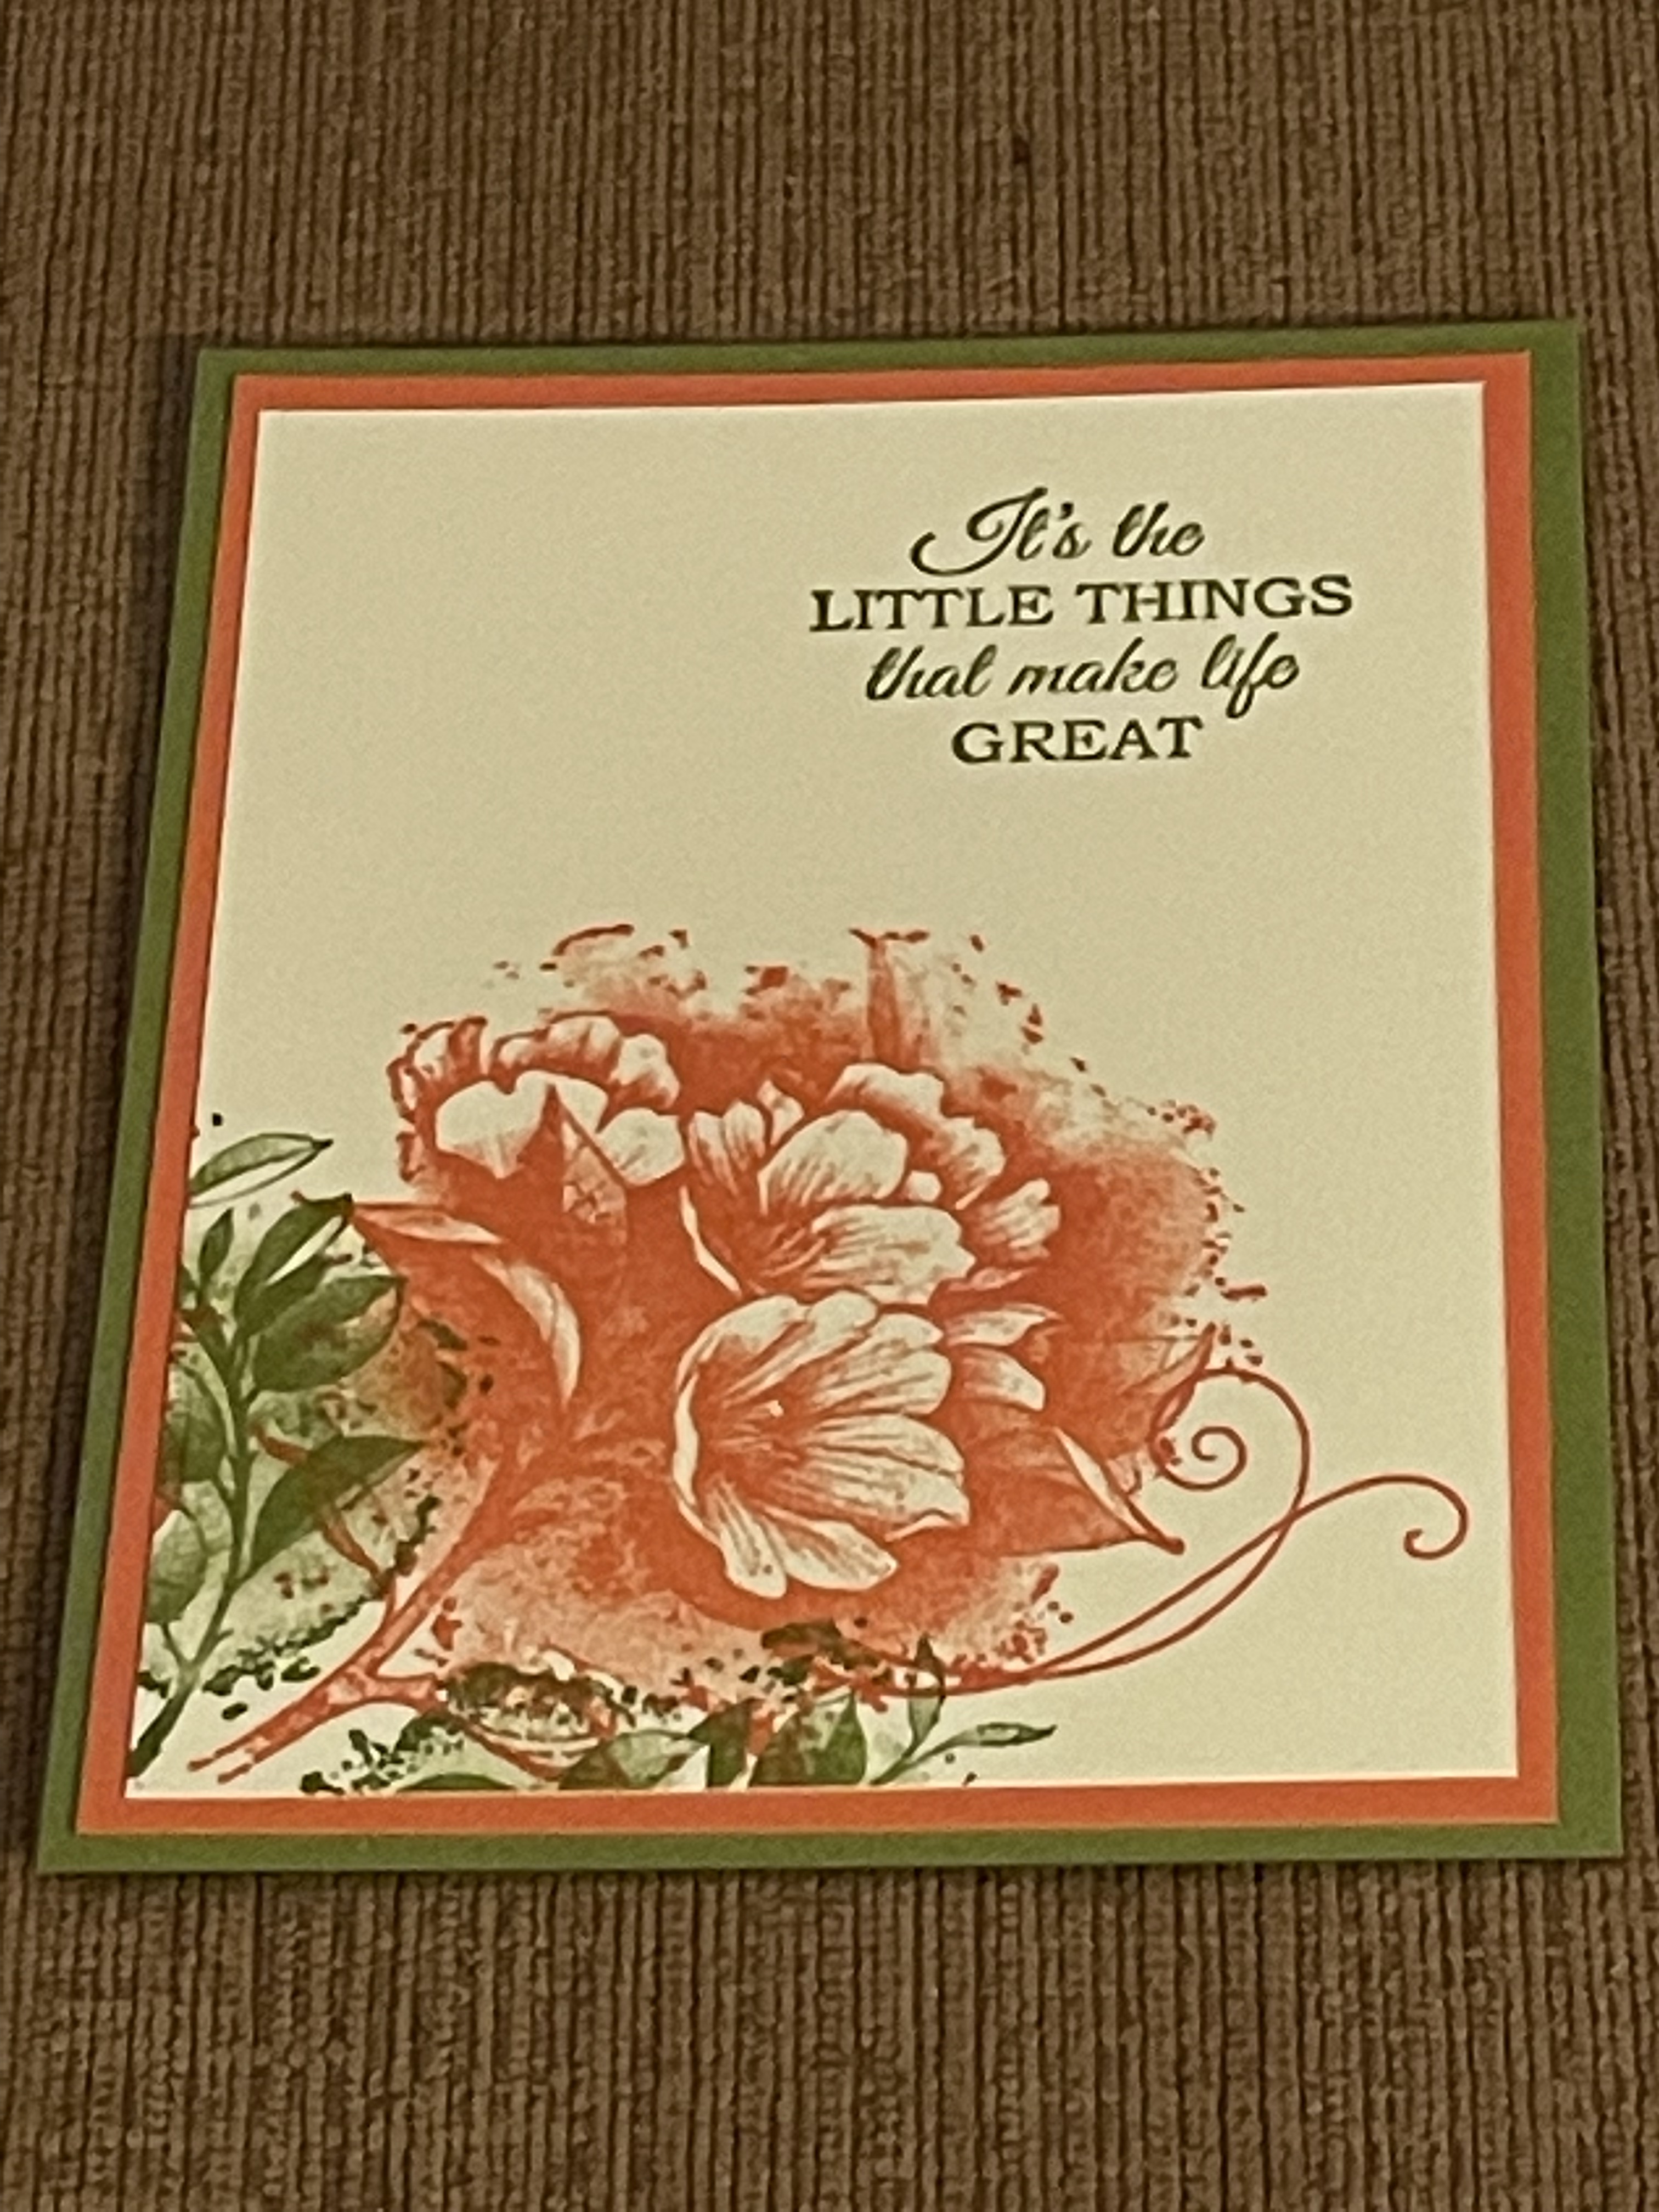
If you have been reading my blog posts you may have seen once or twice that I said that I am not a flower person. I really don’t know much about flowers, I can barely identify even though the most popular ones. When I saw that the host set was called Calming Camellia, I knew it was a flower set but did not know what it would look like. When my order qualified to receive it, I figured I would give it a try. So when another North Carolina Stampin’ Up demonstrator presented the “Four-In-One” technique during our January Stamp-A-Long, I pulled out this stamp set so I could stamp-a-long.
If you are not familiar with this technique, you take a full sheet of cardstock (8 1/2″ x 11″) and stamp from the center. You can be very random in your stamping, especially of the stamp does not have direction to it. Since I was using the flower, I was intentional in stamping out from the center which I had marked with a pencil. I stamped the flower and flourish in Calypso Coral and the leaves and sentiments in Old Olive.
I cut the stamped sheet into four 3 3/4″ x 5″ pieces. Which I mounted on a 4″ x 5 1/4″ piece of Calypso Coral and a Old Olive card base (8 1/2″ x 5 1/2″ scored at 4 1/4″). I chose the direction of the card based on the blank space. I then added the sentiment. The above cards I kept simple by stamping the sentiment directly in the card front and not adding any embellishment. The other two cards got a little more. I mounted the sentiment on a piece of Calypso Coral and added a bow from the Early Espresso Faux Suede ribbon.
I hope you enjoyed this technique and this stamp set. As I mentioned, the Calming Camellia stamp set (#158117) is free during Sale-A-Bration with a party or personal order of $300 or more. Keep in mind, you only have until February 28 to snag this set for free!
I know, I know, it’s not January anymore but a delay in shipping and other planned projects meant I could not put together the January Paper Pumpkin until the last day of January and post them until today. Of course, this month’s paper pumpkin is really oriented to Valentine’s Day or similar occasion so I am good, right?
Cards made according to enclosed instructions
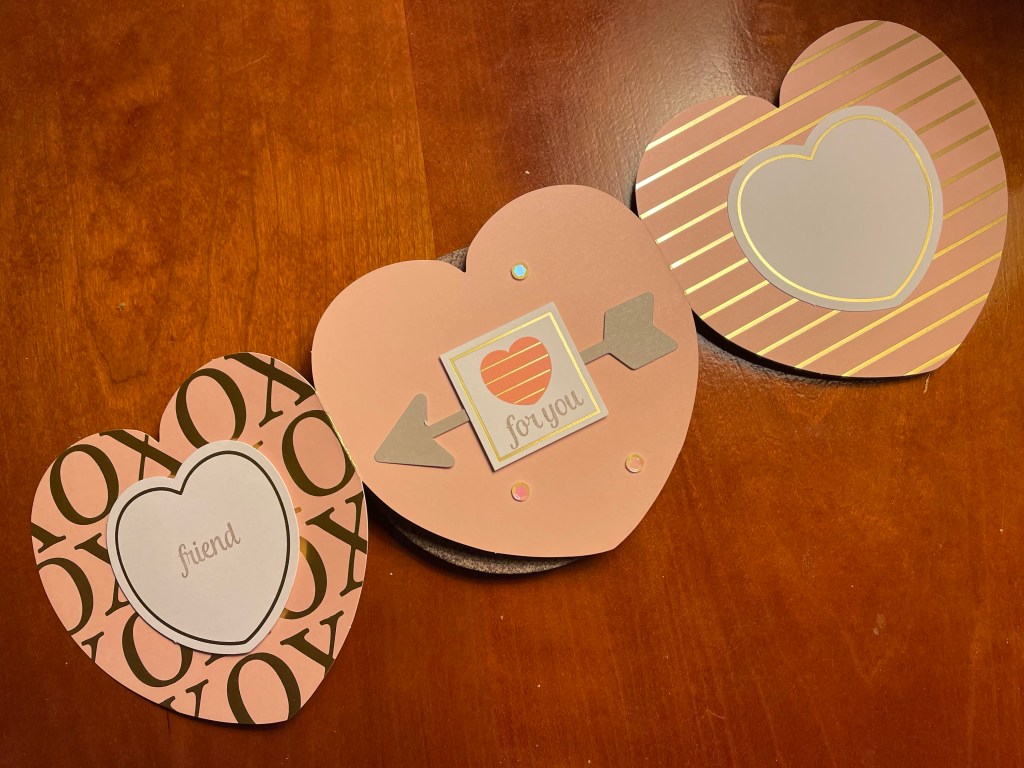
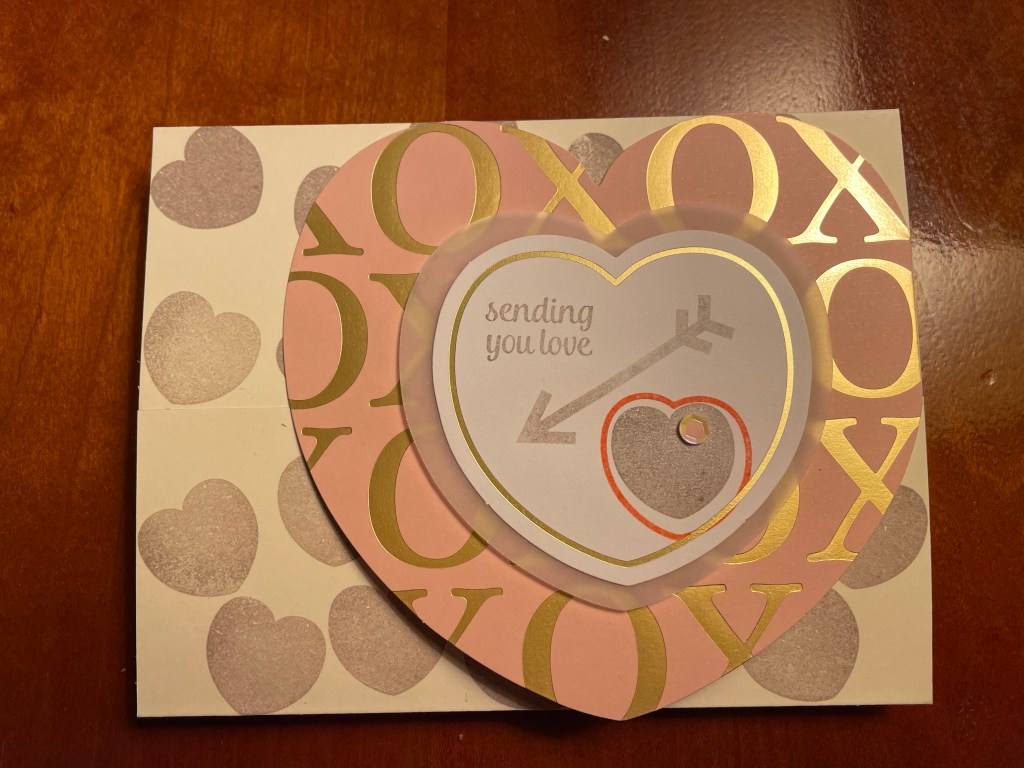
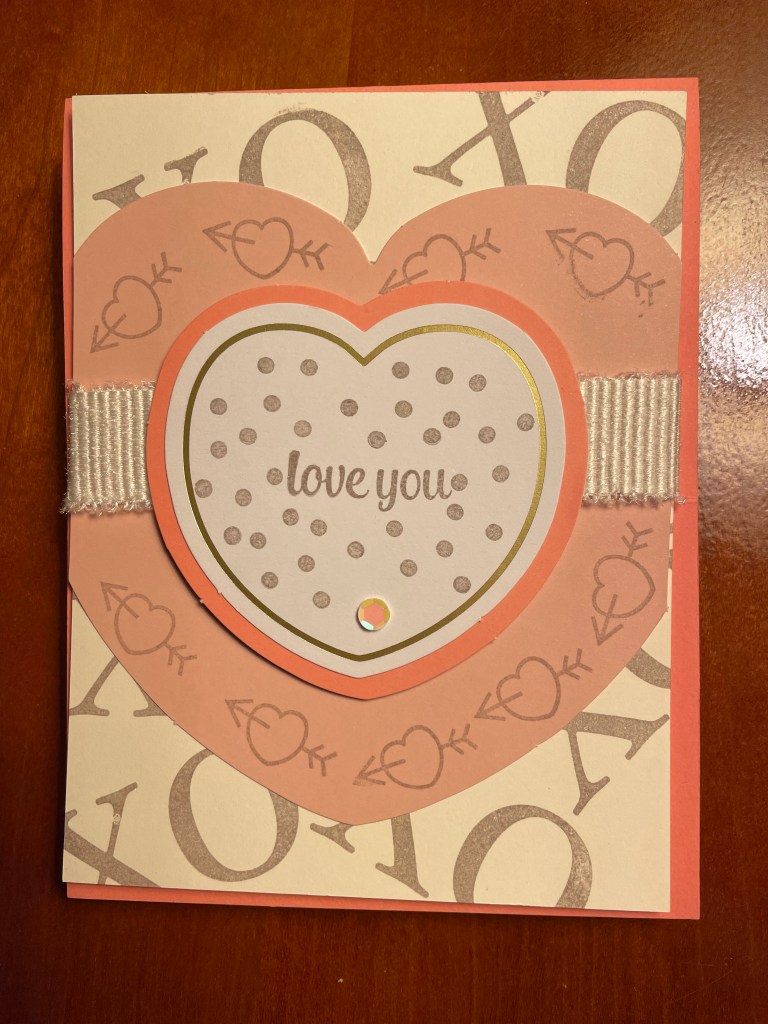
As you can see the January Paper Pumpkin is a card kit but the cards are not your typical A2 or any shape of rectangle. They are heart-shaped tri-fold cards. The featured colors are Flirty Flamingo, Blushing Bride, Very Vanilla, Basic White, and Gold. They were fairly easy to put together with a little stamping and layering. Once I had one of each design put together, it was time to put together a few alternatives.
For the first alternative, I chose a Very Vanilla card base and scored it at 2 1/8″ from both ends to create a gate fold. I cut apart the tri-fold card giving me three hearts to work with. I had to be careful how I placed them since they were 4 1/4″ high and even wider than that. Another problem(?) was that the sides where I cut them apart were flat in those sections. To avoid that being a problem, I positioned the heart all the way to the right so that the flat edge was on the side of the card. I stamped on the gold edged heart with Gray Granite and Flirty Flamingo and I layered it on a vellum heart. I can’t forget to mention that I stamped on the card base with Gray Granite as well.
For this second alternative, I chose the middle piece from the tri-fold. Since it already flat on both sides, I trimmed a little more off so I could fit it on the 4″ x 5 1/4″ Very Vanilla card front. Once again I stamped on the card front and Blushing Bride heart with Gray Granite. I chose to layer that on a Flirty Flamingo card base. I once again stamped on the gold edged white heart with Gray Granite and added one of the sequin from the kit. I brought in a piece of the Frayed White Ribbon from the January to June Mini Catalog.
I don’t know about you but I enjoyed working with the January kit. I am looking forward to the February kit with this Safari theme. Be sure to subscribe by February 10 to receive your kit. https://www.paperpumpkin.com/en-us/sign-up/?demoid=2155441
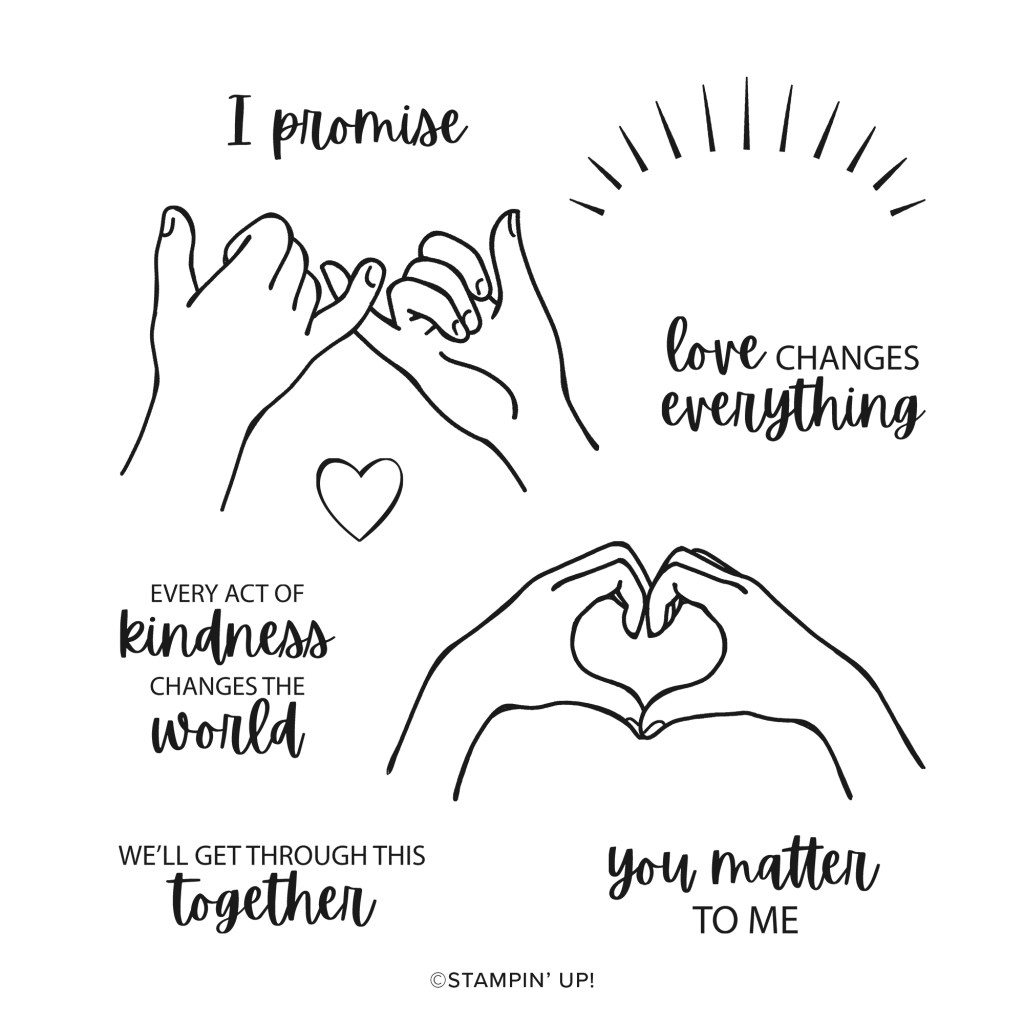
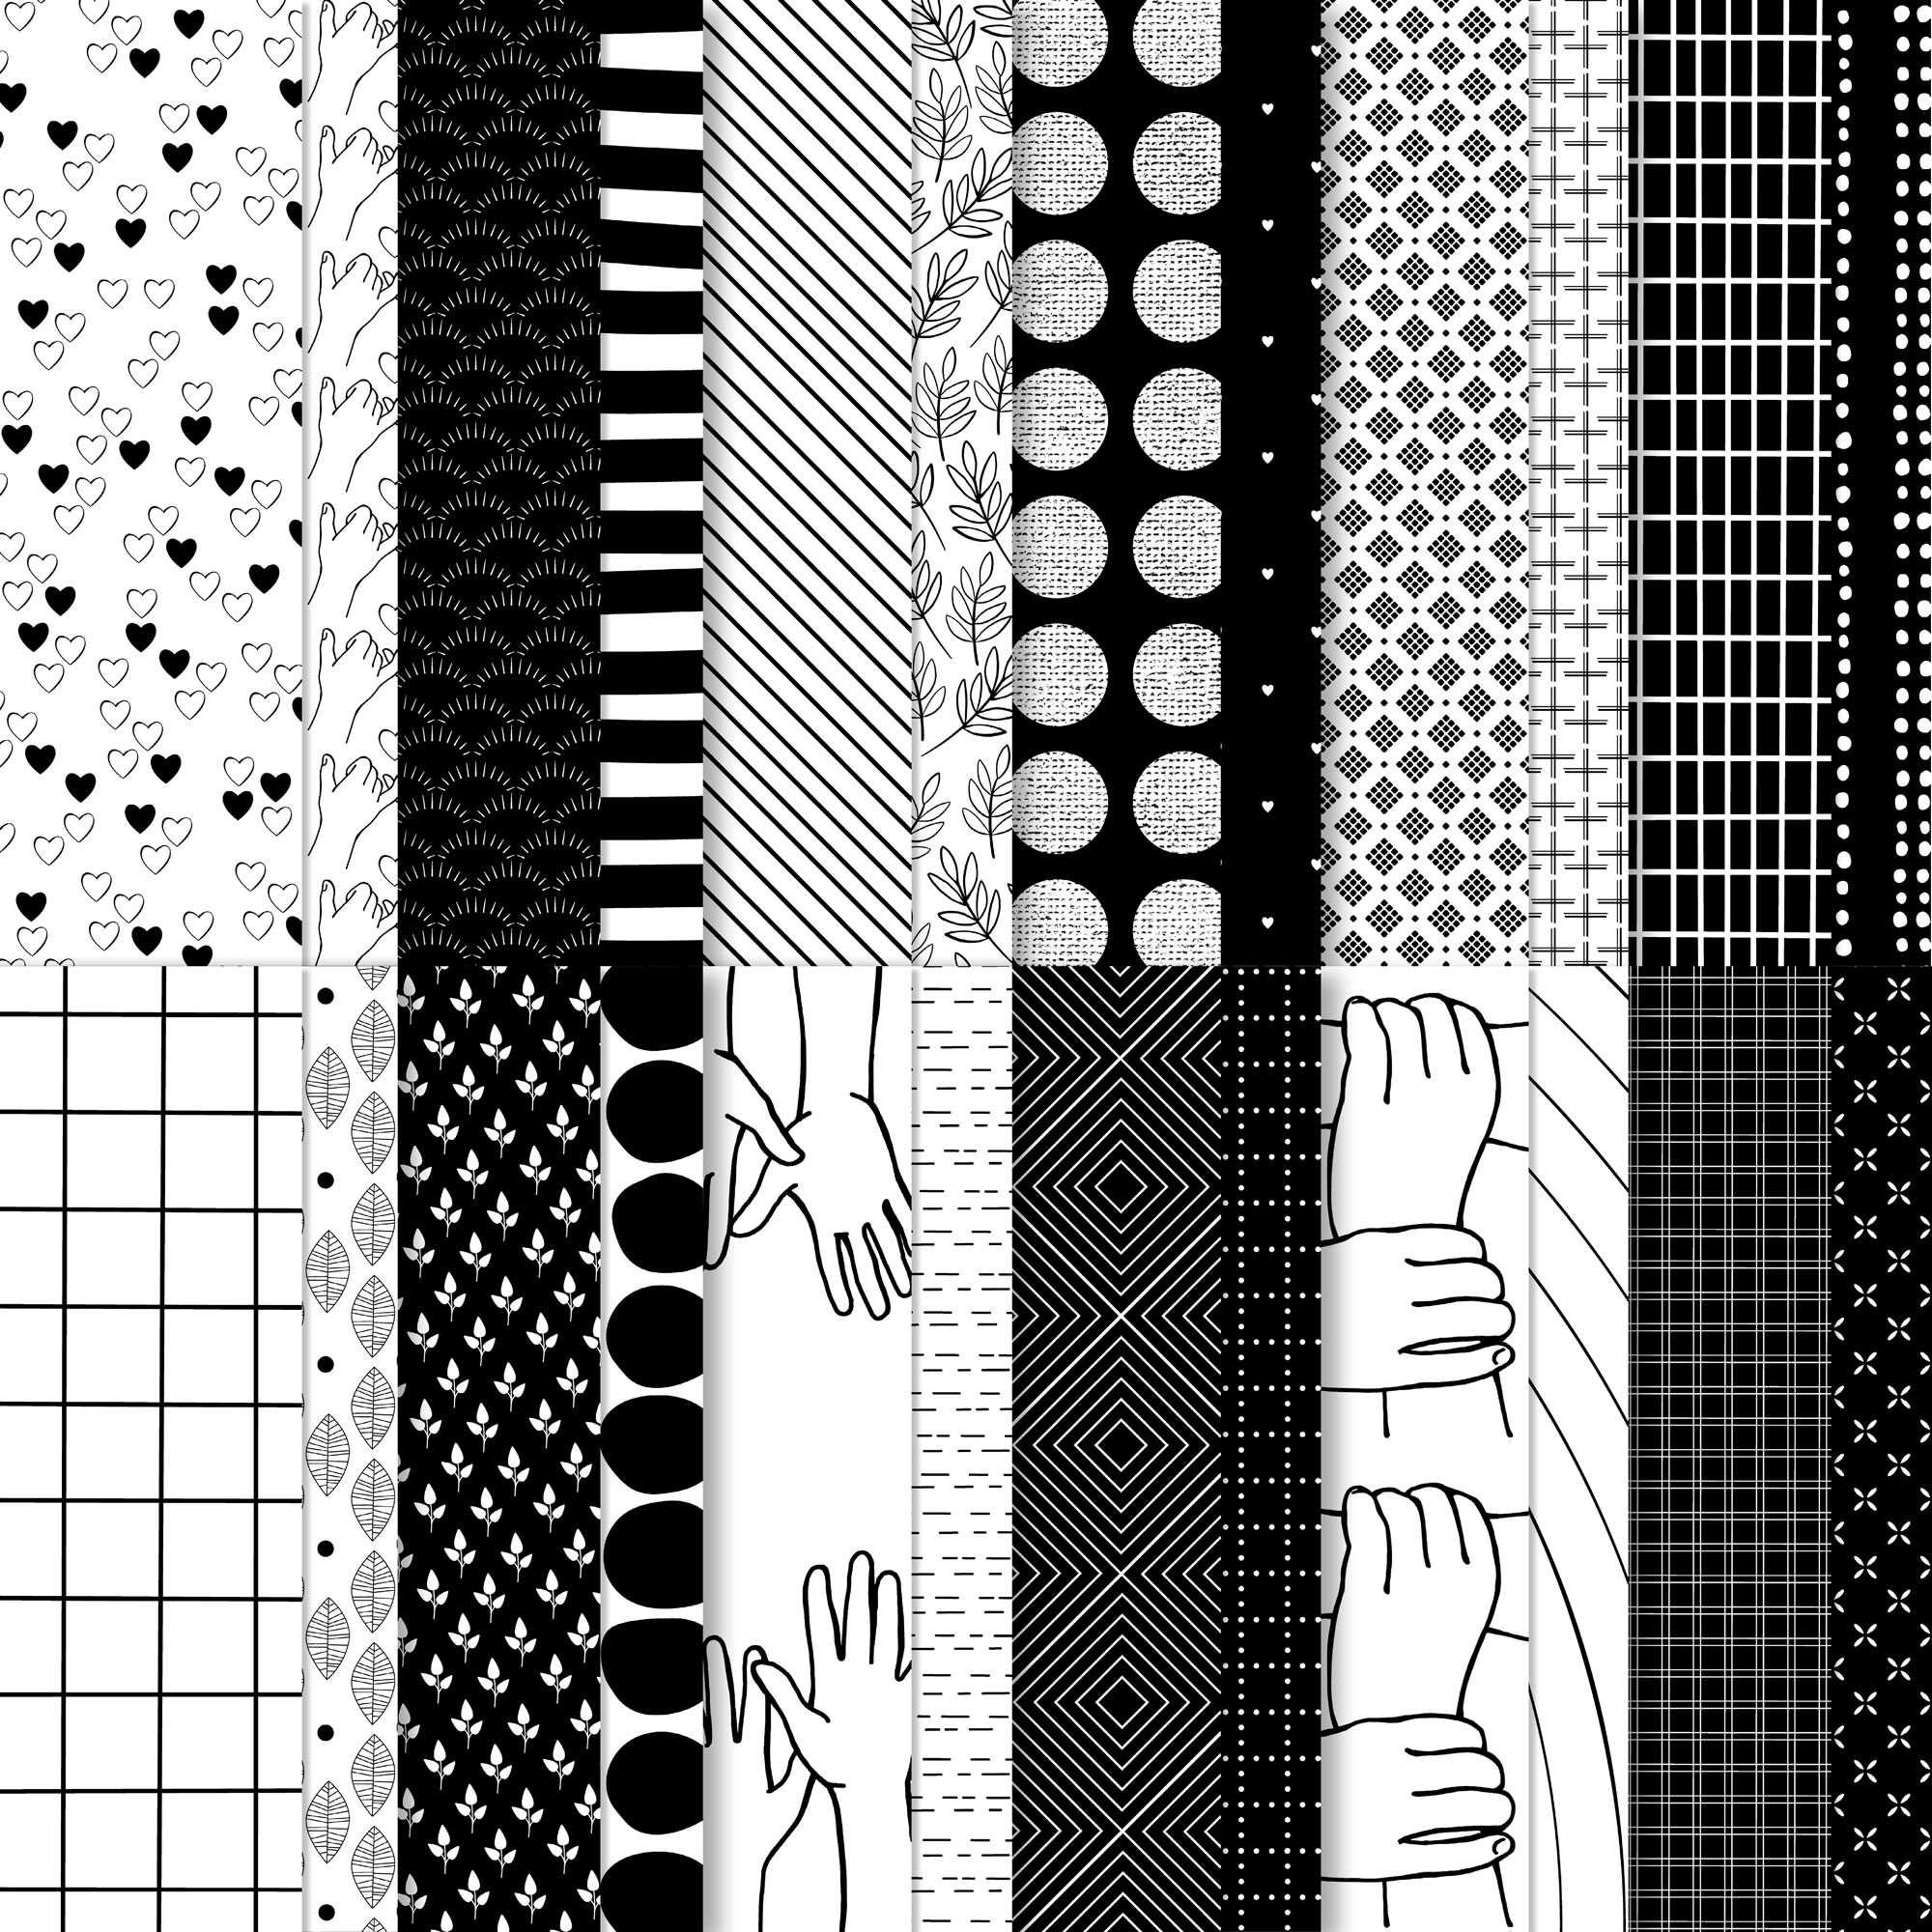
The last few years have been, well, a lot. Between the pandemic, political uncertainty, and awareness of racial injustice, and the intersection of each, we are in need of affirming products to create cards and other papercrafted products. Starting today (February 1, 2022) Stampin’ Up offers the All Together Collection. The products in this collection will allow representation of our racial diversity as well as send messages of love and support. Even though I was able to get my hands on the products at the beginning of January since I am a demonstrator, I haven’t been able to play with them too much. But I am definitely planning on using them more. Before I show my projects, here are the parts of the collection.
Here Together Stamp SetHere For You diesAll Together 6×6 DSP
The Here Together stamp set has several images and sentiments that evoke love and togetherness as well as affirmation of who we are. The Here For You dies will cut out the images as well as several large sentiments for emphasis. The All Together 6×6 DSP is Basic Black and Basic White, great for backgrounds and coloring. The outline images can easily be colored with the Natural Tones Stampin’ Blends. These alcohol markers come in a pair of a pink undertone and a yellow undertone marker. They are great for showing the richness of human skin tones as well as our animal friends. (Think of our stamp sets with otters, rabbits, deer, kiwi, the list goes on!)
Natural Tones Stampin’ Blends
As I mentioned, I have only been able to create a few cards with these products. The first was created for an Instagram Hop with Paper Crafters Unite Against Racism. I cut a 3×3 piece from one of the sheets in the All Together 6×6 Designer Series Paper. I then colored in each hand with different Stampin’ Blends from the Natural Tones collection. I then used Melon Mambo for the hearts, cardstock and to stamp the sentiment. I added a piece of Early Espresso Faux Suede Ribbon behind the sentiment to finish the card.
The second project highlights how the same stamp set can be used with the Natural Tones Stampin’ Blends to create different looks. The blonde hair was colored using the Bumblebee marker but the other hair and both skin tones were colored with the Natural Tones Stampin’ Blends. One used the pink undertone while the other used a yellow undertone. (I posted these cards in the blog post for the January NC Demos Blog Hop if you want to read more about them.)
As I said, I am really looking forward to creating more with this set. You can check out this video to know more about the collection. The Natural Tones Stampin’ Blends will carryover to the next catalog but the stamp set, dies and dsp will only be available until May 2 (or while supplies last).
Let me know what you think of these products and the projects. I can’t wait to share more on Facebook Live on my Facebook page, Papercrafting with Amanda, as well as on Instagram.
Welcome to the NC Demos Blog Hop! We are so glad you are here! You might have already stopped by Laurie Meier’s post and know this month’s theme, but if you are just popping in this month’s theme is Sale-a-bration.
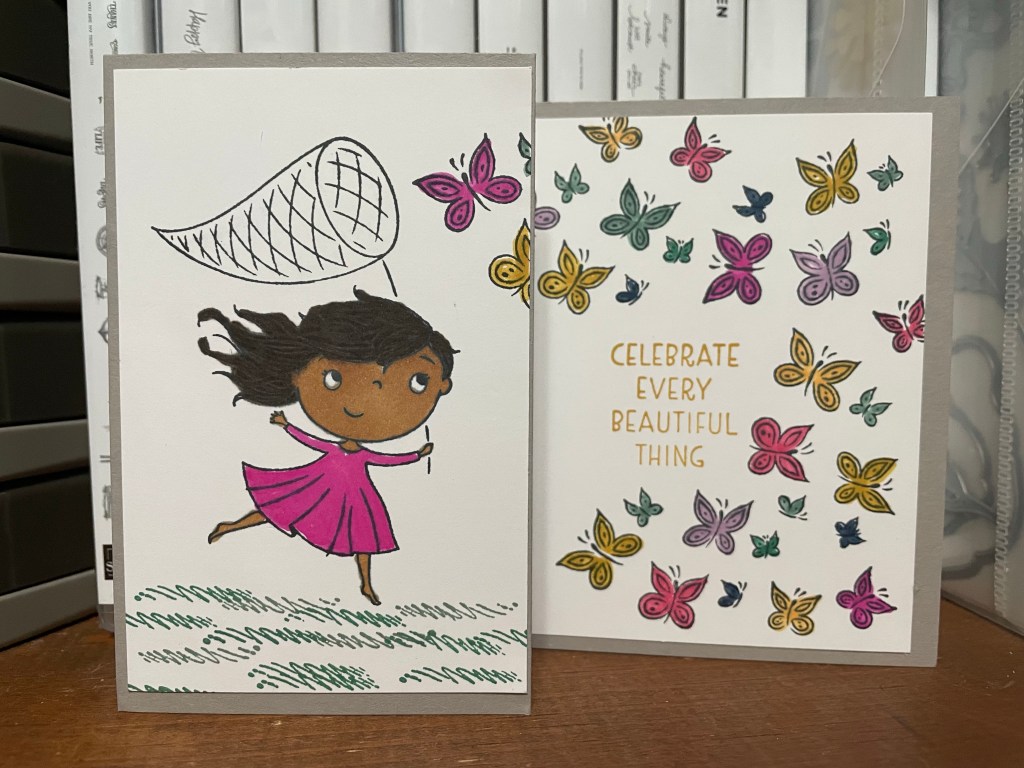
One of the best parts of Sale-a-bration from Stampin’ Up is earning free stamp sets that you may not have purchased on your own but, hey, it was free, so why not try it? The Catching Butterflies stamp set is one of those. It’s cute and I love butterflies and I have a daughter who totally would have run around catching butterflies but did I really need it? (I have two daughters as you will see but the older one did not chase butterflies!) After seeing a few samples and swap cards I had an idea. Why limit the girl and butterflies to the front of the card? Why not carry the butterflies all the way across the card? After all, if some butterflies are pretty, why not a whole card of them?
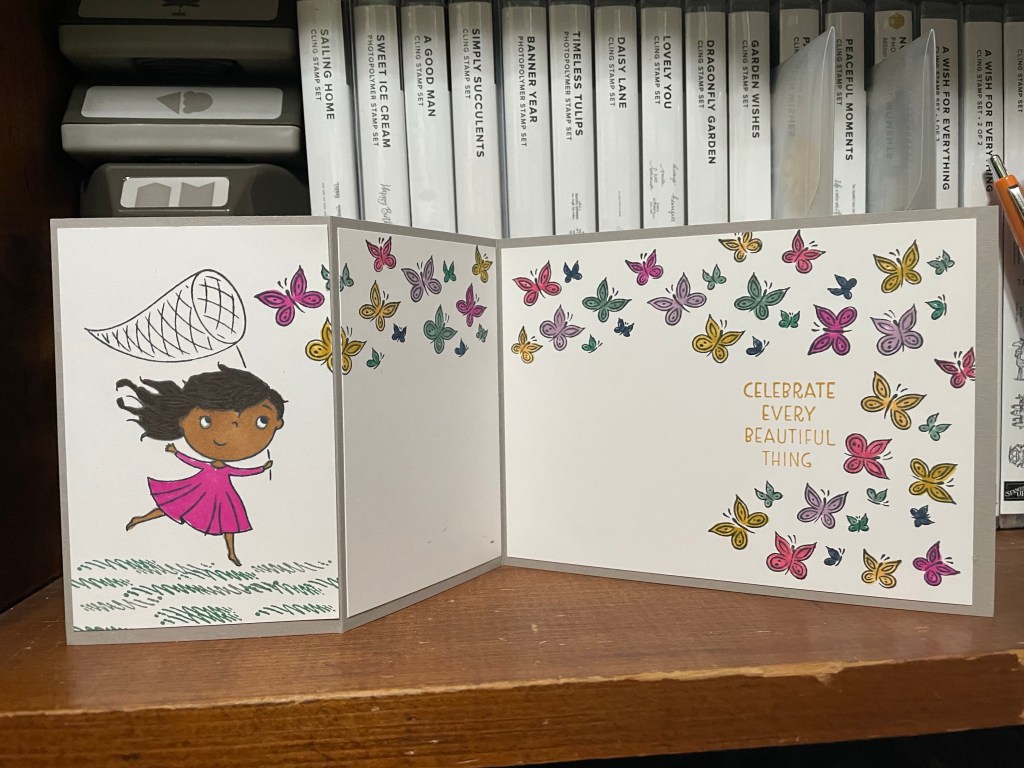
I decided on a simple Z fold card. I love this fold because it uses the same size card base as the standard A2 greeting card but gives it a little something extra. To create the Z fold, start with a 4 1/4″ x 11″ card base. Score at 2 3/4″ and 5 1/2″. I chose Gray Granite for the card base as a neutral contrast to the Basic White cardstock I was going to use for stamping. Plus, I wasn’t matching to specific colors in a DSP. Besides, I was going to have lots of colors in the butterflies and on the girl so I really didn’t want to distract from them. For this card I chose most of the In Colors from the past two years – Just Jade, Bumblebee, Misty Moonlight, Magenta Madness, Pale Papaya, Soft Succulent, Fresh Freesia, and Polished Pink – to color the butterflies and the dresses.
I started with two pieces of Basic White – 4″ x 5 1/4″ and laid them side by side. Using Memento Tuxedo Black Ink, I stamped the image of the girl and net on the far left. Then I stamped one set of butterflies. At this point I cut the piece in half which gave me a piece 2″ x 2 5/8″. I then laid the piece with the girl on top of the blank 4″ x 5 1/4″ piece. I positioned the butterflies over what I had already stamped, pulled away that stamped piece and stamped the butterflies on the larger piece. This meant that the butterflies would line up when the card was closed and open. (I have to pause because I had an a-ha moment while typing this. Looking back, I would have made my life much easier if I had used the Stamparatus. After all, one of the best features of the Stamparatus is being able to positions stamped images in the same place on multiple pieces of paper. Oh well, live and learn. In my defense, my stamping area doubles as an office space so my Stamparatus is put away most of the time and therefore forgotten. I would love tips on how to remember to use it.) Ok, back to the card. I continued stamping the butterflies along the top and right side of the card, and a little at the bottom. I used the individual butterfly to fill in blank spaces. I then stamped the sentiment towards the right where it would be seen whether the card was open or closed. I left plenty of blank space in the middle of the card for writing. When the card was closed it would not be seen.
It was time for the final touches of coloring in the butterflies and the girl. The first card represented my youngest daughter who has pale skin and blonde hair. For her hair I used Bumblebee while for her skin I used one of Stampin’ Up’s new Natural Tones Stampin’ Blends. They come in a combo pack with a pink and a yellow undertone. For her I choose the lightest blend with a pink undertone. The second card represents my oldest daughter who has dark brown hair and a darker skin tone, especially in the summer if she spends a lot of time outside. (Actually, she is really good about putting on sunscreen so her face never gets this dark anymore.) For her I used a darker shade for the hair and a medium shade with a yellow undertone for her skin. The Natural Tones Stampin’ Blends Collection will be available beginning February 1 along with the other products in the All Together Collection. Look for a blog post featuring this collection on Tuesday, February 1 at 5am EST!
Thank you for letting me share my project. I hope you enjoyed seeing the Catching Butterflies stamp set available during Sale-a-bration until February 28 as well as a preview of the Natural Tones Stampin’ Blends available February 1. Please leave me a comment to let me know what you think of my card. Don’t forget to stop by and see Tracie Evans Langley’s post if you didn’t start there. I can’t wait to travel there next!
Growing up, my father always gave us Sweetheart conversation hearts. One year, he gave us a puzzle instead of the candy. Not that I love the candy, but I missed it that year. The thought was there but a puzzle just wasn’t the same as the candy. As a Spanish teacher, I have even sought out the candies in Spanish to give to my students. So, when I saw the Sweet Conversations stamp set in Stampin’ Up’s 2022 January to June Mini Catalog, I had to get it.
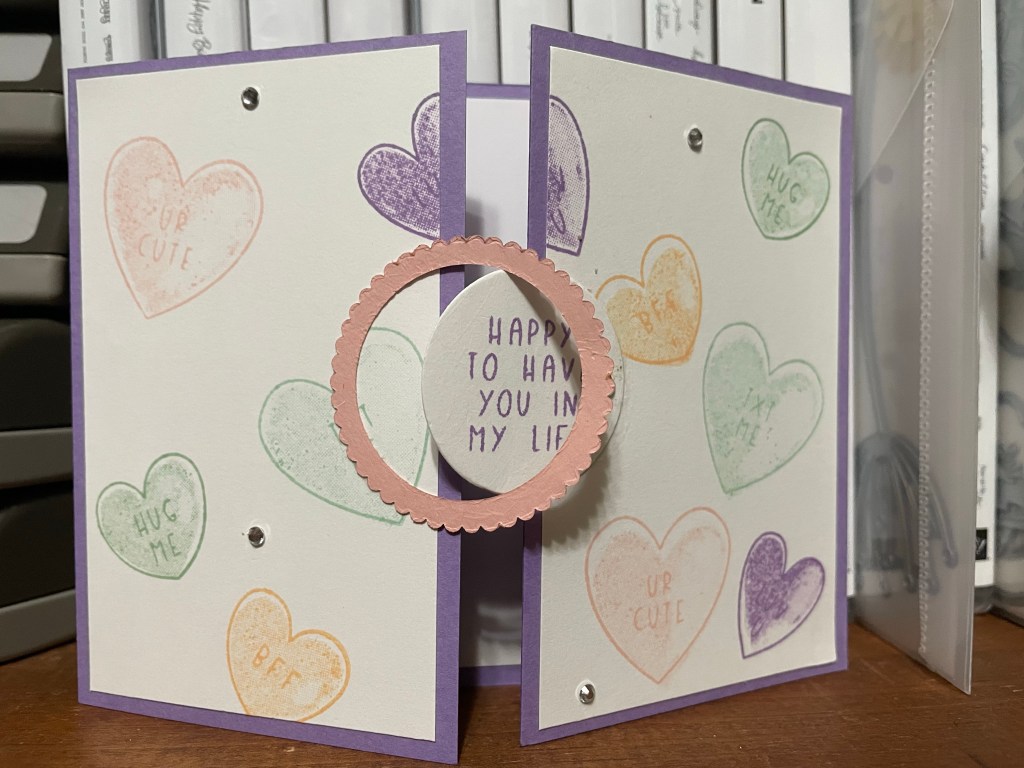
In addition to wanting to use the stamp set to create a Valentine’s card, I wanted to create a fun fold. As you can see, I chose to do a gate fold but added an interlocking closure to the front. I used the layering circles to cut the circles, using a scalloped circle that was one size up from the circle to create the frame.
Rather than use the DSP I wanted to use the stamps to create the background. I tried to mimic the colors of the sweethearts to the best of my memory. I decided on Mint Macaron, Blushing Bride, Pale Papaya, Highland Heather, and Pool Party. I stamped the outline a words full-strength and then stamped off once for the inside of the hearts. To add a little something else, I added Rhinestone Basic Jewels to the front.
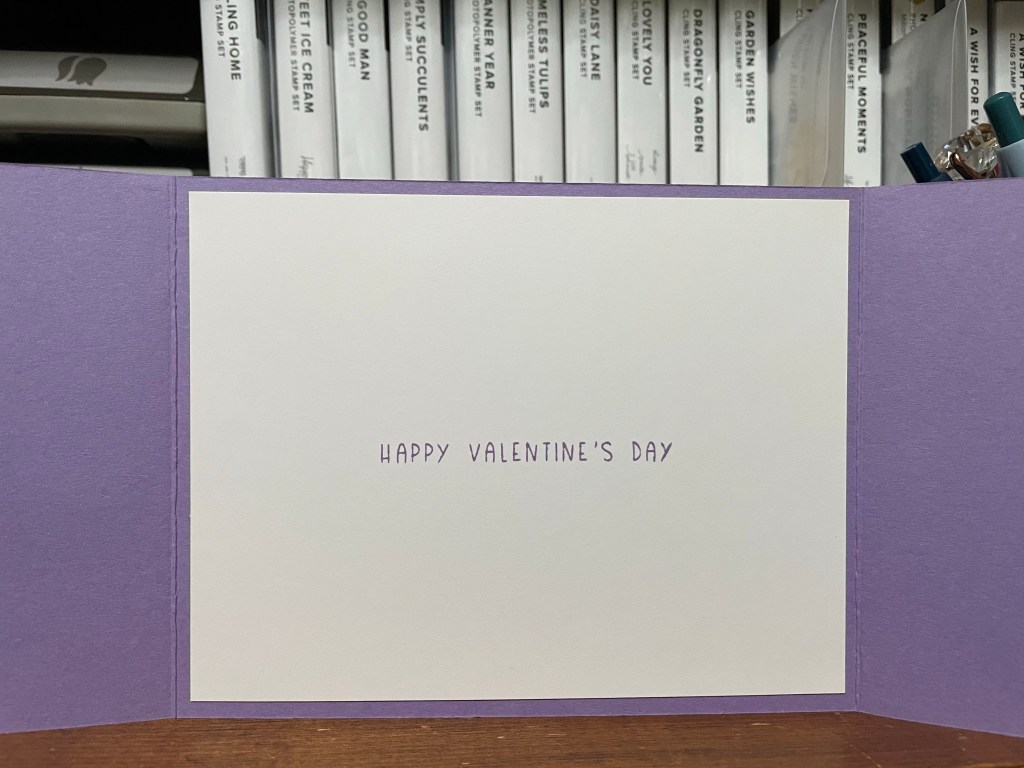
I rarely stamp a sentiment on the inside of a card but I decided it made sense to stamp one on this card. I guess it will save me some writing later on!
I would love to hear what you think of the card, of the Sweet Conversations stamp set, or of stamping on the inside of a card. The Sweet Conversations stamp set is available now as part of the Sweet Talk Suite. I am looking forward to using some of the other products in the suite like the Sweet Heart dies and the Gingham Embossing Folder. Or maybe I will use the Sweet Talk DSP instead of creating my own background. In fact, if you purchase the Sweet Conversations Bundle and the Sweet Talk DSP, you can earn a free item during Sale-a-bration through the end of February.
Which reminds me, Sale-a-bration is a great time to join Stampin’ Up as a demonstrator. Not only will you have the opportunity to be part of my team and choose $125 of product for $99 with free shipping, but you also can choose two free stamp sets. Let me know if you want to know more!
Sale-a-bration is a time to earn free items but it also brings pretty products and the opportunity to make new projects. The Friendly Hello stamp set and Designer Series Paper bundle is available as a free item with a purchase of $100 or more. Personally I love the color combination in the DSP – Fresh Freesia, Garden Apple Green, Shaded Spruce, Pool Party, Petal Pink and Basic Black. (Not listed but important to know – Basic White). I wasn’t sure I liked the designs when I first looked at it but decided to jump in and use it.
For some reason I was in the mood to make fancy fold cards. Maybe it was because I wanted to show off the DSP by using multiple pieces on each card. Maybe it’s because we had wintry weather and I had been scrolling through Pinterest and Instagram, seeing card designs that I wanted to try. In any case, I started with a book fold card. I made one before at local demos event but wanted to try it again. It’s actually pretty simple. Start with a 4 1/4″ x 11 piece of cardstock (Shaded Spruce for this card). Score as normal at 5 1/2″ but also score at 6 3/4″. Then simply put adhesive between the two score lines to adhere that section of the front to the back. For the inside you will want a 4″ x 4″ piece of Basic White. For the front left side section I used a 1″ x 4″ piece of Fresh Freesia and 3/4″ x 3 3/4″ piece of DSP. For the main section I used a 4″ x 4″ piece of Fresh Freesia and 3 3/4″ x 3 3/4″ piece of DSP. To show off both sides of the DSP, I flipped over the narrow piece. I stamped the sentiment on Basic White with Fresh Freesia ink and cut it out with a die from the Ornate Frames. I sponged a little Fresh Freesia around the edges. I realized that the piece of DSP had a couple of images nicely positioned – the Fresh Freesia flowers and the bird on the branch. Therefore, I positioned the sentiment in the corner to allow those images to show. I finished the card by adding a few Fresh Freesia jewels.
The next card was inspired by one by Patti Bennett which in turn had been inspired by a card she received. The Granny Apple Green card base is 5 1/2″ x 10, scored at 4 1/4″ and 8 1/2″. I picked the DSP because of the striped side. Unfortunately, the other side was primarily Granny Apple Green like the card base and blended in when laid directly on the card base. To remedy this problem I mounted the DSP (5″ x 3 3/4″) on a 5 1/4″ x 4″ piece of Basic White. Even though the DSP had white, they were small enough images that the contrast was sufficient. I cut a 1 1/4″ x 5 1/4″ piece of the striped DSP and mounted it on the right flap of the card. Next, I cut a 2 3/4″ x 3 1/4″ piece of Basic White for the sentiment which I stamped in Shaded Spruce. I added the flower images in Granny Apple Green and mounted it on a 3 x 3 1/2″ piece of Granny Apple Green. I used Stampin’ Seal on just the right side of the piece of Granny Apple Green and adhered it to the right flap. Once again I finished the card by adding a few Fresh Freesia jewels.
The last card was a triple fold card. It has been awhile since I made one so I decided it was time. Once again, the card base was larger than normal – 11″ x 5 1/2. It is scored at 1 3/16″, 4″, and 6 3/4″. I decided to have alternating sides of the DSP sheet showing so I cut them at 4″ x 5 1/4″, 5 1/4″ x 2 1/2″ and 5 1/4″ x 1″. I needed somewhere to write so I cut a piece of BAsic White – 5 1/4″ x 2 1/2″. For the belly band, I cut a 11″ x 1″ piece of pool party. The sentiment was stamped on a 4″ x 3/4″ piece of Basic White. It is hard to see but there are small Fresh Freesia jewels on the bottom of each stem of the berry images. Other than all the measuring, cutting and scoring, this is a fairly easy card to make.
I hope you like these three cards spotlighting the Friendly Hello stamp set and DSP. Remember, they can be yours free during Sale-a-bration when you purchase $100 or more from Stampin’ Up.
Product List
Friendly Hello bundle (stamp set and Designer Series Paper) #159990
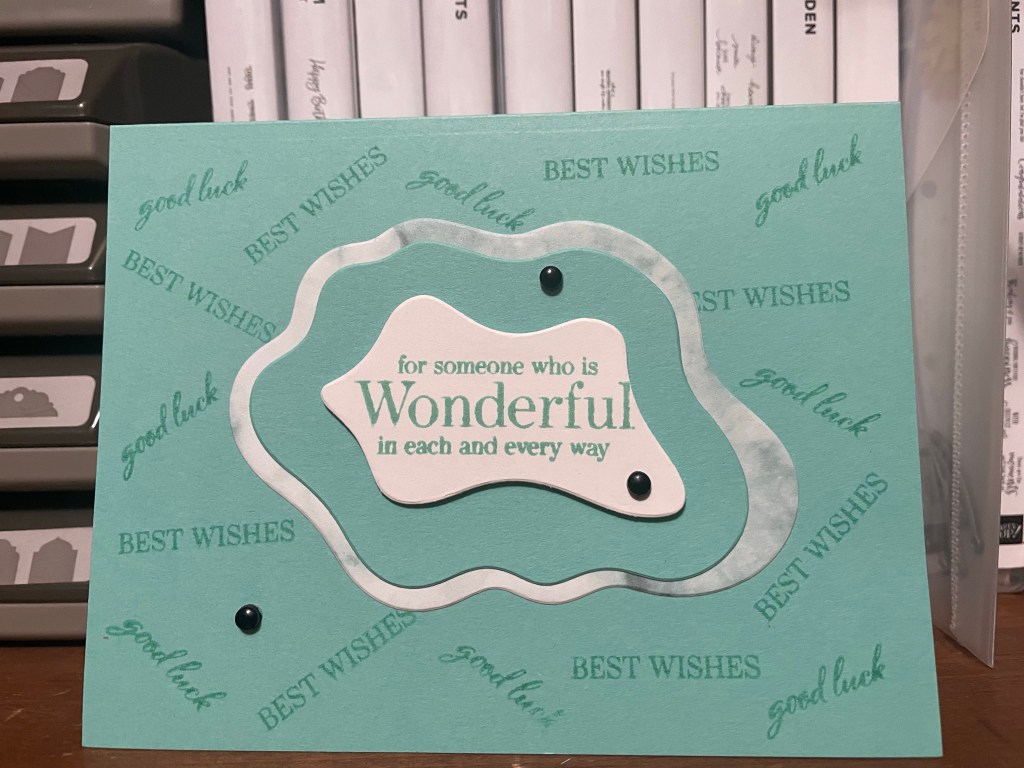
Have you ever really wanted to play with something but didn’t know what to do? That’s how I was with these three products – Simply Marbleous Designer Series Paper, Special Moments stamp set, and Layering Diorama dies. I couldn’t just use one of these but maybe if I put them together, I could create something.
I started by using the middle two of the Layering Diorama Dies to cut out the center from a card front from the Simply Marbleous DSP and a coordinating piece of Coastal Cabana cardstock. I then stamped the sentiment from Special Moments in Coastal Cabana on a card base of Basic White Thick Cardstock in Coastal Cabana. I used the Blending Brush and Coastal Cabana ink to add some color around the sentiment and fill in the white space. Once I adhered the pieces, I added a few white Classic Matte Dots on the Coastal Cabana layer. Considering it is a Sympathy card, I wanted to keep it muted.
I had the pieces leftover when I cut the Simply Marbleous DSP and Cardstock with the Layering Diorama Dies so I decided to make another card! I started with a card base of Coastal Cabana and stamped the sentiments with Coastal Cabana ink. I then cut out a piece of Basic White using the smallest Layering Diorama Die and stamped the sentiment in Coastal Cabana. I popped up the sentiment with dimensionals and adhered the other pieces to the card base with Stampin’ Seal. I thought it needed a little something else so I added a few black Classic Matte Dots scattered around the card front.
I could have stopped with those two cards but, well, I just had to make one more. For this card I still used the Simply Marbleous DSP and Special Moments stamp set but decided to change up the color. I also wanted to bring in the butterfly image from the Amazing Silhouettes. I decided on a piece of DSP with Blushing Bride and Flirty Flamingo and cut it into 3″x3″ pieces. I mounted the DSP on a 3 1/4″ x 3 1/4″ piece of Blushing Bride. I stamped the butterfly on Basic White with Flirty Flamingo ink and fussy cut the image. I then mounted that on the DSP and then mounted it on a Basic White 4″ x 5 1/4″ card front. Next I stamped the sentiment with Flirty Flamingo ink. I then tied a single knot in a piece of Black & White Gingham Ribbon and wrapped it around the card front above the sentiment. Finally I mounted the card front on a Flirty Flamingo card base.
I hope you enjoyed these three cards. They were made possible by Sale-a-bration. That’s right, the Simply Marbleous DSP is free when you purchase $50 or more of product from Stampin’ Up. The Special Moments stamp set is free when you purchase $100 or more of product. Don’t miss out on these amazing products. They are only available until February 28!
Product List
Special Moments stamp set #158081
Simply Marbleous 6″ x 6″ Designer Series Paper #158128