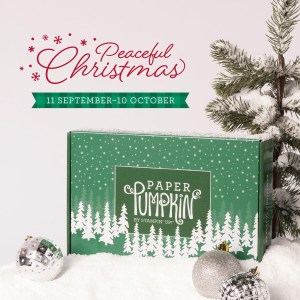
Once again, I was looking forward to putting together the October Paper Pumpkin kit – Peaceful Christmas. As I have said before, one of the main reasons I look forward to Paper Pumpkin because I can easily put together the cards or 3D project with a whole lot of thought. Even when I am tired – mentally, physically, or emotionally, I can relax and create by following the instructions. It is wonderful therapy and costs less than a massage or session with a licensed clinical therapist. (No offense to either profession. I have friends in both professions and have used their services. But, Paper Pumpkin doesn’t require an appointment or driving anywhere as it arrives in the mail.)
This month there was another reason I was looking forward to the arrival of the kit -the trees! Not only did the kit have stamped trees and vellum trees, but it also coordinated with the Peaceful Cabin Bundle. The Peaceful Cabin stamp set has a cabin, of course, along with sentiments, snowflakes, a fence, a fox, and . . . trees! The Cabin Dies cut out the outline of the trees, cabin, and fence as well as the inside. Oh, and I can’t forget the snowflakes and the fox. You can create card width scenes with the silhouette of the fox, cabin and trees!
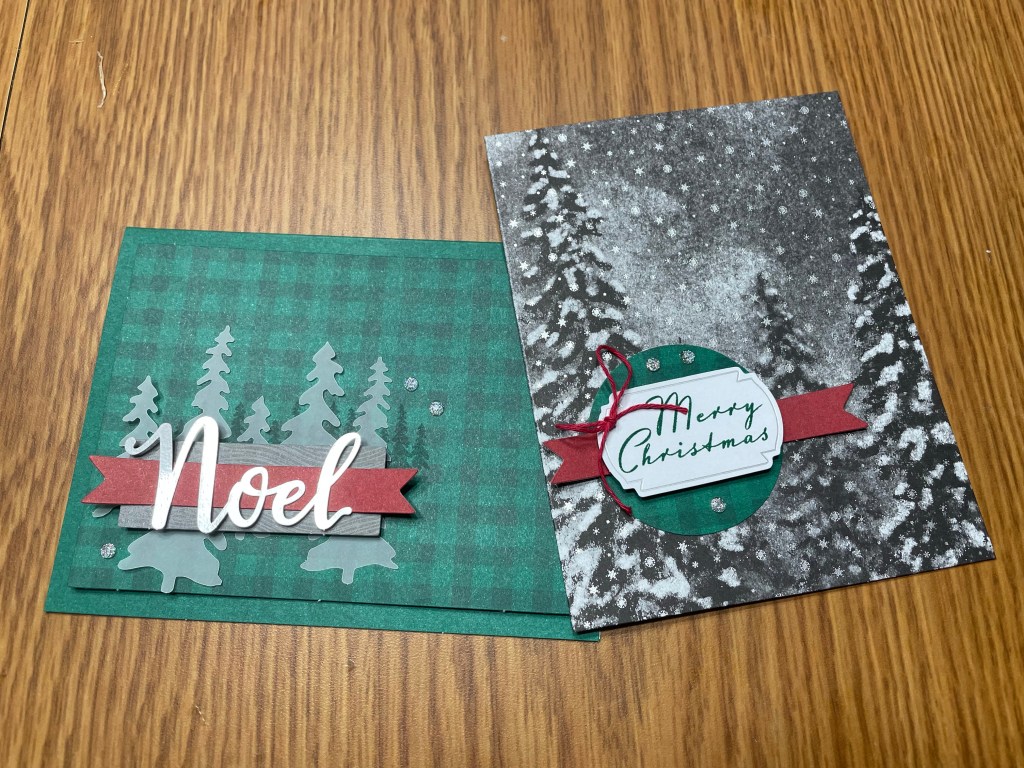
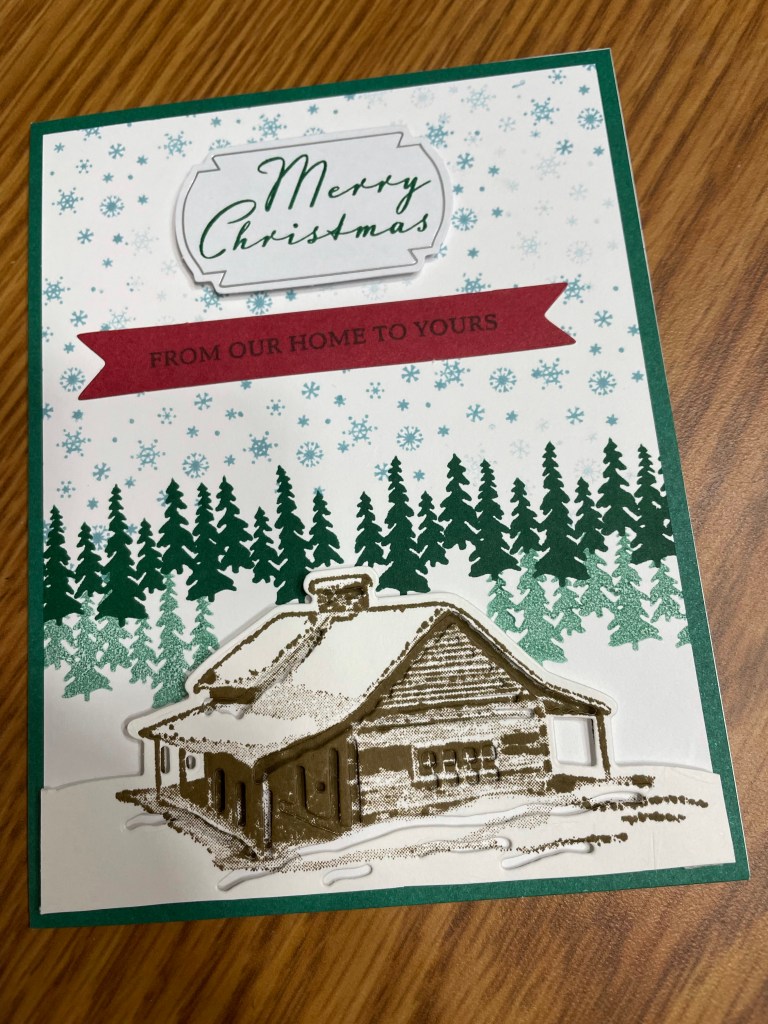
Here are a few of the alternatives I created, combining the elements of the October Paper Pumpkin Kit and the Peaceful Cabin Bundle.
I have to admit, it took a little extra thinking to put these together but I think it was worth it. I look forward to making a few more with this kit and bundle. There are so many possibilities.
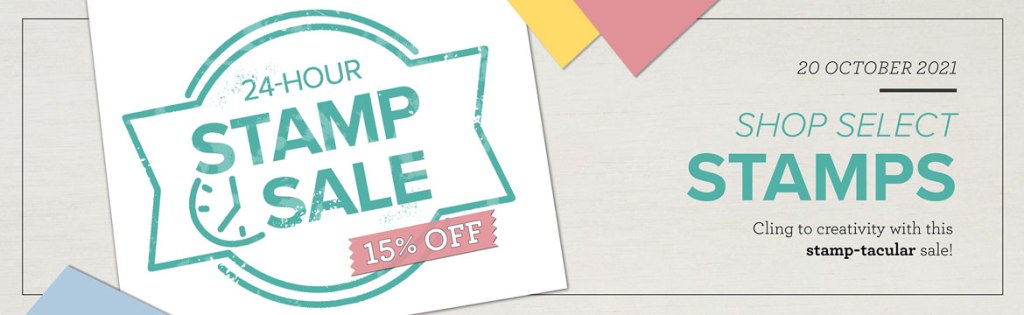
OMG! I can’t believe it! Stampin’ Up is putting their cling stamp sets on sale! This is a great opportunity to scoop up cling stamp sets that you have had your eye on. (Remember, cling stamp sets are red rubber stamps with the super sticky backing so they won’t fall off the clear block while you are stamping.) Here is the key information:
The sale will run for 24 hours.
The 15% discount will apply to select cling stamp sets only.
Every cling stamp set from the 2021–2022 Annual Catalog (excluding the Host stamp sets) will be discounted!
Want to know which stamp sets are on sale? Check out this flyer.
Which stamp sets are on your shopping list? Here are my top ten from the list:
Nature’s Beauty #150528
Sailing Home #149457
Back On Your Feet #149385
Painted Poppies #151599
Daisy Garden #155079
Spiral Dye #156927
A Good Man #149270
Daisy Lane #149325
A Wish For Everything #149320
Count On Me #155647
Wow, it was hard to limit it to ten stamp sets! These are ten stamp sets that I already own and love using. Use this link on October 20th to pick up a few sets that you will love to use. I can’t wait to see what you pick out. Leave me a comment and let me know what is on your list.
Welcome to the Stampin’ Pretty Pals’ Blog Hop! This month, the theme is “Fantastic Fun Folds and 3D projects.” We really hope that you enjoy and will be inspired by them! As you hop from blog to blog, don’t forget to leave comments because we love hearing from you. You will find the lineup at the end of my post to help you “hop” along from Pal to Pal.
I love Fun Folds! As much as I love simple cards, fun folds trigger my love for origami. I also love the challenge of putting them together. The problem is, I can’t create an original one. For that reason, I practice a tried and true papercrafting practice – CASE! CASE stands for Copy and Share Everything (or Everyone) and is part of the fun of papercrafting. It allows us to be creative and not get stopped when we can’t think of what to do. Seeing other people’s creations gives us ideas and allows us to create. So, I hope viewing my blog or someone else’s gets your creative juices flowing. Now, how about we look at my fun fold for this blog hop?
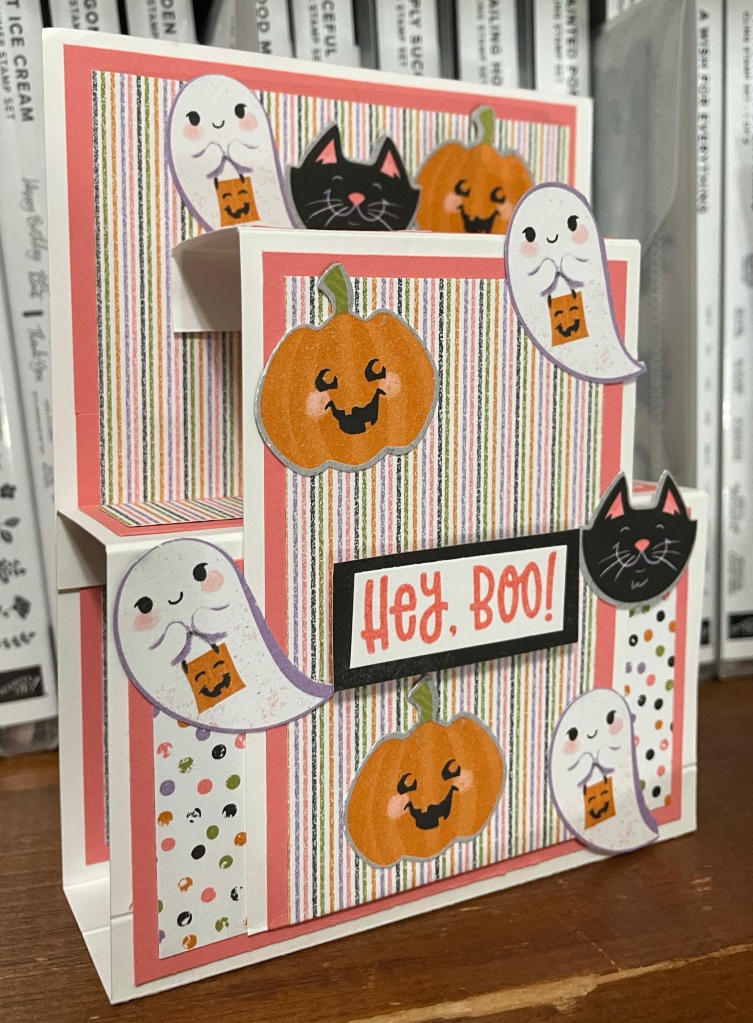
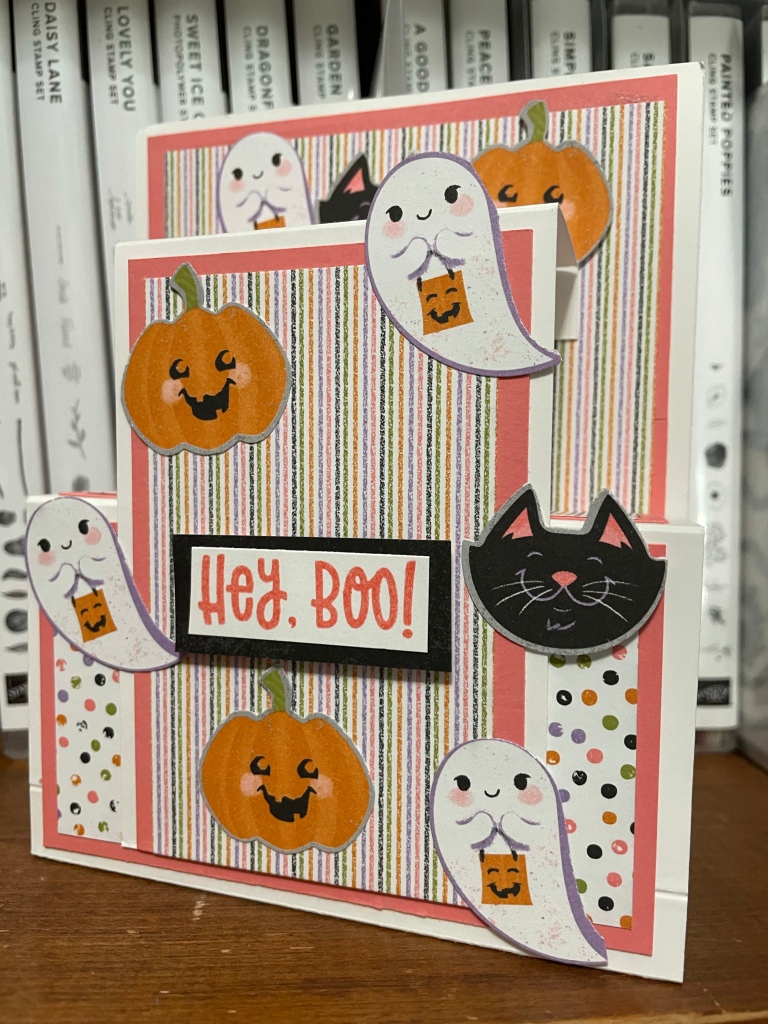
For this project I created a Pop Up Step Front Panel Card. While I saw multiple versions that I loved, I used instructions from Teresa Milke Steinman at Stamping with Teresa. You can find her version here. I made a few changes so it would be a 4 1/4″ x 5 1/2″ card to mail. I picked this card design because I wanted to create a card that could double as Halloween decoration for my daughter. She is living on her own and still looking for items to decorate her apartment. I chose the Cute Halloween DSP because I love the colors and the patterns. It is a great combination of Halloween and all-purpose patterns. The stripes and dots make a great background paper. Plus there are cute images to punch out with the Halloween Punch. While this DSP has traditional Halloween colors like Basic Black, Pumpkin Pie and Basic White, it also has a few “out there” colors like Old Olive, Highland Heather, and Flirty Flamingo. This last color was what I chose for my cardstock and ink, a real stretch for me. Halloween and Pink? I really had to convince myself that it was okay. Finally, I chose the “Hey, Boo!” from the Cutest Halloween stamp set. I love how it sounds and it fits my daughter. Plus it seemed like a great choice for a card that will double as a decor piece.
As I mentioned, I changed the dimensions to create a 4 1/4″ x 5 1/2″. Here are the card pieces I used:
Basic White: 4 1/4″ x 11″ scored on long side at 1/2″, 1 3/4″, 4 1/4″ and 5 1/2″; 5 3/4″ x 2 3/4″ scored on long side at 1/2″ and 1 3/4″; 1 1/2″ x 1/2″ strip for sentiment
Flirty Flamingo: 4″ x 5 1/4″, 2 1/2″ x 4 1/2″, 4″ x 2 1/4″, 4″ x 1″, and 2 1/2″ x 1″
DSP: 3 3/4″ x 5″, 2 1/4″ x 4 1/4″, 3 3/4″ x 2″, 3 3/4″ x 3/4″, 2 1/4″ x 3/4″(this is the black on the top of the box), 2″ x 1/2″ and 1 3/4″ x 3″ (this is under the sentiment)
More inspiration awaits, so use the lineup below to visit the rest of the Design Team. The Pals are excited to show you what they’ve created! Then, please mark your calendars for our next blog hop on November 10th. Our theme will be “Home for the Holidays” when our Design Team creates a project to celebrate the upcoming holidays. Until then, have fun in your craft space.
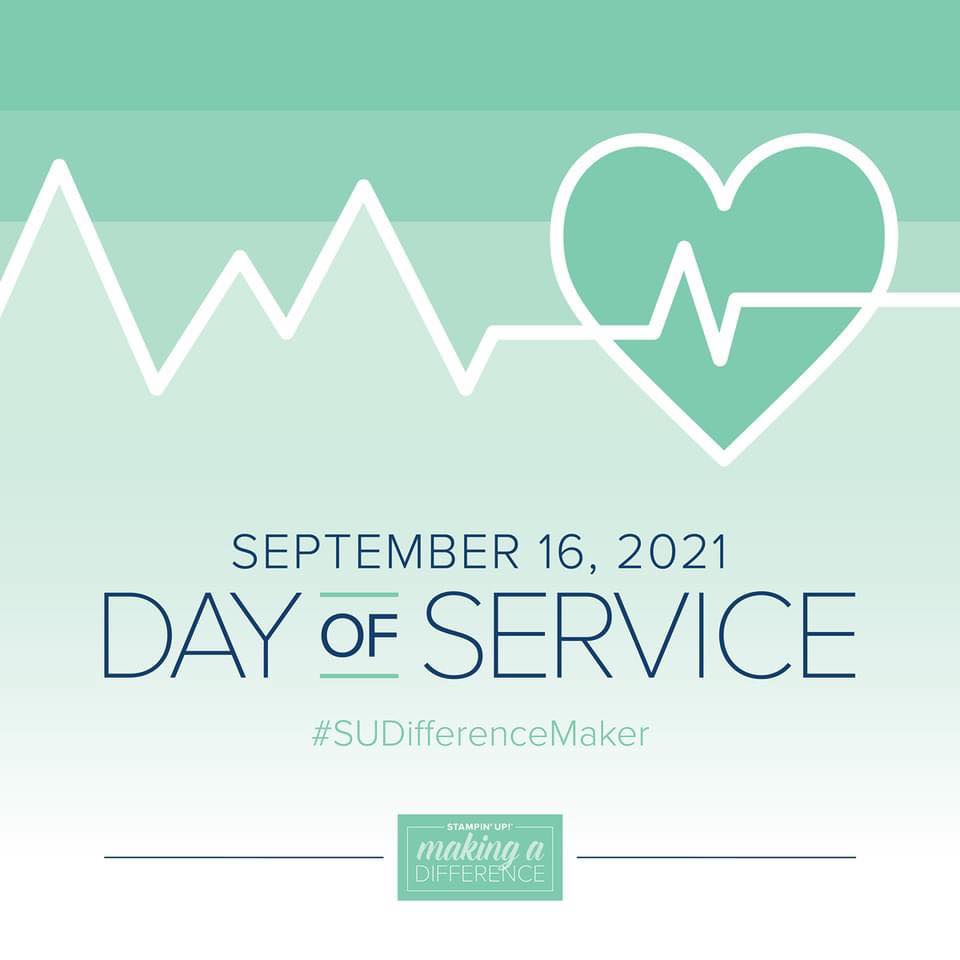
I love making cards, but I love it even more when I can make a difference in someone else’s life. For that reason, I jumped at the chance to make cards on Stampin’ Up’s Day of Service to benefit heart health and the health care workers that work in cardiac care.
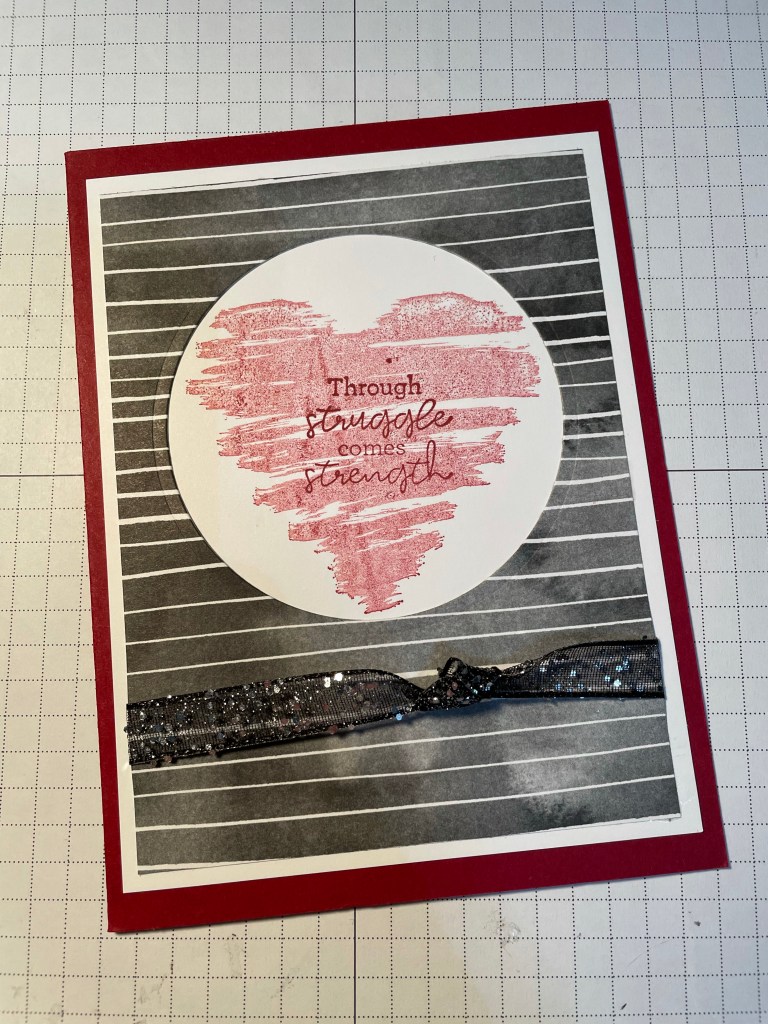
I created two cards using the Strong of Heart stamp set. For each stamp set purchased, Stampin’ Up will donate $3 to support heart health.
For the first card, I chose Cherry Cobbler ink and cardstock for the card base (8 1/2″ x 5 1/2″, scored at 4 1/4″). I stamped off the heart image twice on Basic White (5 1/4″ x 4″) before adding the sentiment. I thought it was a nice way to play with the sentiment by using the same color for the sentiment and image but stamping the sentiment full strength. I then cut a circle out of the Beautifully Penned Designer Series Paper, available through September 30 with during Sale-a-bration. I tied it all together with a piece Black Glittered Organdy Ribbon.
For the second card, I chose Poppy Parade ink and cardstock. It is a little brighter red than Cherry Cobbler. I embossed the piece of Poppy Parade (5 1/4″ x 4″) with the Painted Texture 3D embossing folder. It is amazing how much a little texture can add to a card. I mounted that piece on a Very Vanilla card base (8 1/2″ x 5 1/2″, scored at 4 1/4″). I stamped the heart and flower image on a piece of Very Vanilla cardstock using Memento Tuxedo Black ink. After it was dry, I used Light and Dark Poppy Parade and Light and Dark Granny Apple Green Stampin’ Blends to color in the flowers. I punched the corners using the Detailed Trio Punch. I stamped the sentiment in Poppy Parade on a 1/2″ strip of Very Vanilla cardstock and punched the ends with the Treasured Tags Pick a Punch. It is interesting how the two different punches gave the same rounded look. Finally, I added a little bling with the Rhinestone Basic Jewels. I am not much of a bling person but it different adds to the card.
I would love to know what you think of the card, Please leave a comment with your thoughts. Don’t forget to take advantage of Sale-a-bration by September 30, 2021!
Welcome to the NC Demos Blog Hop! We are so glad you are here! You might have already stopped by Jo Anne Hewins’ post and know this month’s theme, but if you are just popping in this month’s them is Trash to Treasure!
Let’s face it. Crafters are hoarders. We can’t bear to throw out little pieces of paper, ribbon, packaging, boxes, tins, buttons or ANYTHING we think would be useful, which is pretty much EVERYTHING!
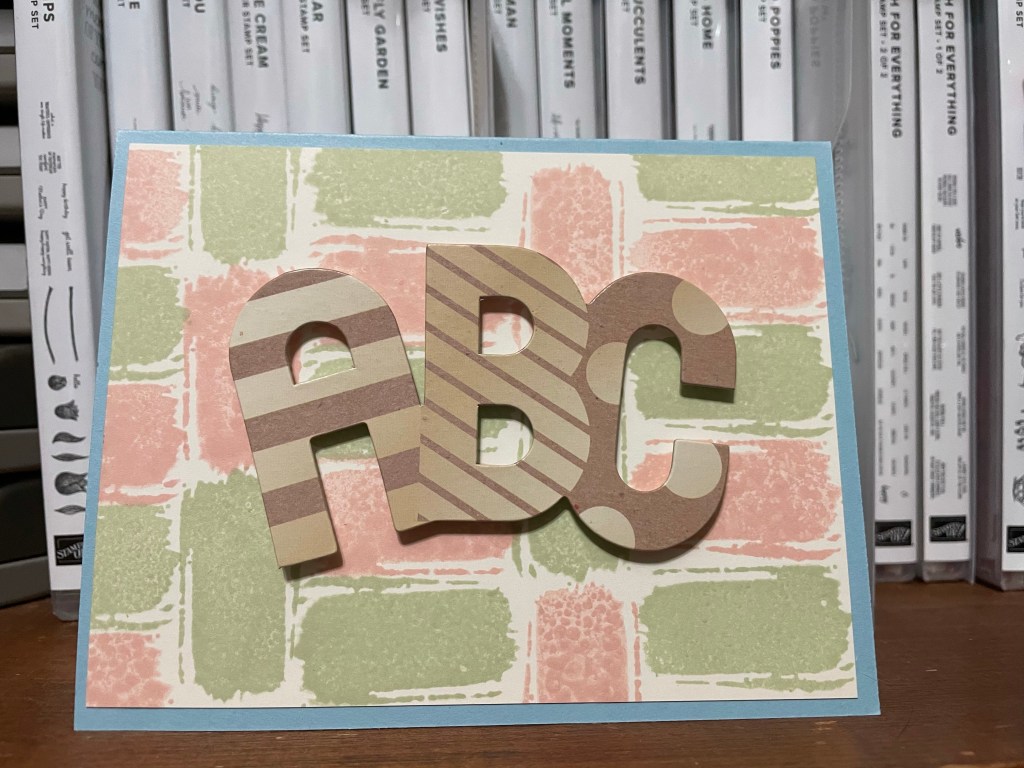
Recently I was cleaning off my large oak teacher’s desk. Our desktop computer died and we removed it, leaving dust and lots of little things. Amongst those little things was an ABC die cut. I don’t know where it came from or how long it had been there. I was about to throw it away when I remembered this blog hop as well as a fellow papercrafter that is having a baby soon. This ABC die cut was perfect for a baby card. I pulled out the Textures & Frames stamp set from Stampin’ Up, available as a free item during Sale-a-bration. At first I didn’t know how to use this stamp set. There weren’t images or sentiments that were easy to use. Finally it dawned on me that they images were perfect to created background images. I can totally create my own DSP with these stamps! I grabbed a 4″ x 5 1/4″ piece of Very Vanilla cardstock and stamped with Blushing Bride and Soft Seafoam inks, alternating colors and direction of the stamp. I mounted the ABC diecut on that piece using mini dimensionals and then mounted it on a 8 1/2″ x 5 1/2″ piece of Balmy Blue cardstock, scored at 4 1/4″.
Thank you for letting me share my project. Please stop by and see Tracie Evans Langley’s post. I know it will be great!
Welcome to the Stampin’ Pretty Pals’ Blog Hop! This month, the theme is “Sentiment as a focal point.” We really hope that you enjoy and will be inspired by them! As you hop from blog to blog, don’t forget to leave comments because we love hearing from you. You will find the lineup at the end of my post to help you “hop” along from Pal to Pal.
Stampin’ Up produces so many beautiful images, it is hard to imagine not using any on a card. The truth is, Stampin’ Up also creates just as many beautiful sentiments. The fonts are varied and stunning. As I mentioned in a previous post, when I saw the “In Your Words” stamp set, I fell in love. While initially I had to have this host set from Sale-a-bration because of one sentiment, the more I look at the set, more sentiments catch my eye. Recently my daughter called after a tough week at work. After the call, I looked at this set to work on a different card, but the sentiment “Life is full of ups & downs / hold on tight” jumped out at me. I knew I had to make her card with this sentiment. No need for lots of images of embellishments, I wanted the sentiment to do its thing. I did decide to use a simple piece from the Cute Halloween 6×6 DSP. I cut a 4 x 5 1/4″ piece and attached it to a Highland Heather card base (5 1/2″ x 8 1/2″, scored at 4 1/4″). I stamped the sentiment in Highland Heather on a piece of Basic White and trimmed the ends with the Lovely Labels Pick a Punch. I attached the sentiment with dimensionals and Voila! A simple card focused on the sentiment.
I looked at the leftover pieces of the 6×6 DSP and just had to make one more card. I did step this one up a little more, but still no stamped images. I used the Painted Textures 3D embossing folder on a piece of 4″ x 5 1/4″ Basic White and attached it to the Highland Healther card base. I then cut the leftover strip of DSP and ended up with two pieces – 2″ x 2″ and 2″ x 4″. I flipped the 2″ square over to the black and white side and attached both pieces to the embossed piece. Once again I stamped the same sentiment with Highland Heather on Basic White and trimmed the ends with the other option on the Lovely Labels Pick a Punch. I would love to know if you think the focus is still on the sentiment on this stepped up card.
Stampin’ Pretty Pals Blog Hop
More inspiration awaits, so use the lineup below to visit the rest of the Design Team. The Pals are excited to show you what they’ve created! Then, please mark your calendars for our next blog hop on October 13th. Our theme will be Fantastic Fun Folds and 3D Projects when participants showcase fun fold cards or 3D items that will be great for any occasion. Until then, have fun in your craft space.
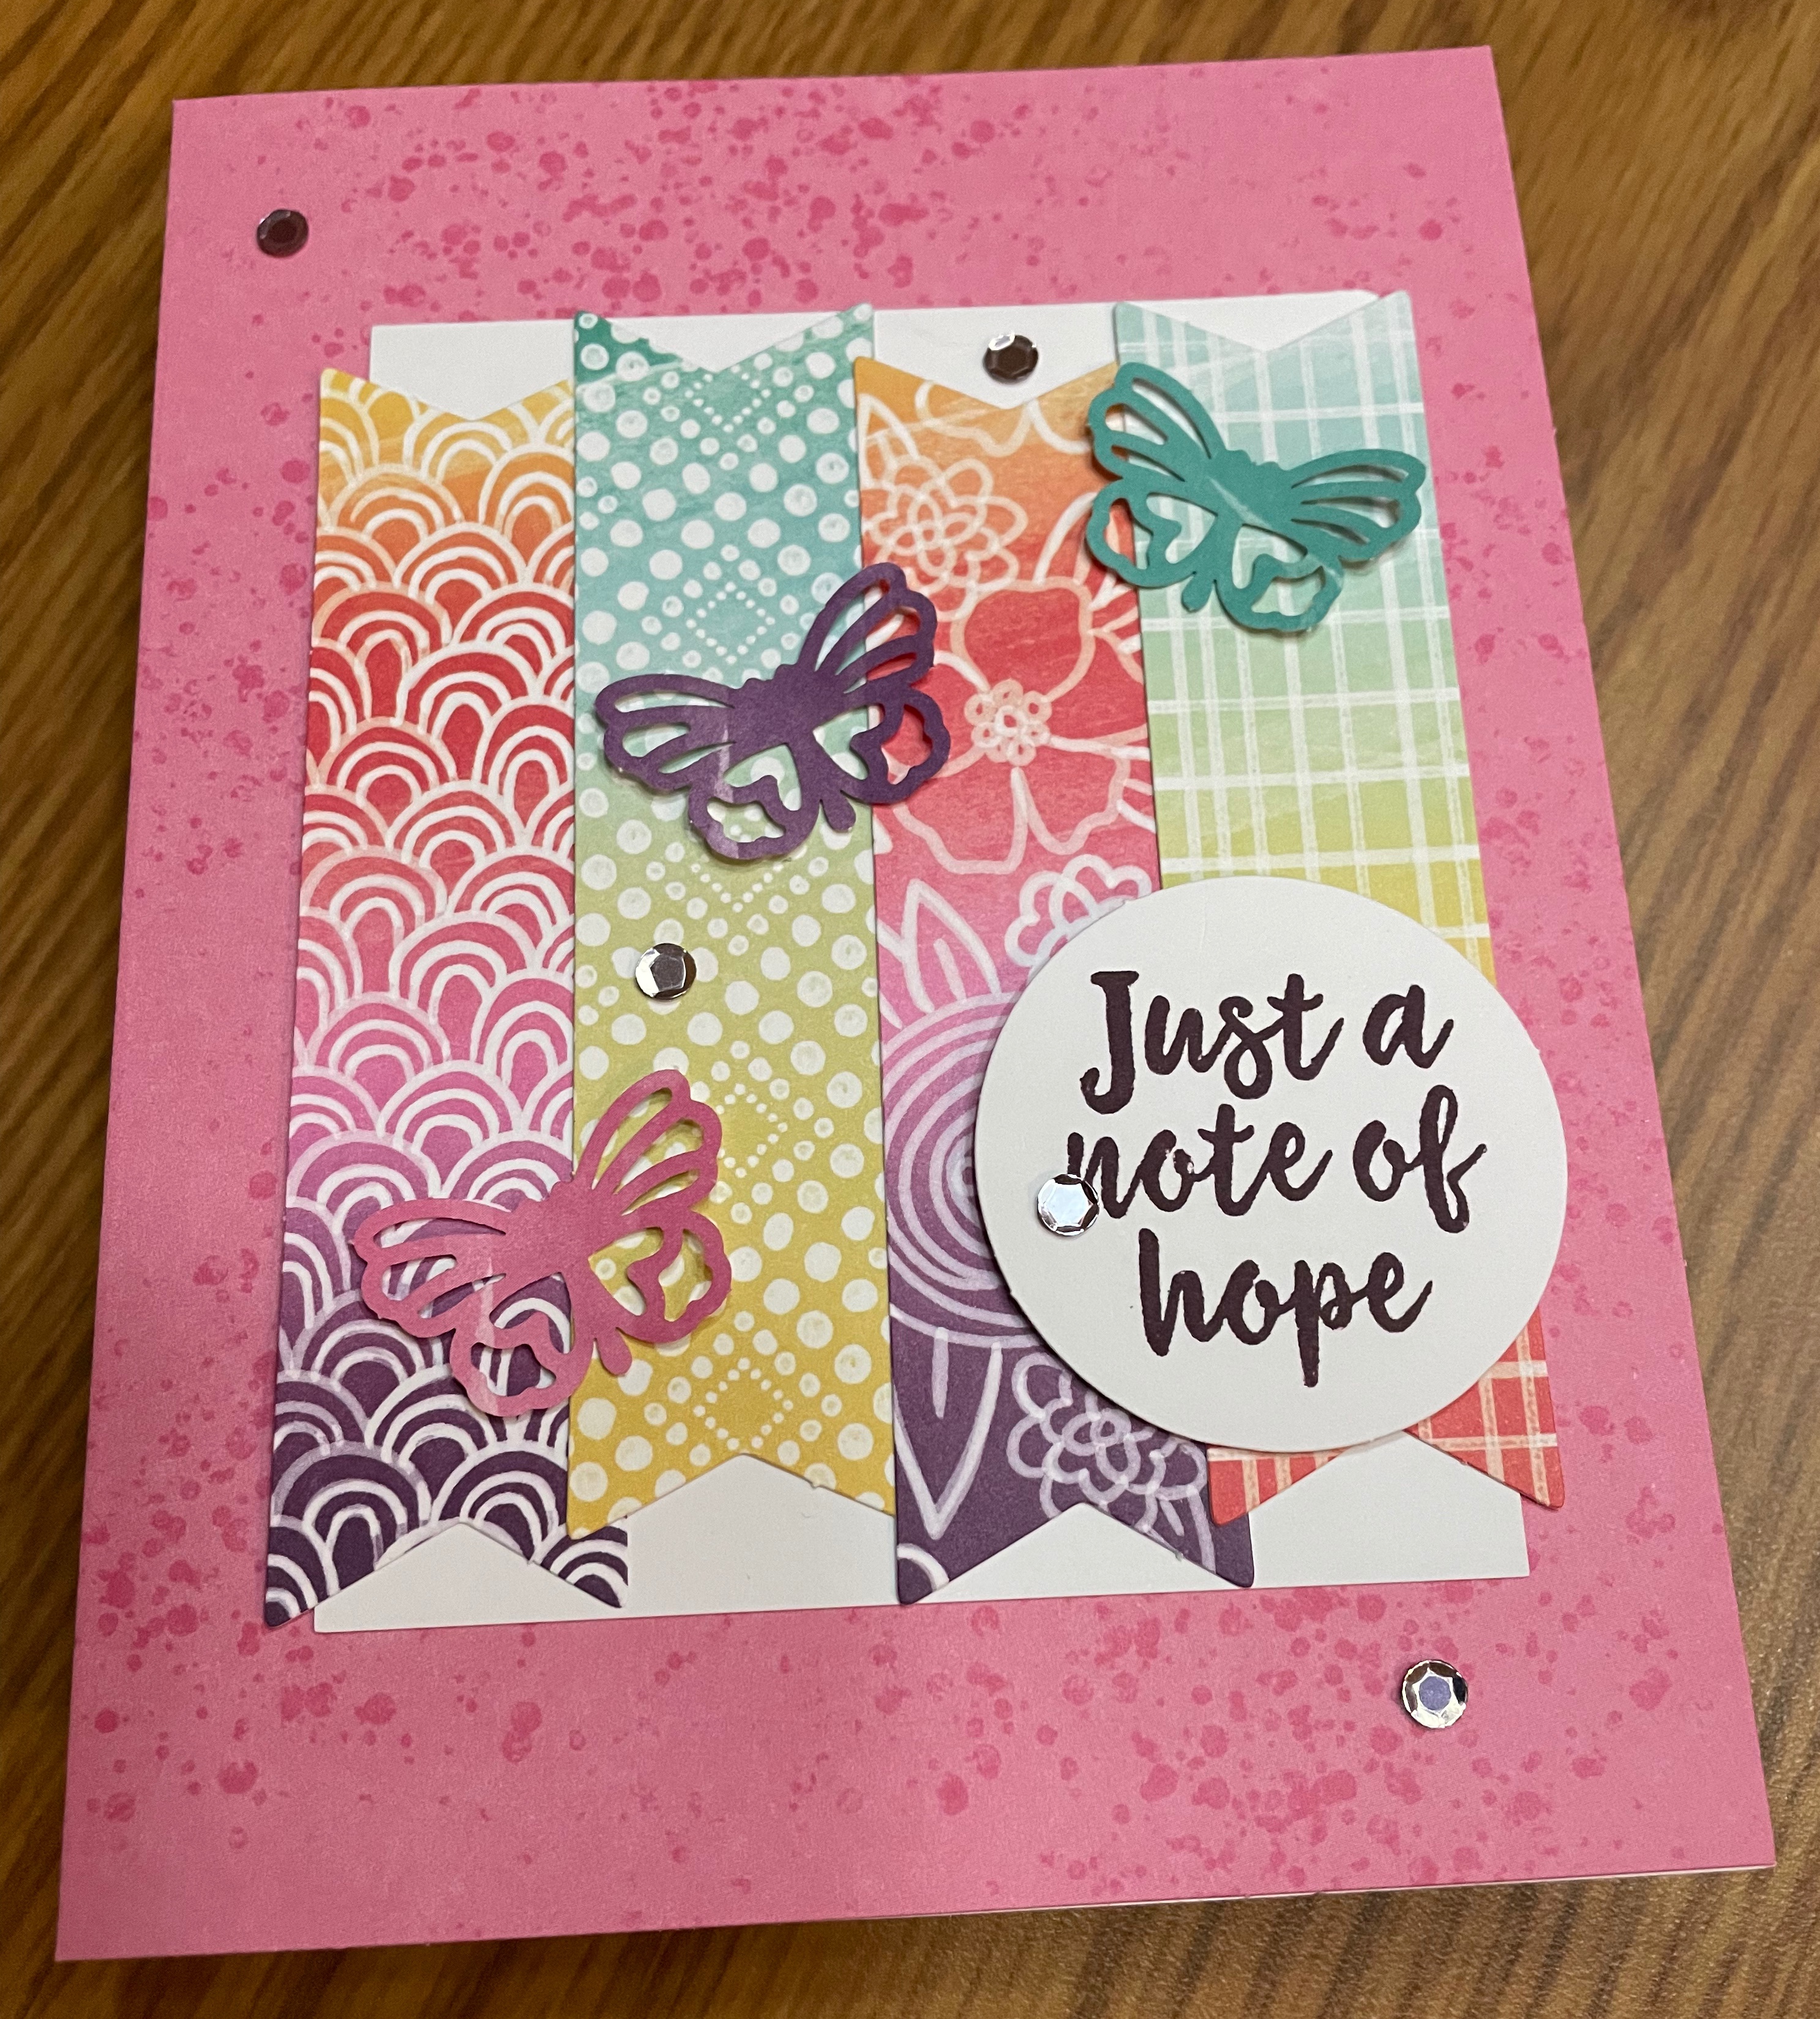
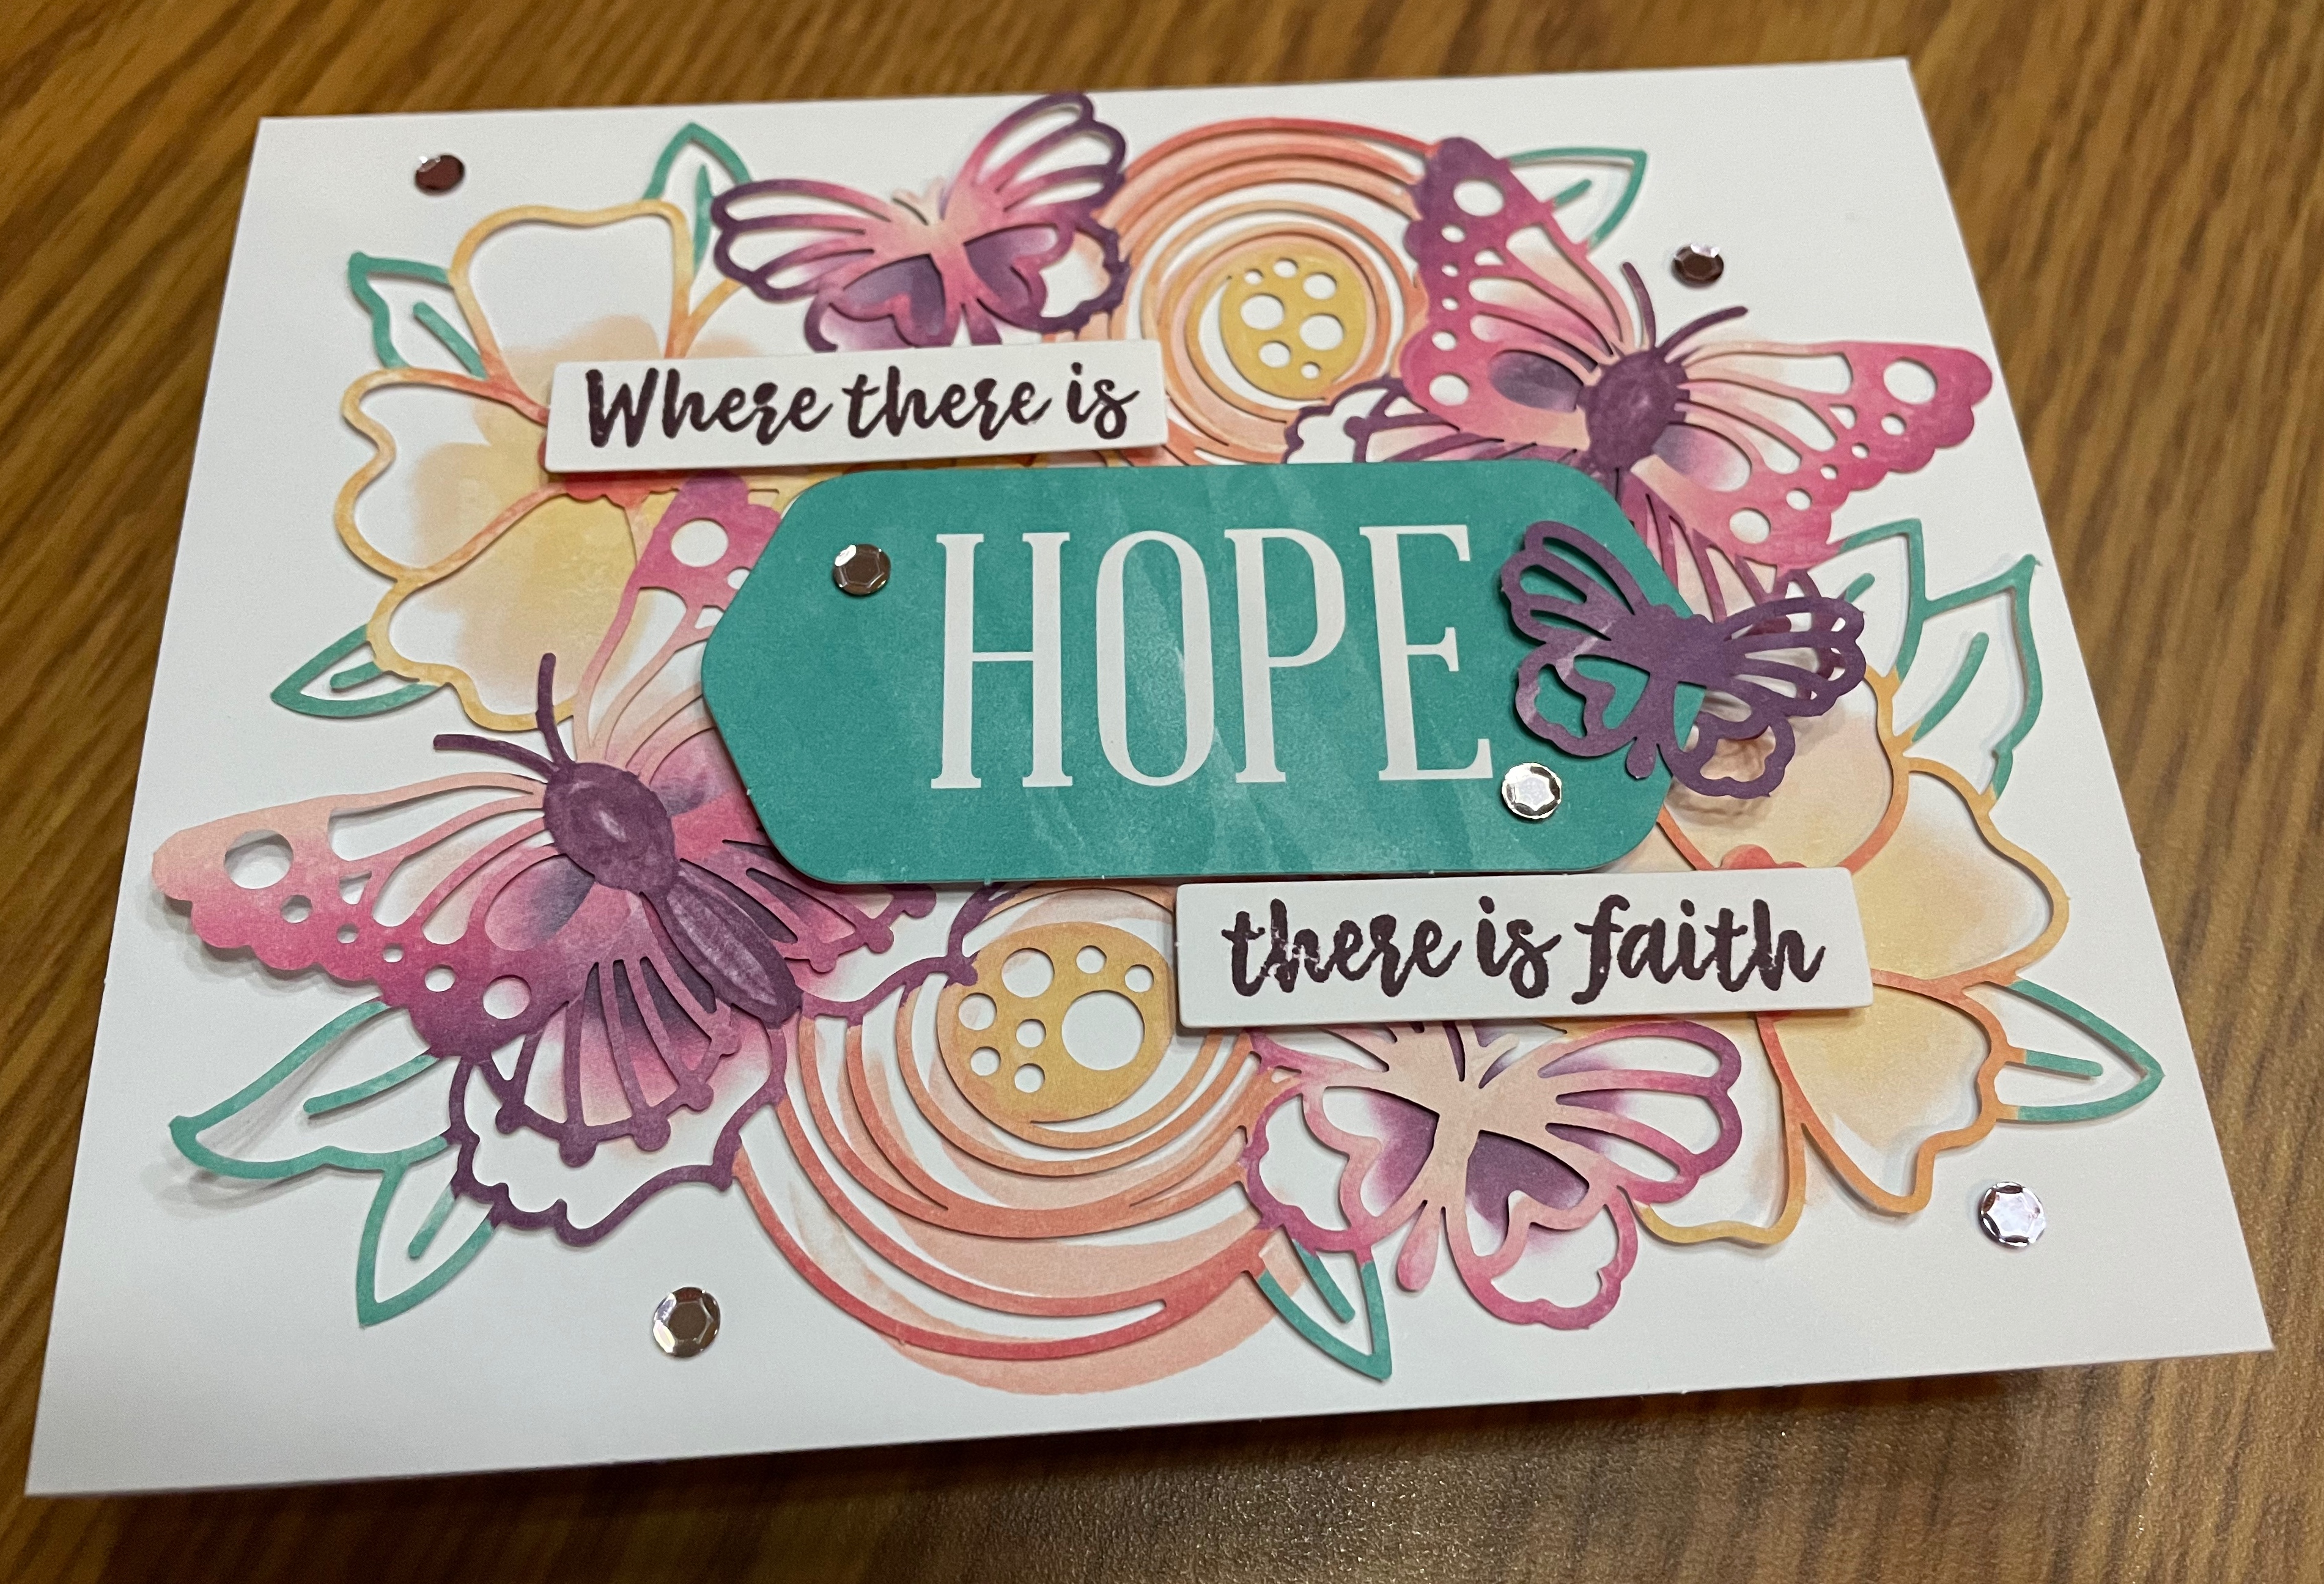
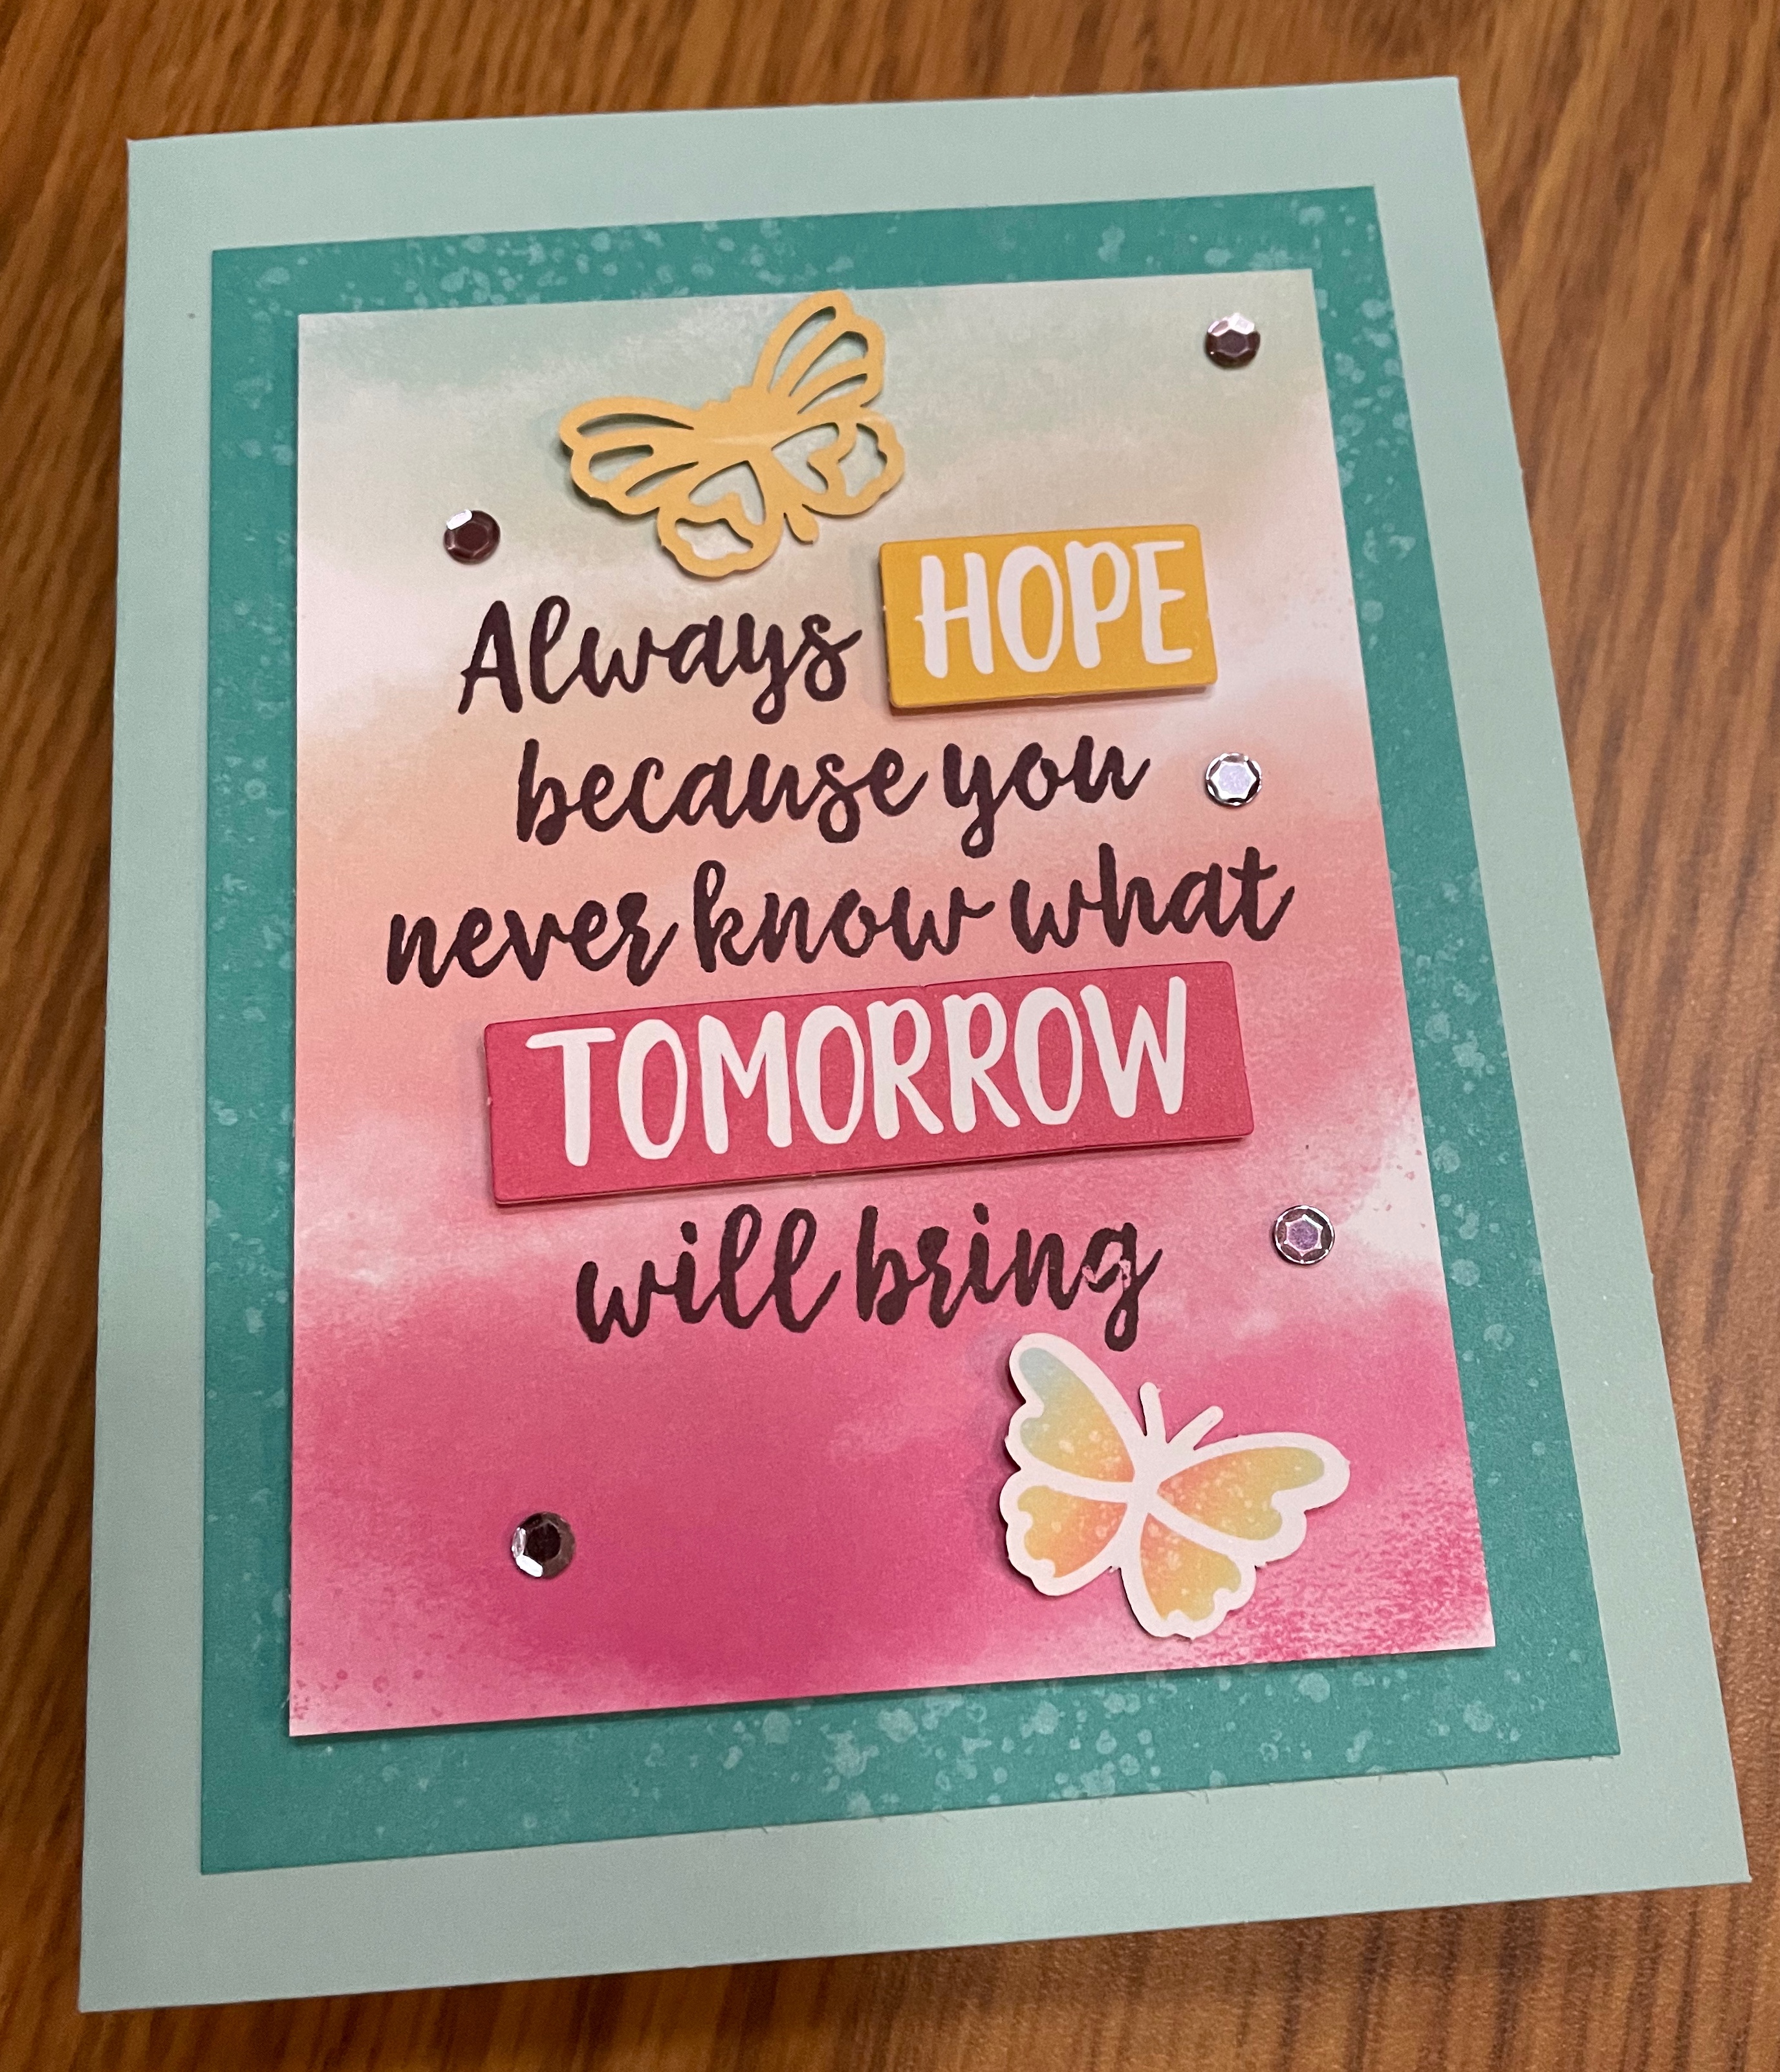
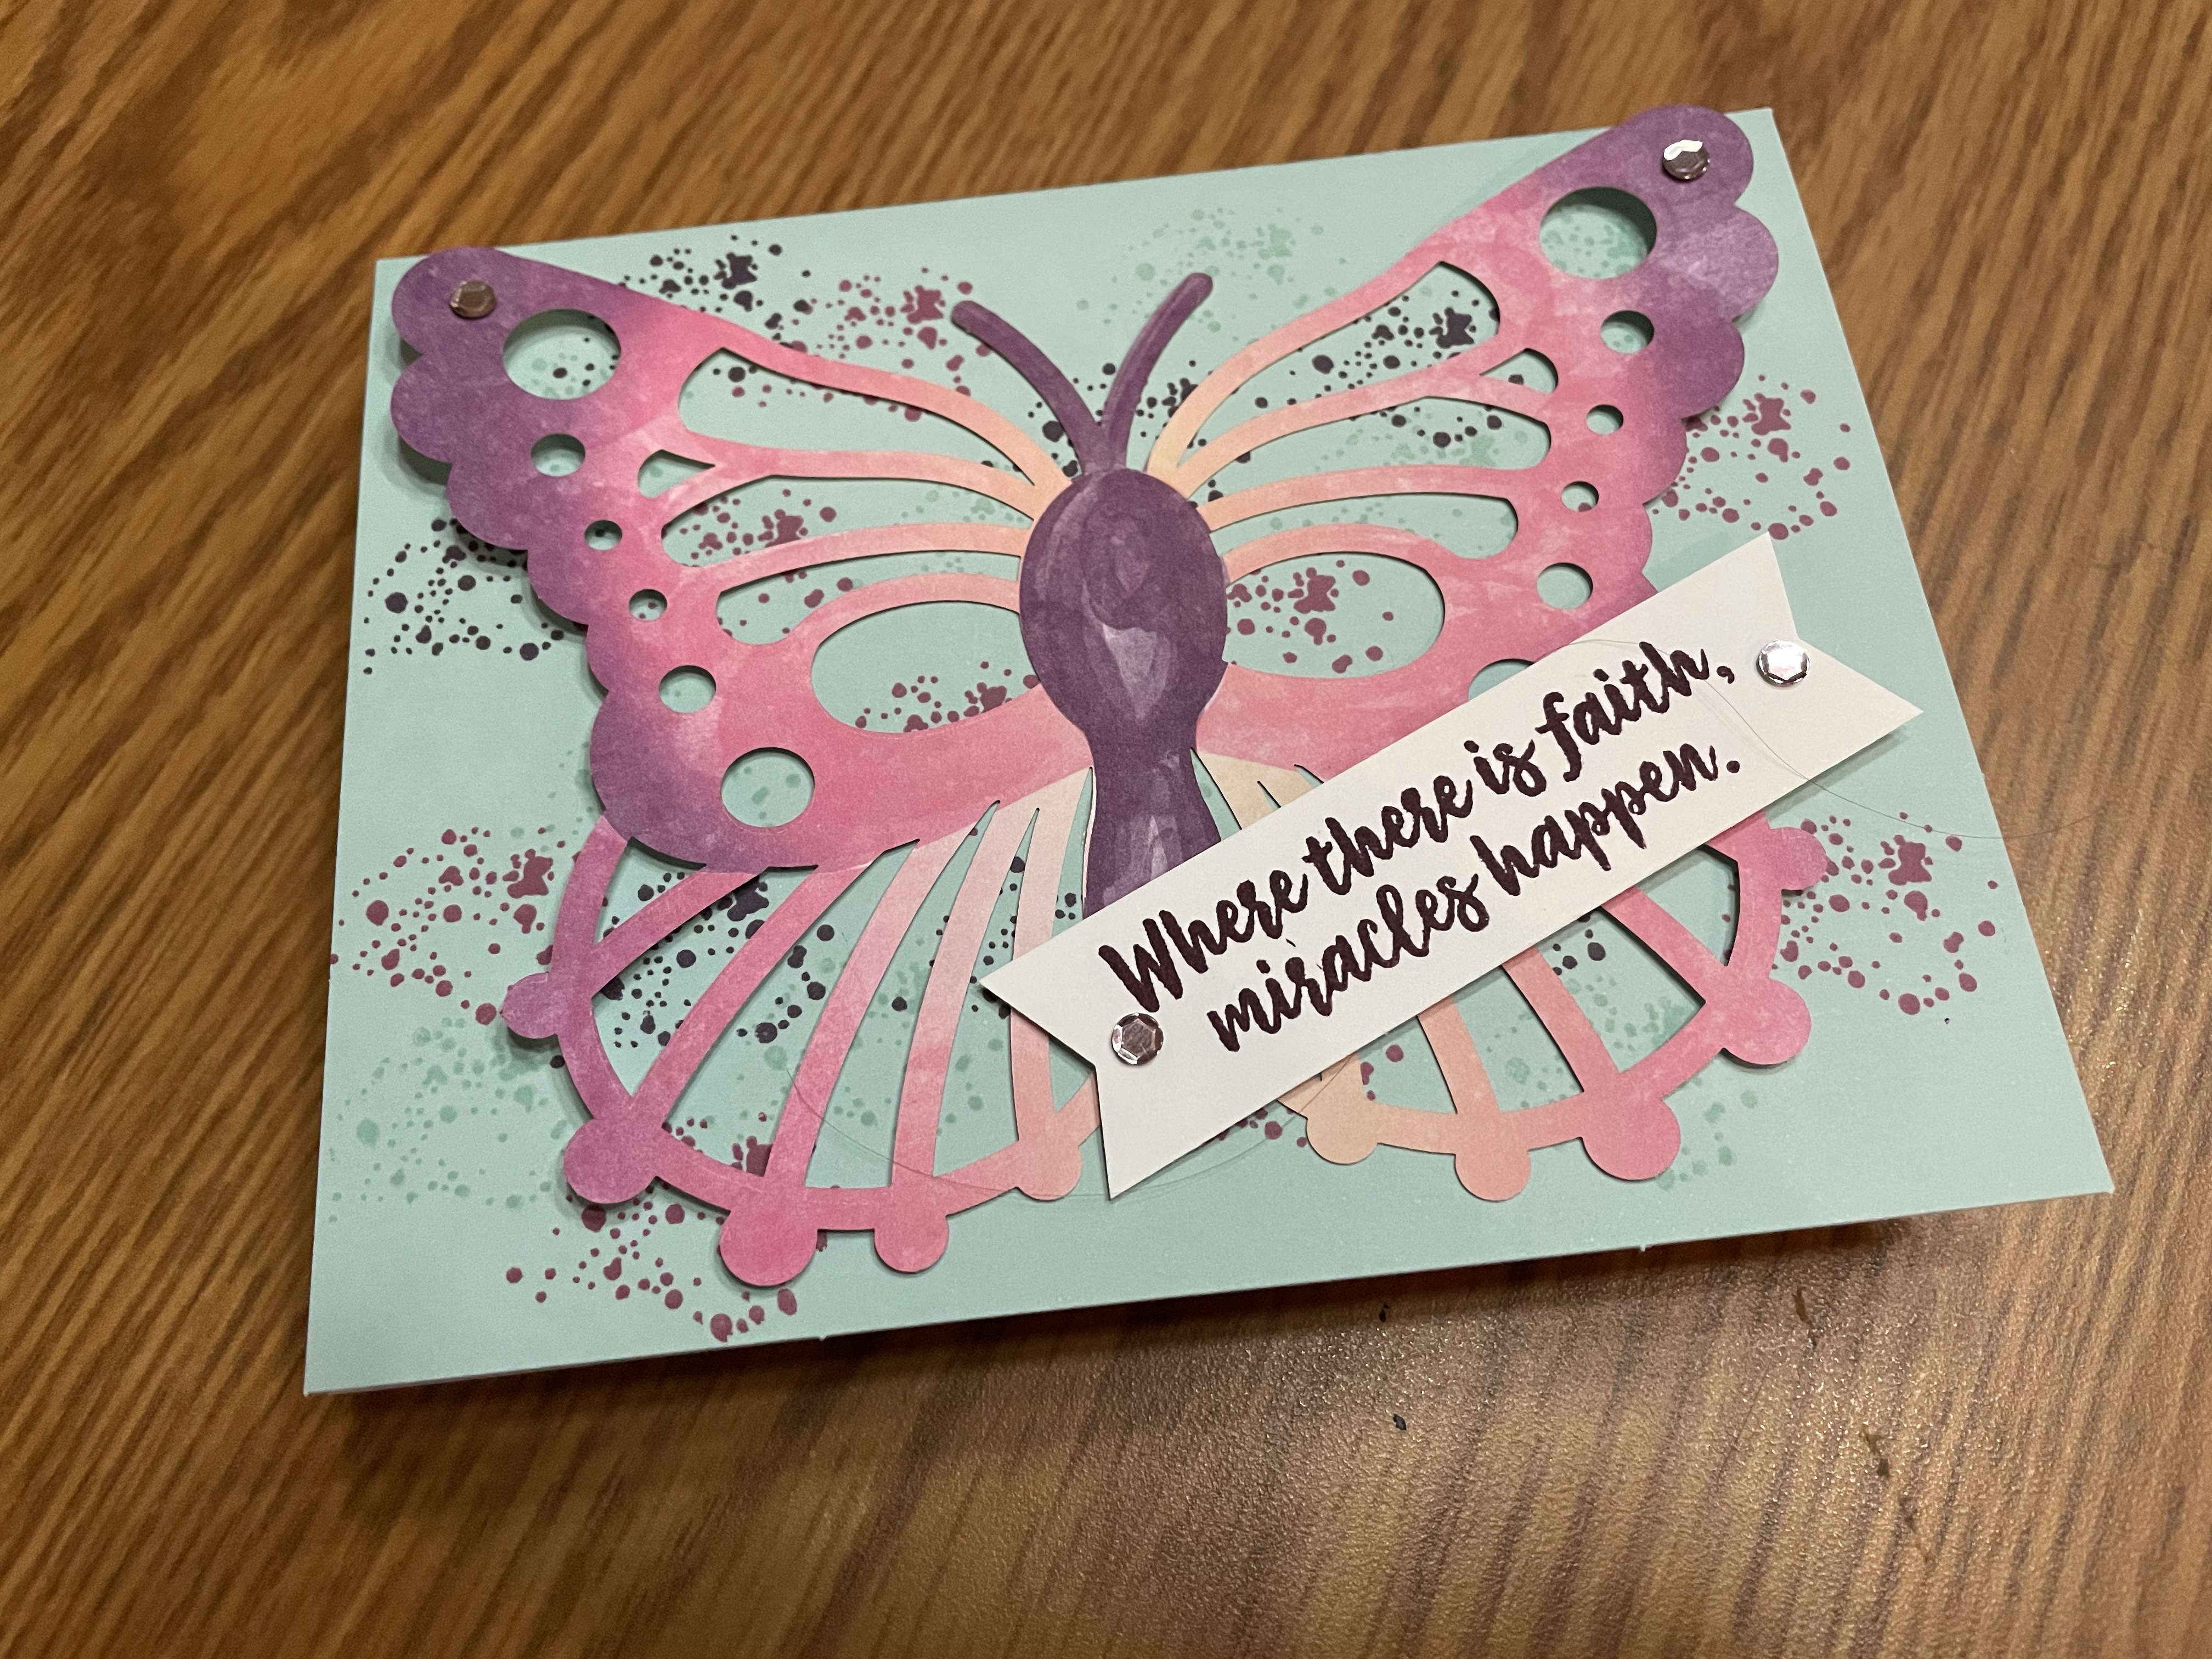
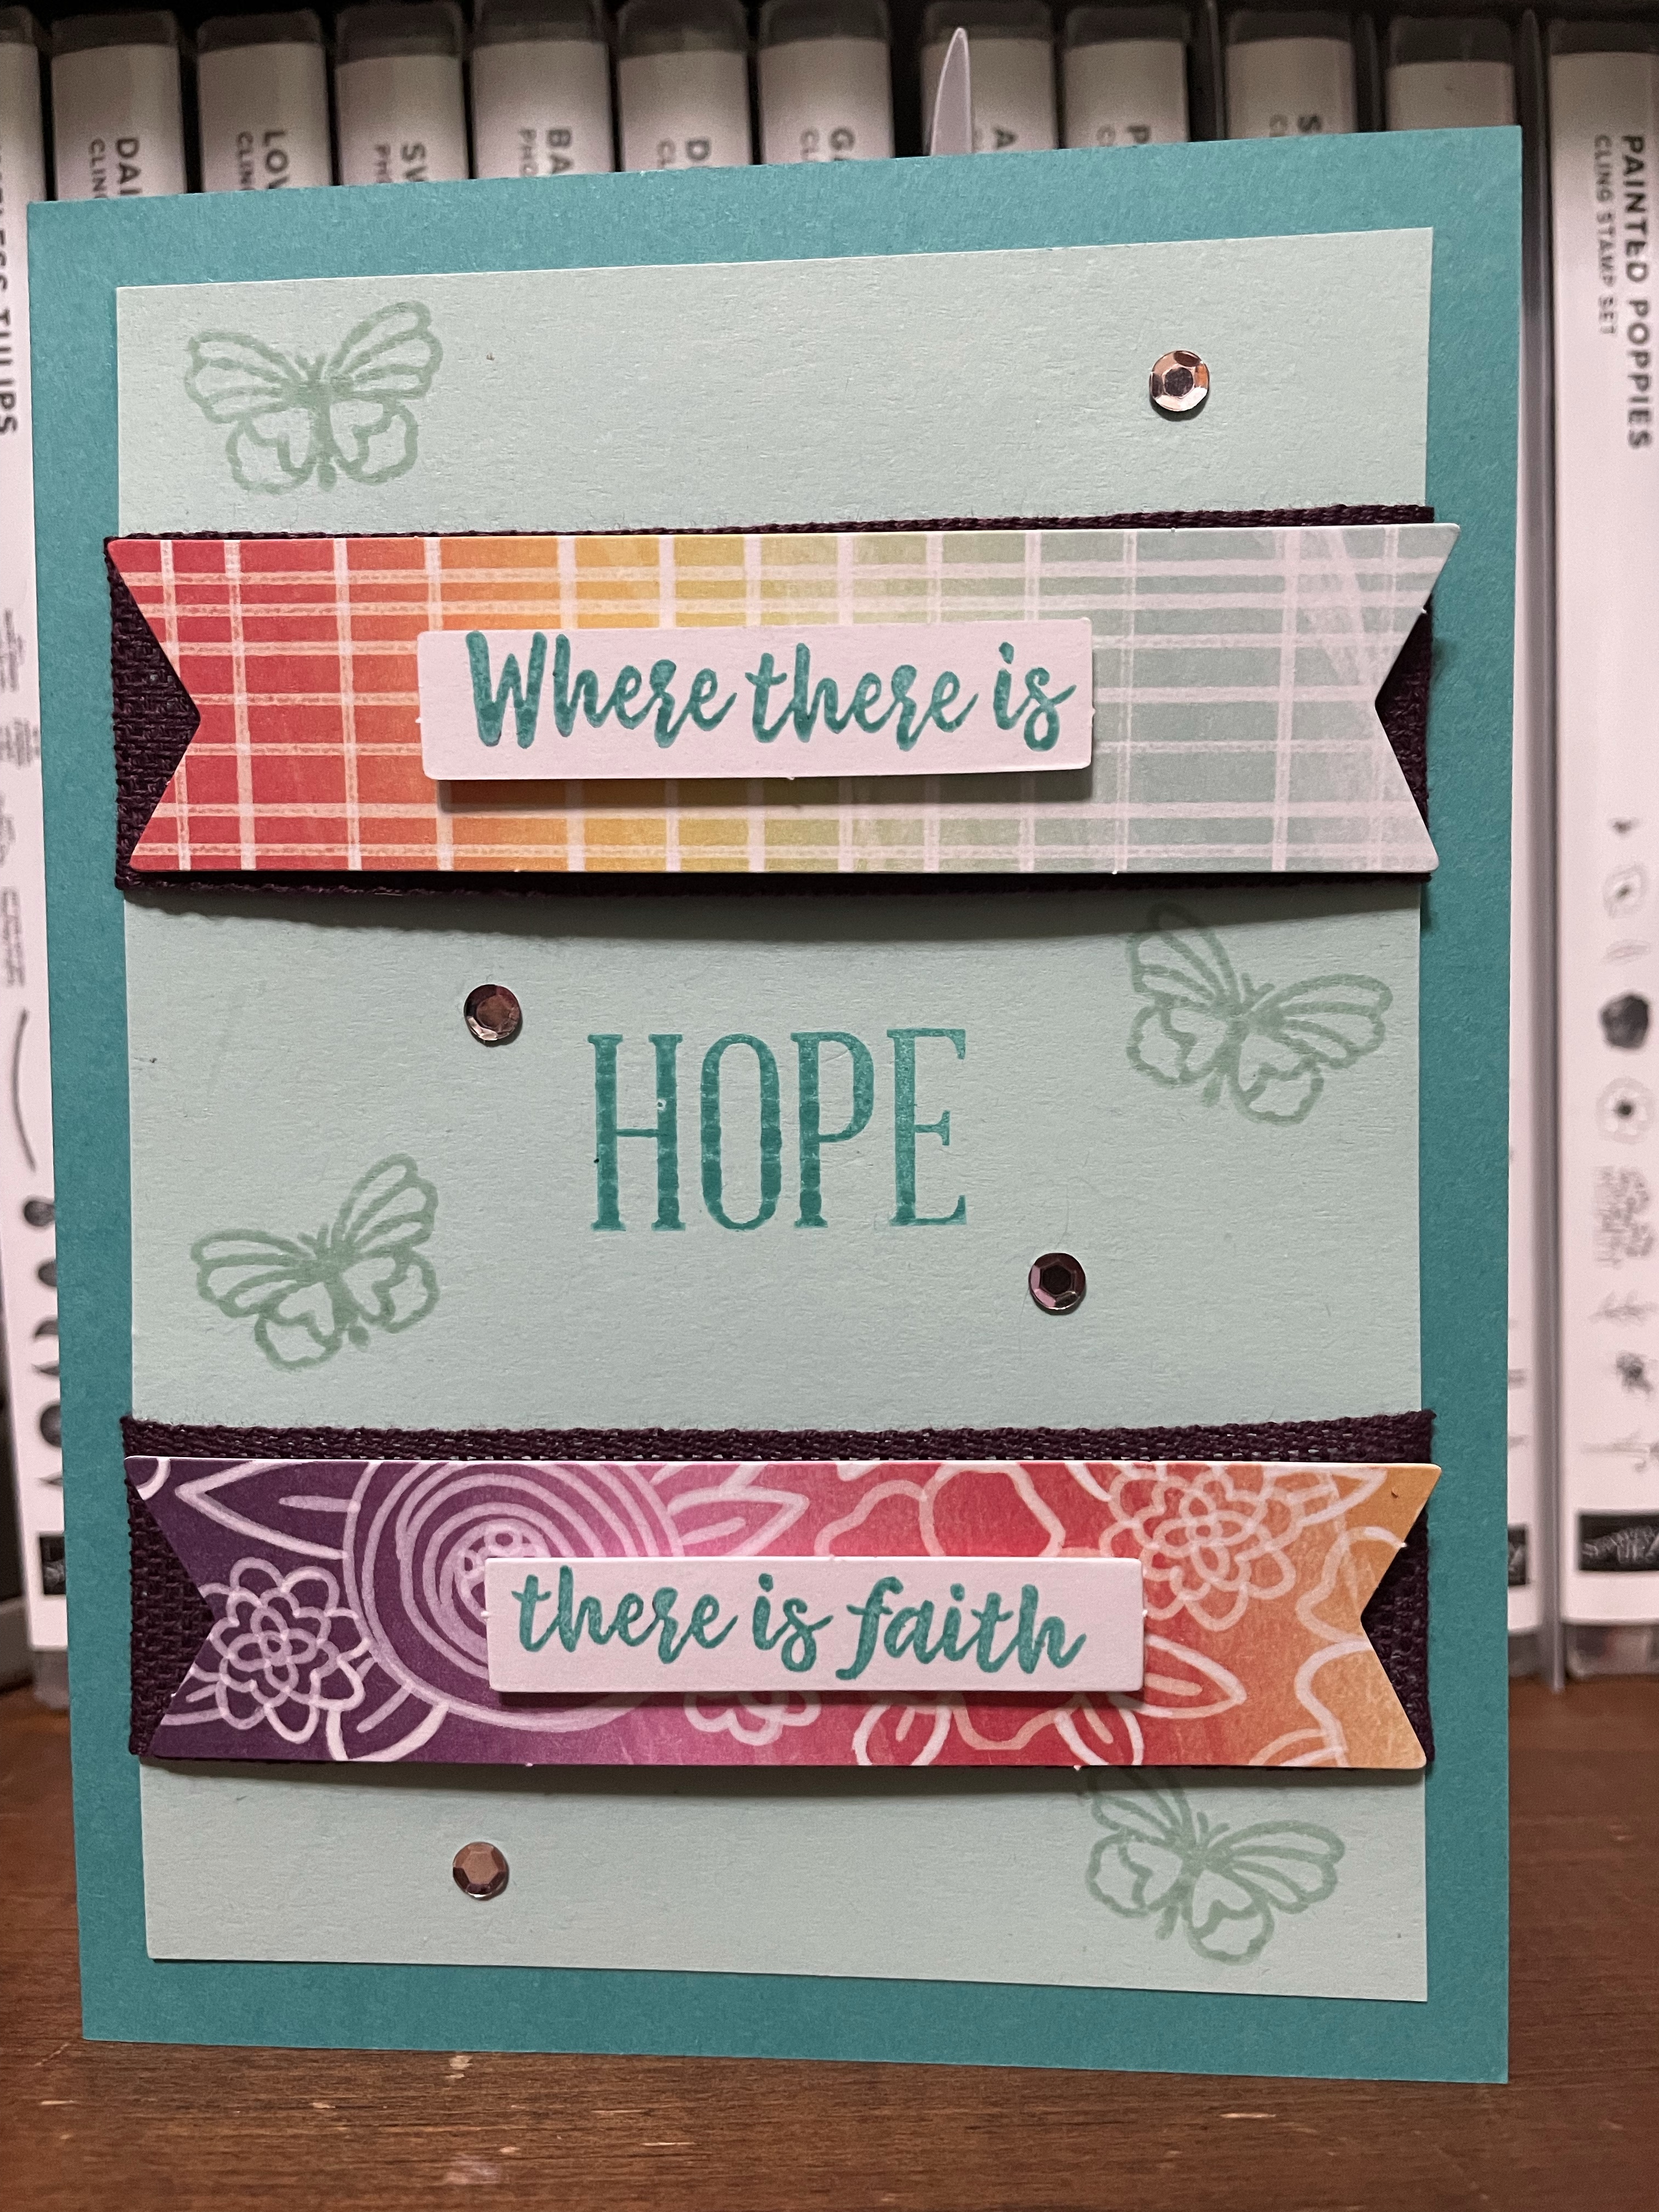
The August 2021 Paper Pumpkin kit was one of the special kits that Stampin’ Up periodically offers. It was the Hope Kit from Shelli. It contained many of my favorite colors – Bermuda Bay, Pool Party, Melon Mambo, Petal Pink, Blackberry Bliss – as well as one of my favorite elements – butterflies!
August 2021 original designs
After putting together one set of cards as designed, I started creating alternatives. This is what I love about Paper Pumpkin. I was able to put together pre-designed cards when I am tired and just need some crafting therapy. Then when I am rested and have some extra time, I can use the elements and put my creativity to work. I still have a finite quantity of supplies so it is not as overwhelming as my whole craft room but just enough to create new alternatives.
August 2021 Alternatives
I hope you will join me for my next Paper Pumpkin evening on September 30 at 7pm EDT. Here is the link if you want to RSVP. We will put together the Haunts & Harvest kit. Have you subscribed for this month? If not, make sure you do so by September 10th. Here is the link if you need to start a subscription.
I love giving my students and fellow staff at my school a birthday card on their birthday, if they celebrate. It was tough last year when we were remote and I didn’t have addresses for other staff. I was able to send cards to my students but it felt incomplete. This year I was excited to start sending cards but had to wait until I was given the list. August came and went with no list. When I finally received the list on September 1, I had to switch to belated birthday cards. Fortunately, my new favorite set, “In Your Words”, had just the sentiment.
In Your Words # 156619
Because our school colors are red and black, I chose Real Red for the card base (8 1/2″ x 5 1/2″, scored at 4 1/4″). I then selected the Beautifully Penned Designer Series Paper from the Sale-a-bration brochure and cut a 4″ x 5 1/4″ for a card front. I stamped the sentiment on Basic White cardstock with Real Red ink and cut it out with the Tailor Made Tags. I love stitching around the edge of the tag. I then tied on a piece of Black & White Gingham Ribbon as a little embellishment.
I loved that I was able to give cards to the six staff members that I missed for August. Hopefully I won’t miss any more birthdays this year but if I do, I’m ready.
Product List
In Your Words stamp set #156619
Tailor Made Tags #155563
Black & White Gingham Ribbon #156485
Real Red cardstock #102482
Basic White cardstock#159276
Beautifully penned Designer Series Paper #156630
Real Red Classic Stampin’ Pad #147084
I hope that you enjoyed this card. Do you want this host stamp set? It is only available during Sale-a-bration and only with a qualifying party order of $300 or more. I can help you set up an online workshop or party to earn this set. We must act quick as this set is only available until September 30.
Welcome to the NC Demos Blog Hop! We are so glad you are here! You might have already stopped by Tina’s post and know this month’s theme, but if you are starting here, this month’s theme is Everything But The Kitchen Sink.
My kitchen is gray. It wasn’t my choice but that is what was here when I bought the house. I grew up with wood cabinets so it took me awhile to adjust to gray cabinets. For one, I wasn’t sure what color appliances to get – white? black? definitely not almond or beige!
For this card I wondered what the Spiral Dye stamp would look like if I only used grays. After all, tie dye is known for bright color combinations. I have rinsed out plenty of Tie Dye in my kitchen and always worry that the dyes will stain my gray countertops. So far, so good, but I digress. There are a few scratches as you can see behind the card in the photo.
I chose to stamp with Basic Gray and Smoky Slate. The Spiral Dye stamp is a background stamp which means it is quite large. Since I wanted to make sure I got a good image, I pulled out my Stamparatus. This would allow me to restamp in the same place if an area didn’t get enough ink the first time. One thing to keep in mind is that the Spiral Dye stamp is designed to have lighter and darker spots just as a real tie dye item would have. I stamped first with Basic Gray on a 4″ x 5 1/4″ piece of Basic White. The stamp is larger than the piece of cardstock which ensures that the image fills the piece. I then turned the piece of cardstock 180º and stamped in Smoky Slate. the resulting image has lots of variations of gray. I then stamped the sentiment from the In Your Words stamp set in Basic Gray and trimmed the ends with the Pick a Banner punch. The final touch was Gray Granite Twine from the Baker’s Twine Essentials Pack.
Thank you for letting me share my project. What do you think about an all-gray card? Leave me a comment with your thoughts. Please stop by and see Tracie’s post next. I know it will be great!
Welcome! Thanks so much for stopping by my blog! I appreciate you being here! My name is Amanda Howard. I am an independent Stampin’ Up! Demonstrator in North Carolina, U.S.A.
If you’ve been following along on the Silver to Silver Elite Blog Hop, then you’ve arrived from my friend, Eva’s Blog. Wasn’t her project absolutely fabulous?!?! I love Eva’s creativity.
The Silver to Silver Elite Blog Hop is a group of wonderful Stampin’ Up Demonstrators that I had a chance to virtually meet this year as we worked at building our business. It’s been fun to work with this group as we pushed ourselves to try new things. For me, this starting a blog. This is their 3rd go out of it and my first with them Our project for this hop was to create using products from the July to December 2021 Mini Catalog and/or Sale-a-bration Brochure.
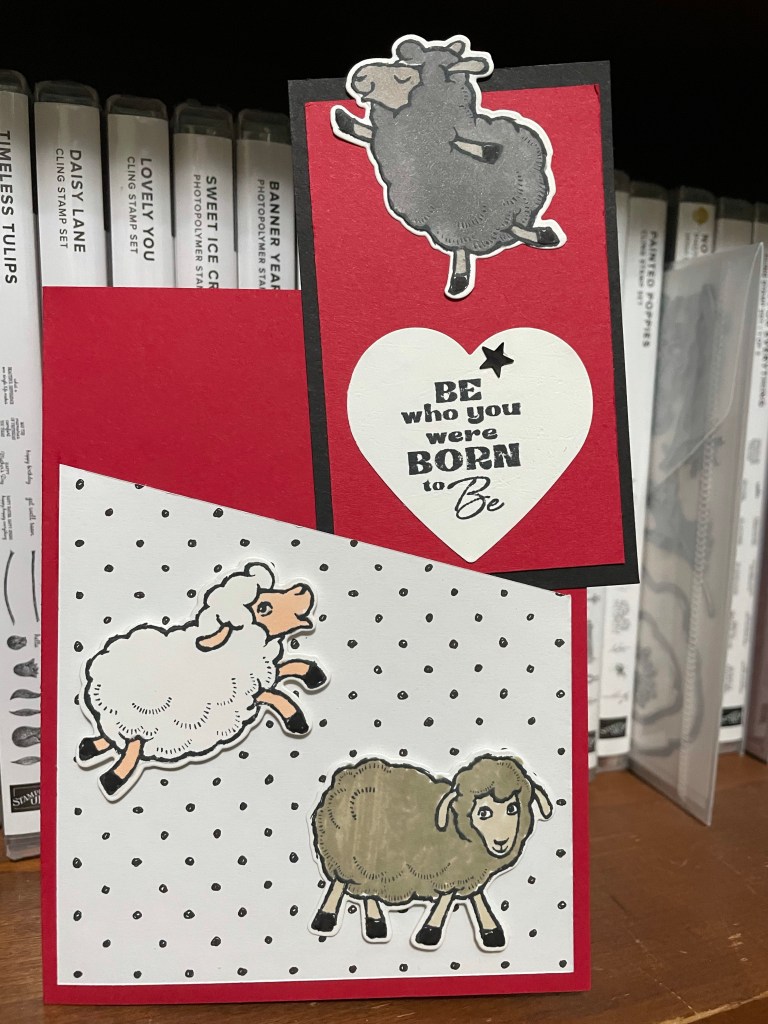
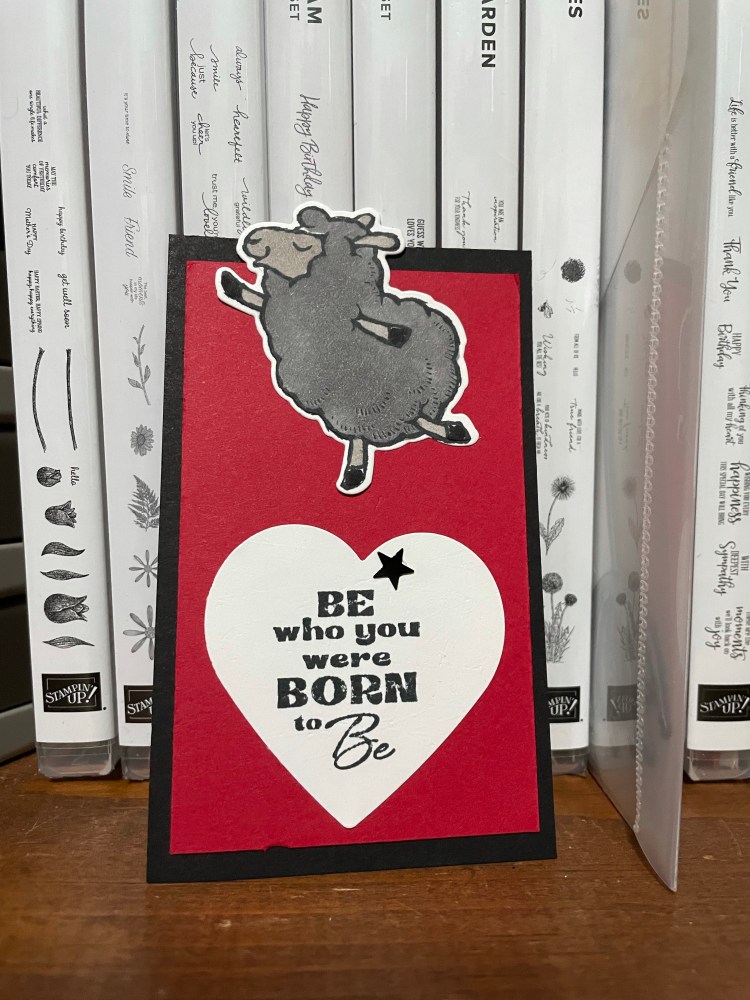
Sometimes you see an image or sentiment in a stamp set and you have to get it. That is how I felt about the “In Your Words” host set from Sale-a-bration. As soon as I saw the sentiment “Be who you were born to be”, I wanted the stamp set. There were other good sentiments in there as well but I had to have that one. I am a public school teacher, mother, wife and youth advisor for church and could envision so many uses for that one sentiment. Of course, since it was the host set, I needed a qualifying workshop order of at least $300 to get the set. Fortunately, there are so many great items in the July-December Mini Catalog it wasn’t hard to reach $300. Plus, since it is Sale-a-bration I was able to pick free items from the Sale-a-bration brochure. When my order arrived and I looked over what I had of course my eyes gravitated to the desired sentiment set but I also spotted the “Counting Sheep” stamp set and coordinating dies. Voila! The card started coming together. I decided to color each sheep differently but still realistic colors. I also liked the idea of using the heart punches for the sentiment. But what shape of card and what background? That was trickier.
Then I totally shifted my thinking with the card. I had a great idea – I was going to use these elements on cards for my students in homeroom! In case you don’t know, I teach Spanish in a public high school. High school is already a rough time for figuring out who you are, maybe only surpassed by middle school. High school brings the added stress of figuring out what you want to do after high school. Students are under so much pressure to have it all figured out early in high school so they can decide college, military, or employment straight out of high school. On top of that, if they choose college, they basically have to know their career so they can pick the best two or four year college for their major. For that reason and after the crazy school year we had last year, I wanted to give them a little something to start the year.
I used a card base of Real Red 8 1/2″ x 5 1/2″ scored at 4 1/4″. I then cut a 4″ x 6″ strip of Beautifully Penned Designer Series Paper – free during Sale-a-bration. I then made a diagonal cut, lining it up at 2 1/2″” and 3 1/2″ on the 6″ side. I attached that to the front with Tear-n-Tape along three side to form the pocket. Two of the sheep were attached using dimensionals.
The book mark was created by attaching the sheep and sentiment on to a piece of Real Red which was attached to a piece of Basic Black, all with Tombow Multi Mono Liquid Glue. I offset the sheep at the top to help with pulling it out of the pocket.
Once again, thank you for joining me I hope you have enjoyed my project. Please leave a comment letting me know your thoughts. Next up is Kelly’s Blog which promises to be amazing! While this is the last Silver to Silver Elite Blog Hop (at least for now), I hope you will subscribe to my blog to see future posts.